

💡 This guide can be used to make any home / office computer or device accessible from the “outside world” aka internet. We assume basic TCP/IP stack and IP v4 addressing knowledge, understanding basic computer networking theory and terminology like IP address, port number, TCP/UDP protocols, DNS, DHCP, etc. Without required skills it is unlikely that you will be successful in configuring your video surveillance system properly, but this tutorial will at least give you a general idea of the procedure. Alternatively, if your video surveillance equipment manufacturer provides Cloud access service, no networking knowledge is required (assuming that you know how to connect your equipment to the internet), and this method is described as well in this article.
Network DVR/NVR – How To Configure/Enable Public Internet Access – with IP/Host

Video Surveillance Artwork by TehnoBlog.org
STEP 1 | Basics
Connect DVR/NVR via Ethernet port and cable to nearby switch or router in your local area network (LAN). Alternatively, use Access Point in Client mode (wireless adapter) to connect it to nearby Wi-Fi network.
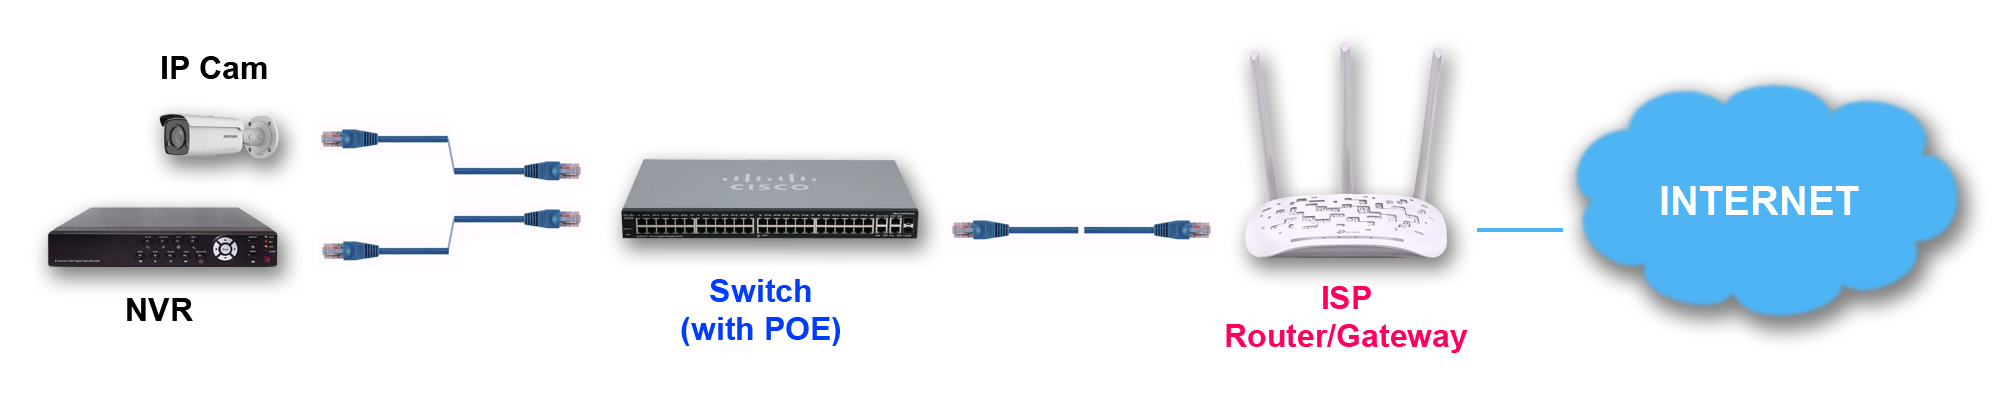
Video Surveillance DVR or NVR To Router or Gateway Network Connection Diagram
STEP 2 | Basics (cont.)
Connect your laptop or desktop PC to the same LAN or Wi-Fi network as DVR/NVR in previous step.
STEP 3 | Connect and Configure Router/Gateway
On your computer run your favorite browser (Chrome, Firefox, Edge, Opera…) and type-in local IP address for configuration of your router/gateway device, e.g. typical IP address is 192.168.1.1 or 198.168.100.1 (check device’s bottom side for instructions, it also has default username and password). After web configuration page loads, type-in username and password of your router/gateway. Default values are commonly admin/admin or admin/blank (nothing) or admin/12345.
For security reasons you should change default router/gateway password to something that is hard to guess!
STEP 4 | Configure Router/Gateway – Static (Reserved) Local IP Address
Define a Static (Reserved) Local IP Address for your DVR/NVR video recorder under DHCP settings in router/gateway. Static IP routes are usually bound to device’s MAC address, so make sure to learn/know what it is. However, in some routers/gateways mapping works on local IPs, not on MACs, so beware of that fact. You will have to define a static/reserved IP address for your DVR/NVR address, because DHCP will randomly assign new local IP once the lease time expires, router resets (loses power), etc.
What is MAC address?
MAC (Media Access Control) address is a unique physical address of every device connected to the network. Also, each port on a networking device has a different MAC address, if it has multiple network interfaces present (such as Switches, Servers or Computers with 2 or more network cards for redundancy). DVR/NVR usually has only one (single) Ethernet / LAN port, thus only one MAC address.
MAC address consists of 48 bits unique string (or 6 bytes (1 byte = 8 bits, 6 bytes x 8 = 48 bits) by which we (e.g. Switches) know where to send (direct) data (technically, in TCP/IP stack they are L2 frames) or from which device it originates from. However, for practical reasons (shorter writing), it is commonly represented (grouped) as 12 hexadecimal code symbols. Single hex code symbol = equals to 4 bits, for example:
0 (hex code) = 0000 (binary) = 0 (decimal)
1 (hex code) = 0001 (binary) = 1 (decimal)
A (hex code) = 1010 (binary) = 10 (decimal)
F (hex code) = 1111 (binary) = 15 (decimal)
Static IP address reservation / binding to specific MAC address example:
AB:CD:EE:FF:01:07 (MAC address) mapped to 192.168.1.200 (local IP address)
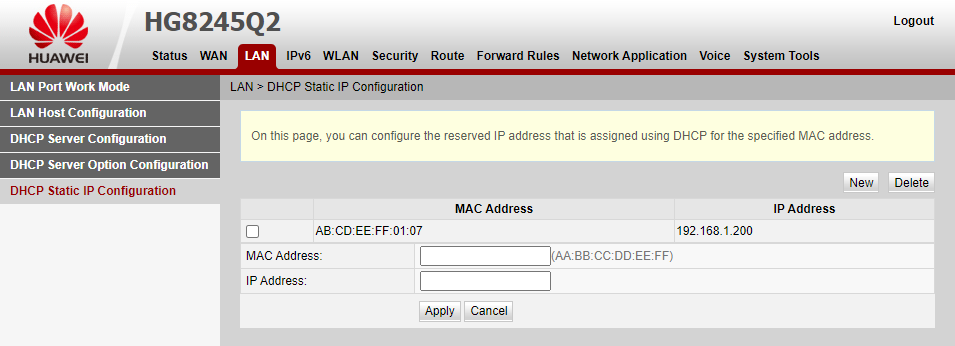
Router/Gateway How To Define DHCP Static IP Address
💡 Some routers/gateways are notoriously buggy regarding static IP reservations (active DHCP simply takes over the precedence and ignores static definitions), arm yourself with patience when dealing with this matter. You can try to manually configure your DVR/NVR/IP Camera device with manual TCP/IP parameters and IP address outside DHCP range of your router or gateway. Beware that in case you use APs in CLient Mode to connect your DVR/NVR wirelessly to remote access point or router/gateway, they might fail to connect and receive (get assigned) proper IP address. You will have to do a lot of trial and error tests, until you find the setting that works.
To find out DVR’s / NVR’s MAC address, go to DHCP status/overview or connected devices list, where you can locate DVR/NVR in the list and corresponding MAC address. Alternatively, look at the label on your DVR/NVR device (usually located at the back or bottom side), where factory default MAC address may be written. Note that many DVR/NVR models support changing the factory default MAC address value, in order to avoid potential collision with other equipment you have if they happen to have the same MAC values.
Yes, MAC collisions are possible, given limited 48-bit strings and zillions of networking devices out there, because first 24 bits are reserved for manufacturer prefix, and remaining 24 bits are used for unique device identifier, reducing the theoretical limit of 248 ≈ 281 trillion addresses (in total) to more realistic 224 ≈ 16.77 million addresses (per manufacturer), in which case you must change it to a unique number in your network to avoid serious connectivity issues.
STEP 5 | Configure Router/Gateway – Reboot (depends/optional)
Once static routing is defined, you might have to reboot your router/gateway in order to flush current routing tables and apply new settings (some newer devices don’t require reboot).
Make sure DVR/NVR is actually assigned the reserved static IP address to it, otherwise the follow-up settings will fail to work! You can usually check this under DHCP status section and connected clients list/table with MACs and IPs, along the remaining leasing time.
STEP 6 | Configure Router/Gateway – Port Forwarding
Port forwarding, along with defined reserved (static) internal routes, enables computers and other devices behind NAT to receive incoming traffic from the outside world (internet).
Define Port Forwarding rule(s) under appropriate section in your router/gateway. Look for the appropriate section in your router’s/gateway’s configuration interface and make sure to forward traffic on specific ports (e.g. 80, 443, 554, 8000) to your DVR’s MAC and/or IP address. Without port forwarding enabled, any request coming from the outside world will be ignored (in another words, it will not work).
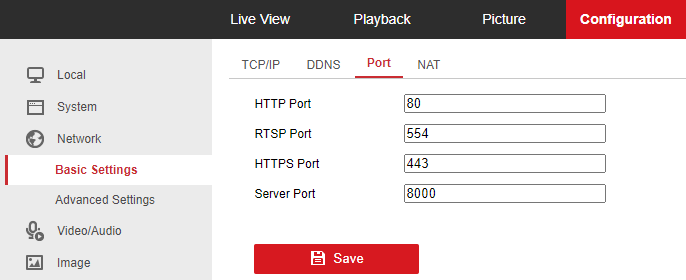
NVR DVR Default Ports
- port 80/443 (HTTP/HTTPS) (TCP) -> forwarded to DVR’s / NVR’s MAC or Local IP address
- port 554 (RTSP) (TCP) -> forwarded to DVR’s / NVR’s MAC or Local IP address
- port 8000/8001 (DVR/NVR Server) (TCP/UDP) -> forwarded to DVR’s / NVR’s MAC or Local IP address
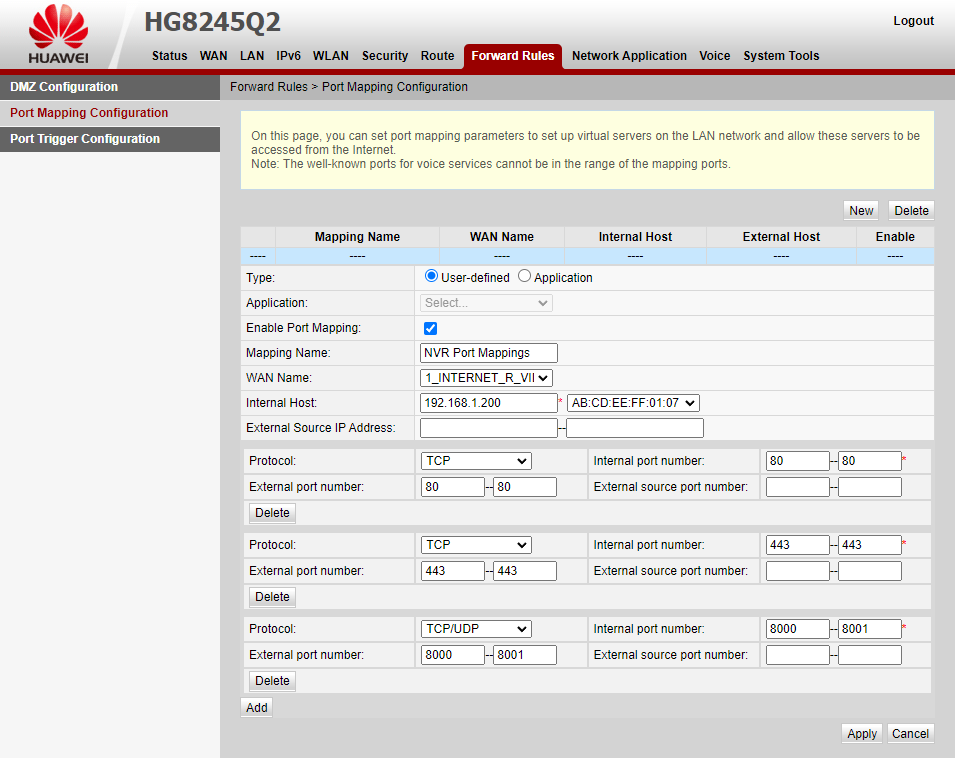
Router/Gateway Port Forwarding Examples
NOTE: For additional security reasons you are encouraged to change above default ports to something else, e.g. ports 81 and 444 for HTTP/HTTPS, port 555 and 8005/8006 for TCP/UDP RTP streams access, simply to prevent most generic automated malware attacks on your equipment. Remember that you must change (update) port numbers both on your DVR/NVR configuration page and router/gateway port forwarding configuration page, otherwise it will not work!
Port Forwarding / Static Routes is complicated. Is there a simple alternative?
Yes. If port forwarding sounds complicated, an alternative is to enable uPNP (Universal Plug and Play) both on your DVR/NVR and router/gateway device configurations. Note that this may pose a security risk to your home or company networks. This is why uPNP is disabled by default on many modern routers, gateways, Wi-Fi APs, and that also includes DVRs and NVRs, as well.
But, if you have issues configuring static routes and port forwarding rules with your router or gateway (remember those buggy ones we’ve mentioned?), uPNP might be the only way to spare you from serious headache and trouble.
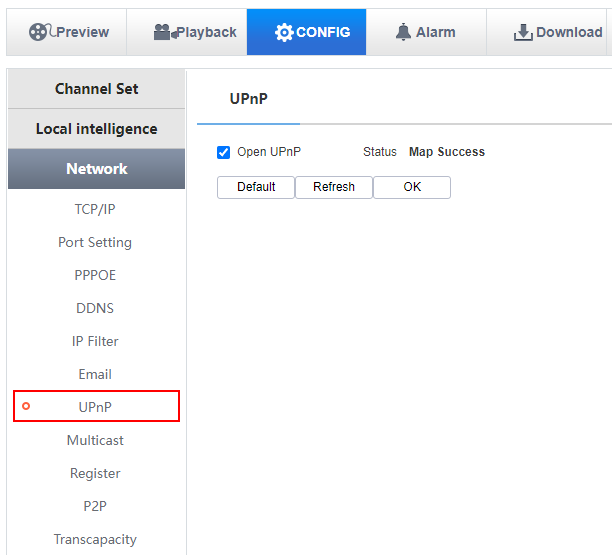
Remember, uPNP must be enabled on your DVR/NVR device:
DVR/NVR How To Enable uPNP Setting Example
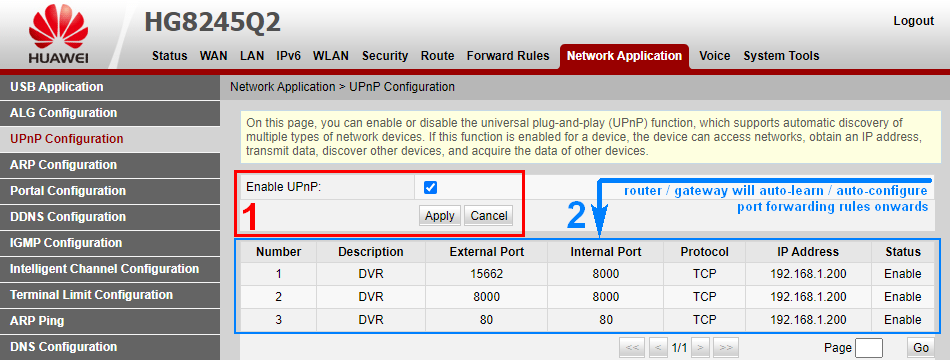
And your router / gateway:
Router/Gateway uPNP Automatic Port Forwarding Example
STEP 7 | DVR/NVR Local Connectivity Test and Configuration
Go to DVR’s / NVR’s configuration either locally using attached mouse or from web interface (using Chrome, Firefox, Opera…) and by typing 192.168.1.200 in your browser’s search/address combo box.
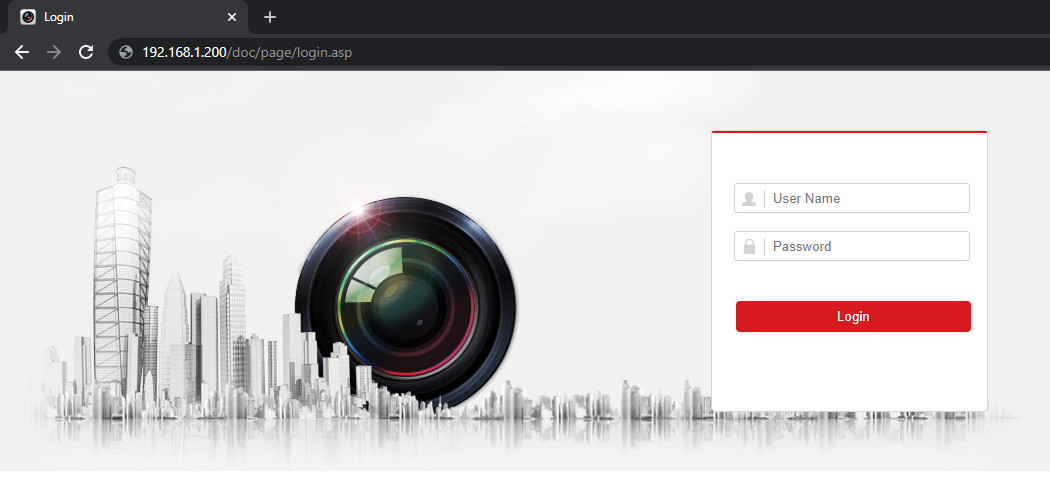
NVR DVR Login Screen Example
NOTE: if you changed web server port in your DVR’s / NVR’s configuration before e.g. from default 80 (HTTP) or 443 (HTTPS) to something different (e.g. 81), then you must also add port in the input field like this: 192.168.1.200:81
Login with appropriate username and password, go to Network/Internet settings page, and define TCP/IP parameters:
Enable DHCP (true) – if you opt for false option value you must configure following parameters manually:
- IP address: 192.168.1.200 (e.g. same value as reserved/static IP route we defined in router/gateway!)
- TCP/IP port: 80 (default for http:// protocol) and 8000 (TCP port for remote internet access)
- Mask: 255.255.255.0
- Default gateway: 192.168.1.1
NOTE: It’s always best to configure them manually and avoid surprises if you experience power outages and unexpected IP address changes later!
NOTE: This is only an example. If your devices use different subnets, IP network mask should be appropriately adjusted. Also, correct “exit node” (default gateway) address must be properly set, otherwise, equipment will be unreachable from the internet.
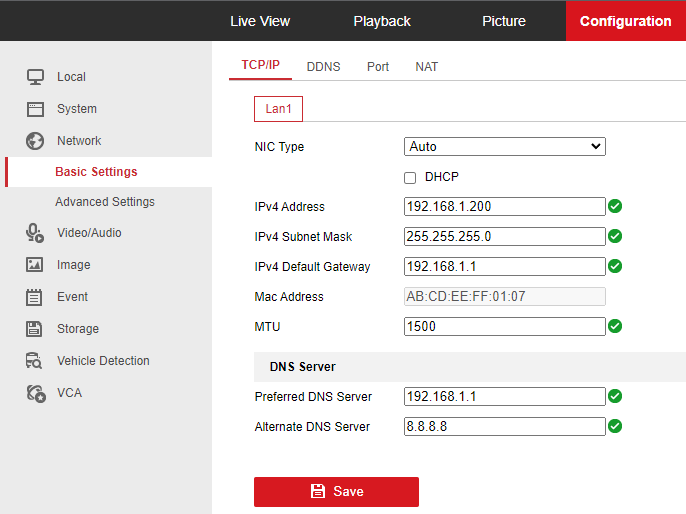
NVR DVR Network Configuration Example
This is a great time to assess your login credentials security and password strength of your DVR/NVR equipment. Change your admin user password to something hard to guess, especially if it’s something trivial like admin or 12345 factory default.
STEP 8 | Public IP or Dynamic DNS Configuration
Now, you must know your router’s/gateway’s public internet (www) IP address in order to “dial in” your DVR/NVR device. Simply, open browser (Chrome, Firefox, Opera…) on your PC (desktop/laptop computer) while it is connected to the same Wi-Fi / LAN network (see STEP 2 above) and type “My IP address” in Google search box.
Example:
100.101.102.103 (for the sake of this tutorial let’s suppose that Google returned this address)
This is your public IP address value (number)!
*
For simplicity and clarity reasons we assume a static (fixed) public IP address obtained from ISP in this guide.
However, most, if not all, ISP providers today provide some kind of address pool sharing, incorporating NATs, and charge extra monthly fee for leasing a static public IP address. A static IP address which doesn’t change over time is absolutely required for services such as video surveillance and many others, because if your public IP address changes frequently (e.g. every couple of minutes if you are behind dynamic NAT, or each time you turn OFF/ON your main router or gateway or experience power outages), you’ll be in big trouble! Think about changing IPs as if you were calling a wrong telephone number every few minutes or days, expecting that the same person answers each time. Unreal, right?
Contact your ISP (Internet Services Provider) for more information about obtaining a static public IP.
*
Alternatively, you can use a Dynamic Domain Name System (DDNS) service, such as NoIP DDNS, DynDNS, ClouDNS, Dynu, DuckDNS, and countless others, which will translate your device’s current dynamic IP address (whichever that is) into a unique internet-like (website) address, for example:
http://my-dvr-device.dynamic-dns-provider.com/
Simply use above address instead of hard-coded public IP address numbers from this step further below, and your device will always be connectible from anywhere in the world, regardless of it’s public IP address changes over time. Some dynamic DNS services are free of charge, others come with a monthly or yearly fee.
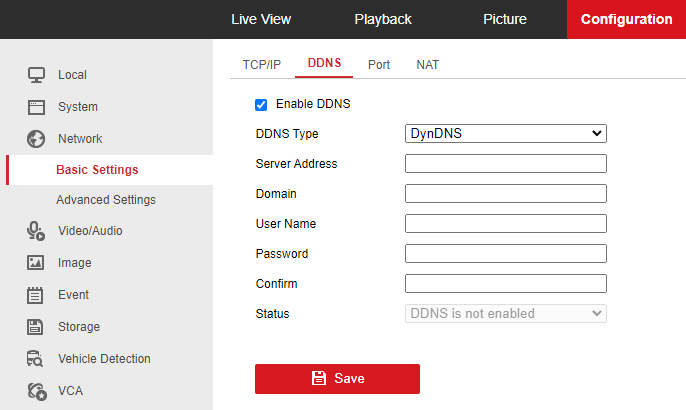
NVR DVR DDNS Setting
Which one is cheaper? Leasing A Static Public IP Address or Dynamic DNS service?
It depends on your ISP’s fixed IP address leasing fees and your needs.
Renting a static IP address may cost you somewhere between $25 and $100 USD per year depending on where you live and your internet service provider. It is notable that prices of static IPv4 addresses are steadily increasing over time as market trends show because of IPv4 pool exhaustion.
Commercial Dynamic DNS services may cost you somewhere between $15 and $100 USD per year, depending on several factors such as number of DNS records allowed, uptime SLA policy, failover policy, live support, multiple geolocation targeting, etc. In general, renting a DDNS service is still cheaper than renting a fixed IP address, because you can create several A/AAAA records with one account and serve different physical locations, while single static IP address usually serves only one. Needless to say, your DVR/NVR recorder must support specific DDNS service, as well. If it only comes with a handful of preprogrammed list of DDNS services, and does not allow you to define a custom one, then you’re out of luck!
For the most basic usage cases there are free DDNS services out there, but some require that you manually confirm account activity by clicking on email confirmations each month or so, and others, thankfully, do not.
💡 Please beware that some poor Android/iOS apps may require that you completely remove existing DVR device configuration, and start from scratch if your DVR/NVR device parameters change (e.g. Public IP Address or Port). Properly written apps do not suffer from this bug (editing device reloads and applies new configuration automatically), but some others don’t and it may cost you a great deal of troubleshooting time. This is why we recommend to have a static (reserved) public IP address and once you setup network parameters successfully, do not be tempted to change them later unless absolutely necessary. Also, providing UPS (uninterruptible power supply) backup power is highly recommended for extra level or reliability and security.
STEP 9 | DVR/NVR Configuration – Connectivity Test
DVR/NVR should be accessible (connectible) from the outside world now.
Again, open browser (Chrome, Firefox, Opera…) on your PC (desktop/laptop computer) and type your public IP address, followed by :port number part, e.g. like this:
http://100.101.102.103:80 (replace :80 with customized port number or use https:// port :443 for SSL/TLS encrypted secured access if your DVR/NVR supports it)
Because port 80 is the default well-known reserved protocol (HTTP), we can simply omit it, like this:
http://100.101.102.103
Now, your access request should be re-routed automatically to DVR’s or NVR’s login portal/page in internal network. Enter username and password and you’re in! You can now remotely change DVR/NVR configuration parameters etc. Modern DVR/NVR devices allow you to create many users and restrict their privileges, it’s a good idea to create a “view only” user with remote (public internet) access, and restrict admin account to direct or local (LAN) connections only. This way you will protect your equipment from hacking.
*
Wait, your PC is still connected to the same local network, how can we be sure that it is really working from anywhere in the world!? Well, use your cell phone’s mobile data internet, or neighbors Wi-Fi to verify! It should be working if you performed all the steps properly.
STEP 10 | Install and Configure Apps
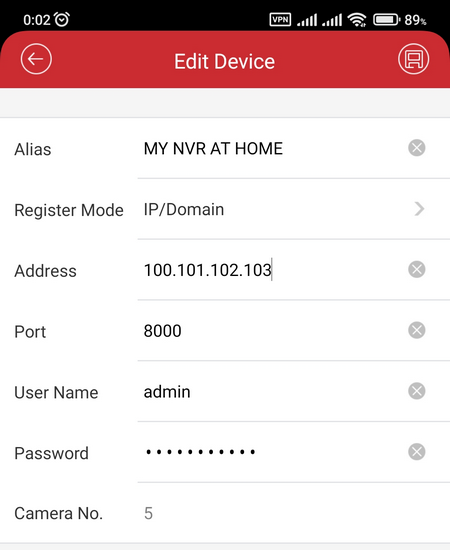
OK, using browser is fine, but not really fancy and useful today. We now must install a mobile phone or tablet app on your phone and configure it with appropriate settings, like this:
- Mode: IP/Domain
- Name: My DVR/NVR (enter something descriptive)
- IP address: 100.101.102.103
- Port: 8000 (we use TCP port for Hik Connect / iVMS-4500 / other 3rd party apps – consult NVR/DVR manual)
- Username: enter DVR’s / NVR’s username here (usually “admin”)
- Password: enter DVR’s / NVR’s password here (blank, 12345, admin or custom defined value)
⚠️ Important Security Note: Never leave factory default username/password when you enable public internet access to your DVR/NVR equipment! Otherwise, you risk that hackers and automated bots/scanners gain access to your unprotected video feeds!
Which app should I use? This greatly depends on your DVR/NVR manufacturer and model number, most popular video surveillance equipment suppliers are Pro-Vigil, OnSSI/Qognify, HIK Vision, Genetec, Eagle Eye, Dahua, MultiSight, Discovery, Western Security, TP LINK, but there are thousands others to mention them all.
There are countless OEM brands/manufacturers from China, and you can try generic video surveillance apps on Play Store or App Store if no official app exist – chances are that at least one will work properly with your equipment (e.g. MEye, EasyViewer, etc.).
For example, HIK Vision uses iVMS-4500 (HIK Connect) app for mobile phones (Android/iOS), and iVMS-4200 app for computers/PC/Mac.
HIK Vision iVMS-4500 App DVR-NVR Configuration Example
Other manufacturers (suppliers) have their own apps, but you are free to try 3rd party apps from other developers on the App store, which provide support for many different models and protocols in case official app does not work properly or you have other issues.
Once the app is installed and configured with the above parameters for mode, IP address and port number, username and password – it should start working, unless it does not support your DVR/NVR device/protocol for transmitting video content or you forgot some step in this guide.
You must use apps that support your specific DVR/NVR model, otherwise you will be wasting too much time on different issues e.g. wrong login messages, unsupported/unrecognized video streams/protocols and alike. But, majority of apps won’t return any feedback error messages at all, so you might be left clueless and wondering what’s wrong.
This is why it is always a good idea to test remote access from the browser first, and if that part works fine, the culprit is either no internet connection on your phone, wrong parameters/credentials in the app, or the app itself.
Network DVR/NVR – How To Enable Public Internet Access – with P2P Cloud
For the sake of article completeness, we will also mention another method that some manufacturers offer for their devices (e.g. Elite, Western Security / SgsEye, and many others).
As you can see from IP/Host method described above, there are far to many potential pitstops and setbacks (TCP/IP parameters, port forwarding, dynamic/changing IPs, and so on) that you must be aware of, and properly resolve them in order to make your video surveillance equipment work reliably remotely.
But, is there another, easier, more user-friendly way? Yes, there is!
P2P Remote Access
What is P2P access for DVR/NVR equipment? Simply put, instead of using IP/Host configuration for accessing your DVR/NVR device over the Internet, followed by the usual set of problems with proper network configuration, you can simply use manufacturer’s (or 3rd party) Cloud service with built-in support for your device.
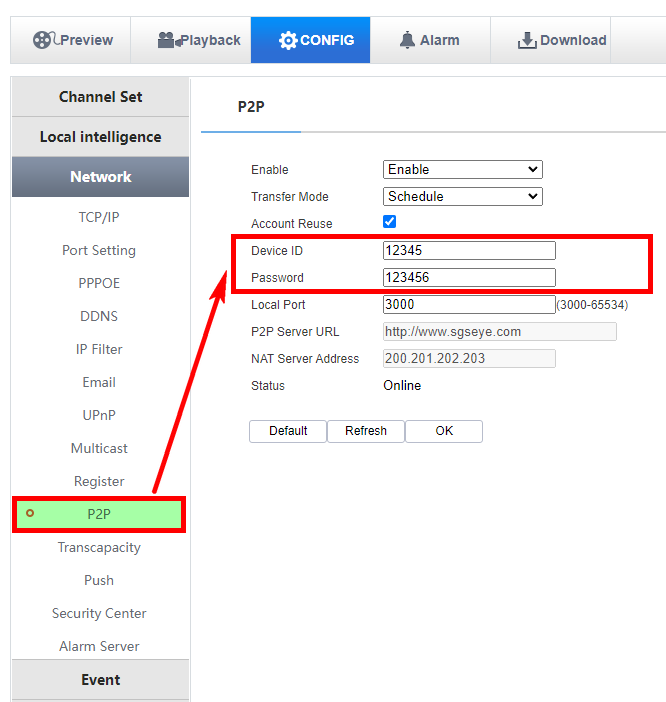
DVR-NVR P2P Configuration
On some devices (as illustrated above) this service is enabled out-of-the-box by default, and for others you will have to setup an account first and use your cell phone’s camera to scan QR code(s), or manually visit manufacturer’s website to setup DVR/NVR device account manually.
What you need is:
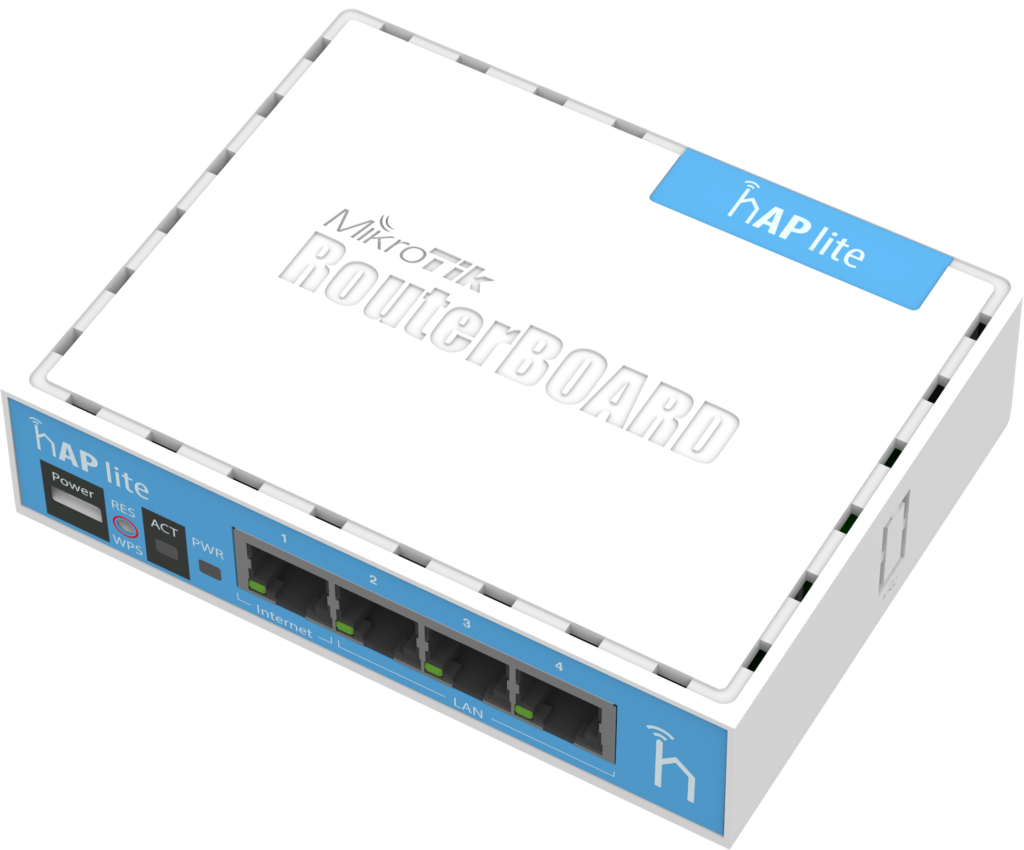
- Connect your DVR or NVR device or a standalone IP camera to the Internet — either using LAN cable or Wi-Fi connection (not all standalone DVR/NVR models support Wi-Fi, so you’ll need a LAN-2-WiFi adapter, Wireless Access point set in Client mode, or you can configure a wireless bridge using MikroTik router, for example).
- Once you have a working internet connection, you need to visit device’s P2P configuration page — either remotely via local computer or directly using attached external monitor, mouse and keyboard, and enable P2P Cloud service (if it’s not already enabled).
- Then create or use a device ID (username or UID), which is usually a unique S/N code pre-defined by manufacturer stamped somewhere at the bottom or hard-coded into device’s firmware, and a user-defined device password. Alternatively, some manufacturers provide you with a QR code stamp which you need to scan with your phone, and it will automatically redirect you to the manufacturer’s cloud service and guide you from there how to create a cloud P2P account. Enter your account / cloud login credentials into device’s P2P configuration page, and you are (almost) done! Note that some devices might require to reboot afterwards, just follow the on-screen prompts.
- Once connected, the device will automatically login to the provided and configured Cloud service, ready for remote access!
DVR-NVR P2P SgsEye P2P Cloud App Setup
Now, install an official app from Android or iOS store, add your device in the app (set arbitrary or descriptive device name, enter P2P device username/UID and password), and you are good to go! Literally, the whole process lasts less than few minutes, assuming your DVR/NVR is properly connected to the internet and has P2P service properly enabled.
This method does have one drawback, and that is the fact that video stream and credentials are processed by 3rd party entity (either your device manufacturer or their cloud partner), which brings up privacy issues, and other related questions. Are you really OK with the fact that your video equipment will send video surveillance data through another server and/or another country? That’s up to you to decide, of course. Is it acceptable for you or your company that another person or entity has access to your video streams? Although, in theory, they are protected by password, video streams do pass through their servers, something you should be aware of and remember.
In any case, this method is definitely a nice alternative, and extremely easy to setup and use.


Comments
Post A Comment