

How To Remove Image Distortion In Adobe Photoshop ?
Adobe Photoshop
Image distortion is inevitable characteristics of all modern images due to the nature of lens technology limitations and laws of physics. Solving various image distortion problems has become much easier in digital realm, with continuous advancements in mathematical modeling and measurements of different lens types in digital cameras. However, there are still situations where you cannot rely on automatic distortion removal tools, and you have to try to fix the problem manually. Remember, there is no such thing as 100% distortion free image.
Article Navigation – Quick Jump To Section
1. Basic Image Distortion Classification by Type
2. Built-In Tools inside Photoshop
3. PT Lens
4. Panorama Corrector
5. Panorama Corrector Tips
6. Perspective Correction
7. Video Tutorials
For example, mobile phone cameras may have completely unknown lenses and characteristics (and you may not be aware how to perform a test & measurement of correction coefficients). Also, panoramic photographs combined from many stitched photos together create new “virtual lenses” with completely unknown and far more complex distortion patterns, which cannot be fixed with any automatic distortion removal tool.
Basic Image Distortion Classification by Type
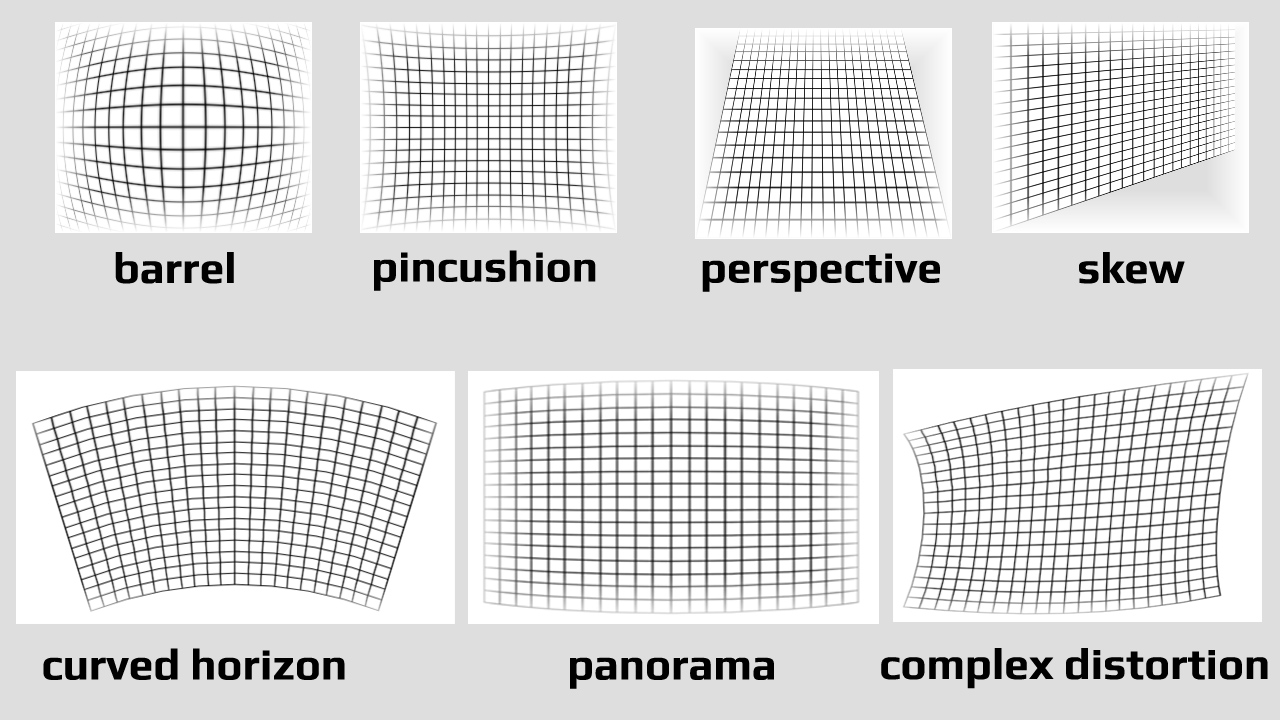
Photography – Basic Image Distortion Types
- Barrel
- Pincushion
- 2D Rotation
- Skew/3D rotation
- Perspective
- Curved Horizon
- Panorama Distortion (very complex to completely remove)
- Complex/Combined Distortions (most complicated removal/fix)
Barrel and Pincushion are scientifically known as negative (convex outward) or positive (concave outward) curvilinear distortion, and the process of reversing or removing optical distortion is known as rectilinear correction.
Built-In Tools inside Photoshop
For basic distortion types factory built-in tools in Photoshop will be enough for corrections. For complex distortion models 3rd party plugins are recommended.
- Lens Correction Tool
- Filter > Liquify… Free Hand Distortion Tool
- EDIT > Transform > FREE / SKEW / PERSPECTIVE / ROTATE / WARP / PUPPET WARP Distortion Tools
TIP: All distortion tools can be used both ways, destructive & constructive. You may get funny and exciting results sometimes when you introduce curved distortion in your images, accentuating motion, dynamics, movement etc.
There is also a “Puppet Warp” transformation tool, however, it is limited to local and specific anomalies, we certainly do not recommend it for general use, unless you like to experiment. It is certainly more powerful for various distortion types, however, it requires careful preparation and patience.
TIP: To use ALL Photoshop built-in transform tools, your image layer must be unlocked. Open Layers tab (or hit F7 if you cannot find it) and double-click on your “Background” image layer to unlock it. Another option is to select it once with your mouse, right-click and check first option “Layer from Background…”. Rename it to anything you like (default name is Layer 0) and press OK.
3rd Party Photoshop Plugins
When it comes to distortion removal plugins, you will find few titles, however, our go-to choice goes down to just 2 names in the business:
- PT Lens (automatic barrel/pincushion & manual perspective/skew/fish-eye removal)
- Altostorm Panorama Corrector (manual distortion removal only – for complex cases)
PT LENS
PT Lens is highly praised for its large camera database and automatic barrel/pincushion distortion removal capability. There is a big chance that your model is already supported in it’s database. There is also manual distortion removal section (in case you cannot find a preset of your lens transfer function and parameters), which is only marginally better than already built-in Photoshop Lens Correction tool. In fact, for anything else, we believe that built-in tools are actually much better for that job.

PT Lens Photoshop Plug-in
PT Lens cannot automatically solve perspective and skew type of distortions, and complex/mixed type of distortion you will find in fish-eye and panoramic pictures. For that, you need to manually edit all images.
Once you open a photo in Photoshop, you simply start ePaperPress PT Lens plug-in via Filter menu. Your photo MUST contain EXIF data and your camera/phone model must be supported. EXIF data is automatically read & IF recognized by PT Lens, automatically sets and applies barrel/pincushion correction all by itself. You don’t have to do anything except press the “OK” button to fix barrel/pincushion distortion!
Other distortion types (skew/perspective shift/etc.) have to be corrected manually inside PT Lens or using built-in Photoshop tools and other plug-ins.
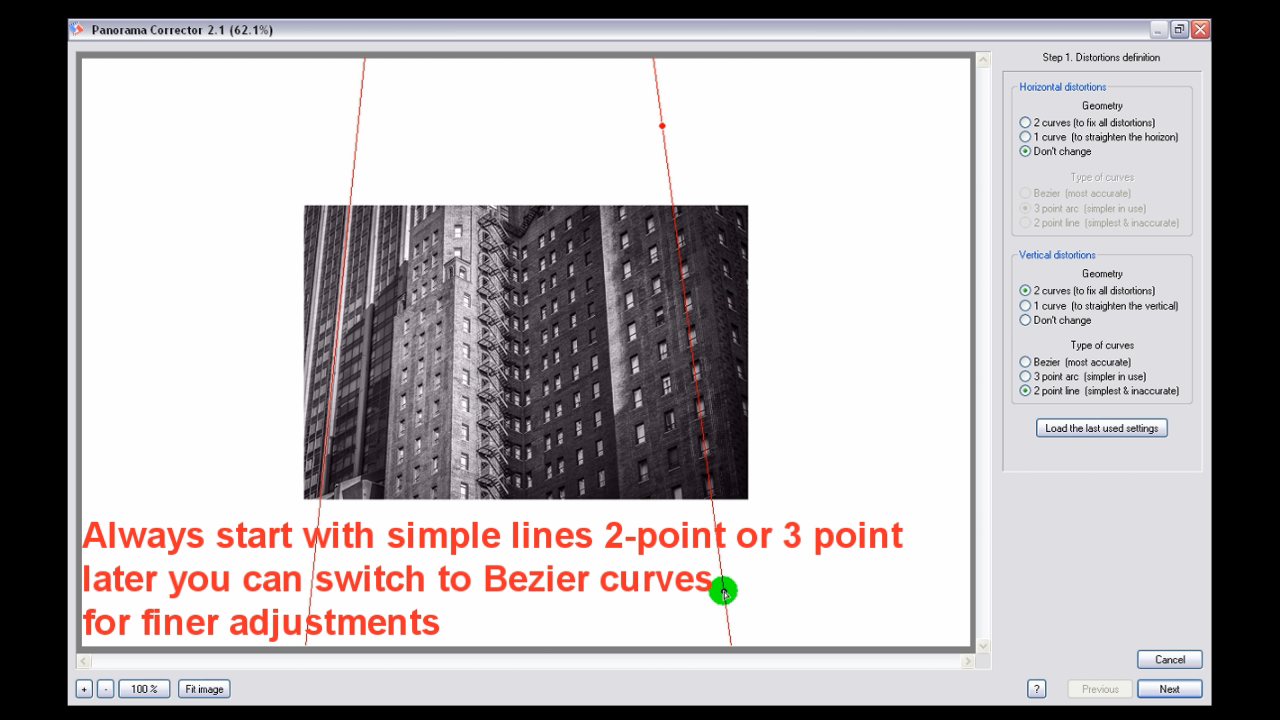
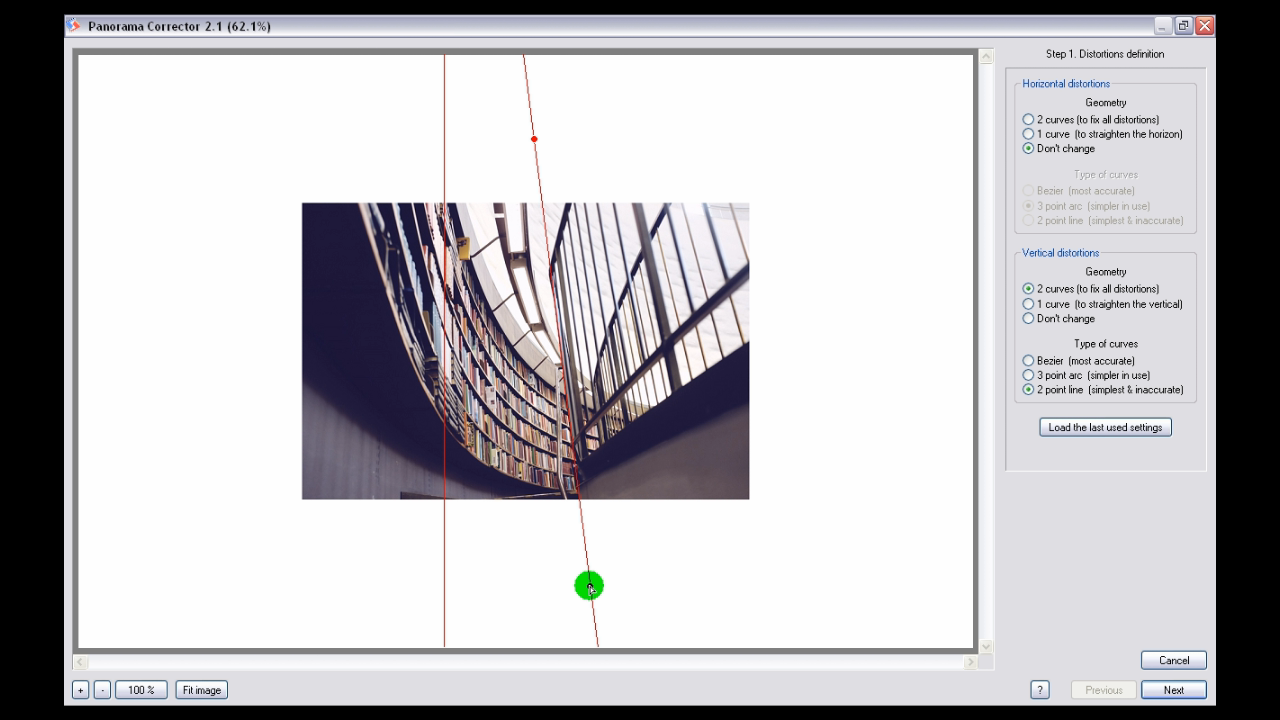
PANORAMA CORRECTOR
Panorama Corrector is our highly recommended plug-in for Photoshop, since with it you will be able to fix highly distorted images with complex distortion patterns combined. It is mainly used for panoramas, but we have found it useful for other precise and easy corrections, mainly perspective, barrel/pincushion and skew distortion types.

Altostorm Panorama Corrector Photoshop Plug-In – Example #1 Complex Distortion Grid
Panorama Corrector is not perfect, and cannot solve impossible distortion patterns, but it is very close to an ideal distortion fix tool you must have in your arsenal.
Altostorm Panorama Corrector Photoshop Plug-In – Example #2 Perspective & Skew Easy Fix
It can be invaluable in photo measurements & digital image forensics fields.
Altostorm Panorama Corrector Photoshop Plug-In – Example #3 More Complex Perspective Fix
For example, Panorama Corrector is not great, almost unusable, for nature/wild macro photography and semi-manual corrections, since you hardly have any reference points to draw lines in the first place. If you do – great! – it will be excellent (as we’ve demonstrated in our third video below). However, in reality, for example, if you are shooting real life objects, you can only guess. On the other hand, if you shoot geometric objects, then it will shine to its best. Still, practice and experience will be of a great help in such cases.

Altostorm Panorama Corrector Photoshop Plug-In – Example #4 Complex Panorama Distortion Pattern Fix
Panorama Corrector Tips
It is always a good practice to flatten down image that you wish to fix (if it has many layers), increase canvas size appropriately, and enlarge the image with high quality resizing algorithm, before you apply the correction with Panorama Corrector plug-in.
1) Always enlarge the image BEFORE processing
We skipped this step in our video tutorials obviously to save on CPU/RAM. You may also use 3rd party enlargement/resize tools, such as BenVista PhotoZoom Pro and S-Spline maximum precision algorithm (our favorite). As machine learning / neural networks / artificial intelligence algorithms become mainstream, you may also try those (for example, TensorZoom), as well – it all depends on source material and training models, really.)
2) Enlarge CANVAS size to get some working space
3) Always start with simple lines 2-point or 3 point, later you can switch to Bezier curves for finer adjustments
4) Adjust sliders (linear coefficients) to get proper W/H [width/height] image ratio
5) Curved Correction Lines (both horizontal & vertical) must NOT intersect with each other! Program will not be able to correct such images, so we have to return to the previous step and correct this. Remember, horizontal lines must NOT touch TOP & BOTTOM sides, and vertical lines must NOT touch LEFT & RIGHT sides. You need to either constrain them within image itself, or enlarge the canvas and draw them outside in the virtual image area.
PERSPECTIVE CORRECTION IN PHOTOSHOP
Perspective shift is probably the most common type of image distortion that occurs when you’re shooting buildings, city landscapes, architecture and so on. It happens because you have a limited space to distance yourself from the object that you wish to capture, and partially because of lens distortion you will commonly get a “falling building” illusion, with curved edges/lines.
Step-by-step Guide
How to fix “falling buildings” distortion with Photoshop? How to straighten up architectural images, skewed buildings and city landscapes with few easy steps? Once you open your image inside Photoshop, follow the steps to quickly fix your image:
STEP 1
Enlarge your image’s CANVAS SIZE (working area) to get some editing space. This is always a good idea when you’re working with Perspective transformation tool in Photoshop.
STEP 2
Unlock your image layer (if you cannot see Layer tab, just hit F7 on your keyboard or check Window > Layer in the top Menu)
STEP 3
select EDIT > Transform > Perspective tool and adjust the points/frame as best as you can to correct the angle of the image.
STEP 4
Press check mark at the top once you are finished and satisfied with the end result, or hit crossed circle next to it to CANCEL all the changes/edits.
TIP: you can also hit ESC (Escape) on your keyboard to cancel all edits and exit from any Transform Tool.
STEP 5
select EDIT > Free Transform (or CTRL+T or Command+T keyboard shortcut)
Now, we will use Free Transform tool to simply restore object’s natural width & height.
Again, press check mark at the top once you are finished (or ENTER on your keyboard)
STEP 6
Zoom-In image and inspect the correction more closely
STEP 7
Looks Great! All we have to do now is to remove (CROP) the white space from the image and save it as new file (please watch our video-tutorials for more details)
PHOTOSHOP WORKSHOP – VIDEO TUTORIAL SERIES
Please, watch the entire video tutorial series for more details about image distortion & how to properly fix it with Photoshop.
PART 1 – Table of Contents
00:05 Basic Image Distortion Types
00:35 Barrel Distortion Example & Lens Correction Tool
01:36 Barrel Distortion Example & Transform WARP Tool
PART 2 – Table of Contents
00:40 Example #1 Complex Distorted Grid
04:38 Example #2 Simple Perspective/Skew
06:33 Example #3 Perspective/Skew Distortion
08:50 Example #4 Complex Panorama Distortion
PART 3 – Table of Contents
00:10 PT Lens Plug-in Barrel/Pincushion Example
02:00 Panorama Corrector Barrel/Pincushion/Perspective/Skew Example
PART 4 – Table of Contents
00:00 Perspective Shift Correction/Fix with built-in Photoshop Transform Tools
02:20 Perspective Shift Correction/Fix with Panorama Corrector Plug-in


![Xiaomi App - How To Re-Install Stock Factory Version - How To Fix Corrupted Gallery App [no root]](https://tehnoblog.org/wp-content/uploads/2025/09/Xiaomi-Gallery-App-Code-Bugs-Artwork-1024x576.png)


Comments
Post A Comment