

Article Updated: 07 Aug 2021
Dying GPU card? Problems with Windows booting up? Problems with artifacts / distorted / garbage image display on your monitor? Welcome to the club of users who experienced problems with their graphics cards, myself included.
Watch Video
Graphics Card Failure – Classification & General Guide
Graphics Card Failure Symptoms
- Video TDR Failure BSOD when booting up from standby/sleep
- Image Artifacts during BIOS / Windows or Live Linux boot
- Failure to cold boot Windows completely with freezing screens, constant reboots/failures etc.
- In extreme cases: no image/signal output (completely black image)
(excluding trivial cases like malfunctioning cable, connector or faulty monitor). In this case card is probably beyond easy and economical repair but you lose nothing to try!
Graphics Cards Failure Causes
- Software / Drivers bugs & compatibility issues
- Hardware Failure
- GPU or RAM memory overheating
- PCB board defects
- Solder joints issues
- Passive Component Failure (Capacitors / Inductors / Resistors / Diodes / Connectors)
- Active Component Failure (GPU / RAM / BIOS / Power Supply Control / Transistors)
Graphics Cards Software / Drivers Issues Fix
- Clean graphics card driver (re)install
- Reverting or updating graphics card drivers
- Reverting or updating your OS
- Booting up Live OS from USB/HDD/CD/DVD
- Fresh OS re-install (Windows, Linux, Mac OS)
Tip: use only official driver uninstall methods / avoid 3rd party “driver cleaner” tools!
Graphics Cards Hardware Problems Verification
- Testing card with another cable, computer and monitor (just in case)
- Booting up Live OS from USB/HDD/CD/DVD
- Restoring backup OS image or fresh OS re-install
What does VIDEO_TDR_FAILURE BSOD error stands for?
TDR stands for Timeout, Detection and Recovery.
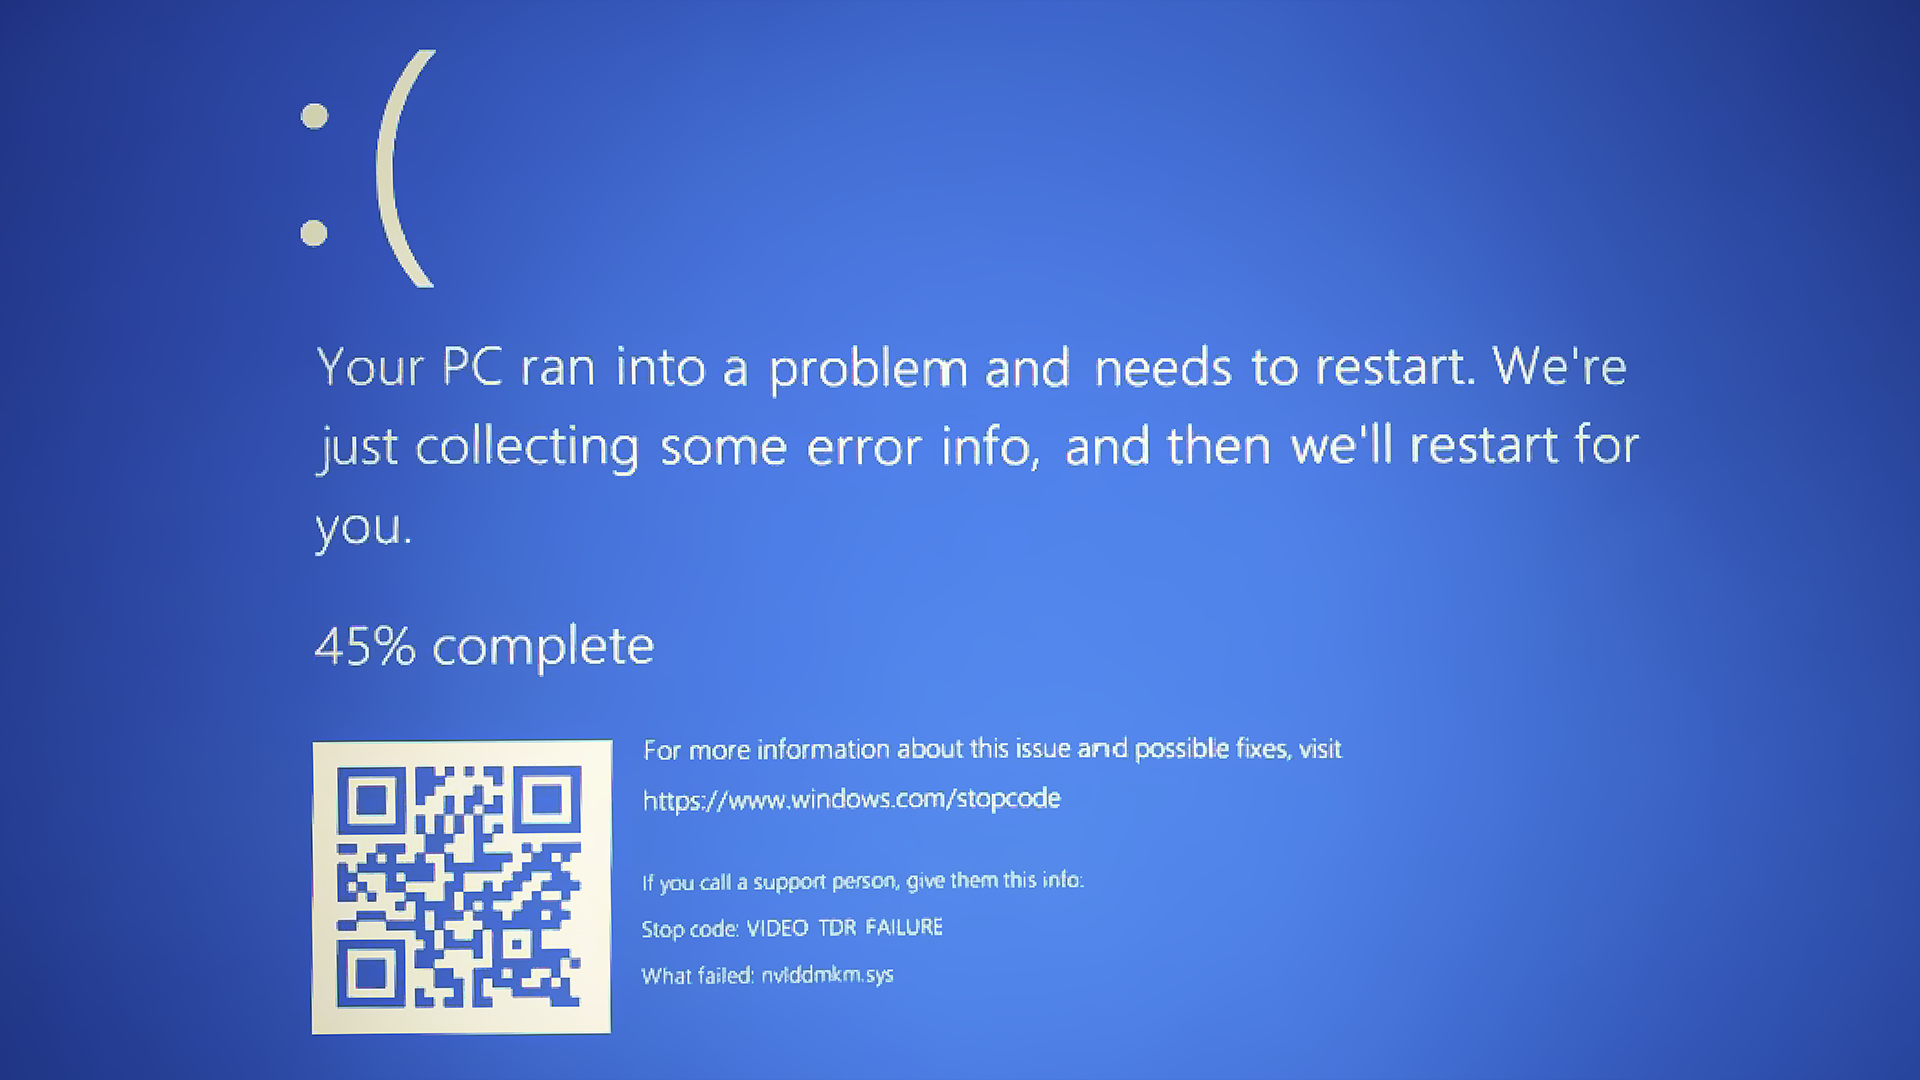
Windows 10 – Video TDR Failure – nvlddmkm.sys BSOD
It is a feature in Windows that detects response problems in the graphics card (e.g. when you boot up from stand-by/sleep mode) and resets the graphics card to recover functional desktop. By default, Windows waits for 2 seconds for a response from the graphics card and then resets the card if the response fails for whatever reason. TDR failure, thus, happens when Windows fails to reset the graphics card and restore functional desktop environment. Trouble is, this may happen either because of software or hardware related issues and this message alone cannot tell you which one is the case!
HOW I FIXED MALFUNCTIONING GRAPHICS CARD
with vertical stripes and image artifacts
Last week one of my older PCs, which is used mainly as a helper/verification machine and multimedia/internet on occasion, started showing strange display behavior out of the blue. To make party complete, add a recent Windows 10 update into the equation and then get totally confused whether it’s a software or hardware issue.
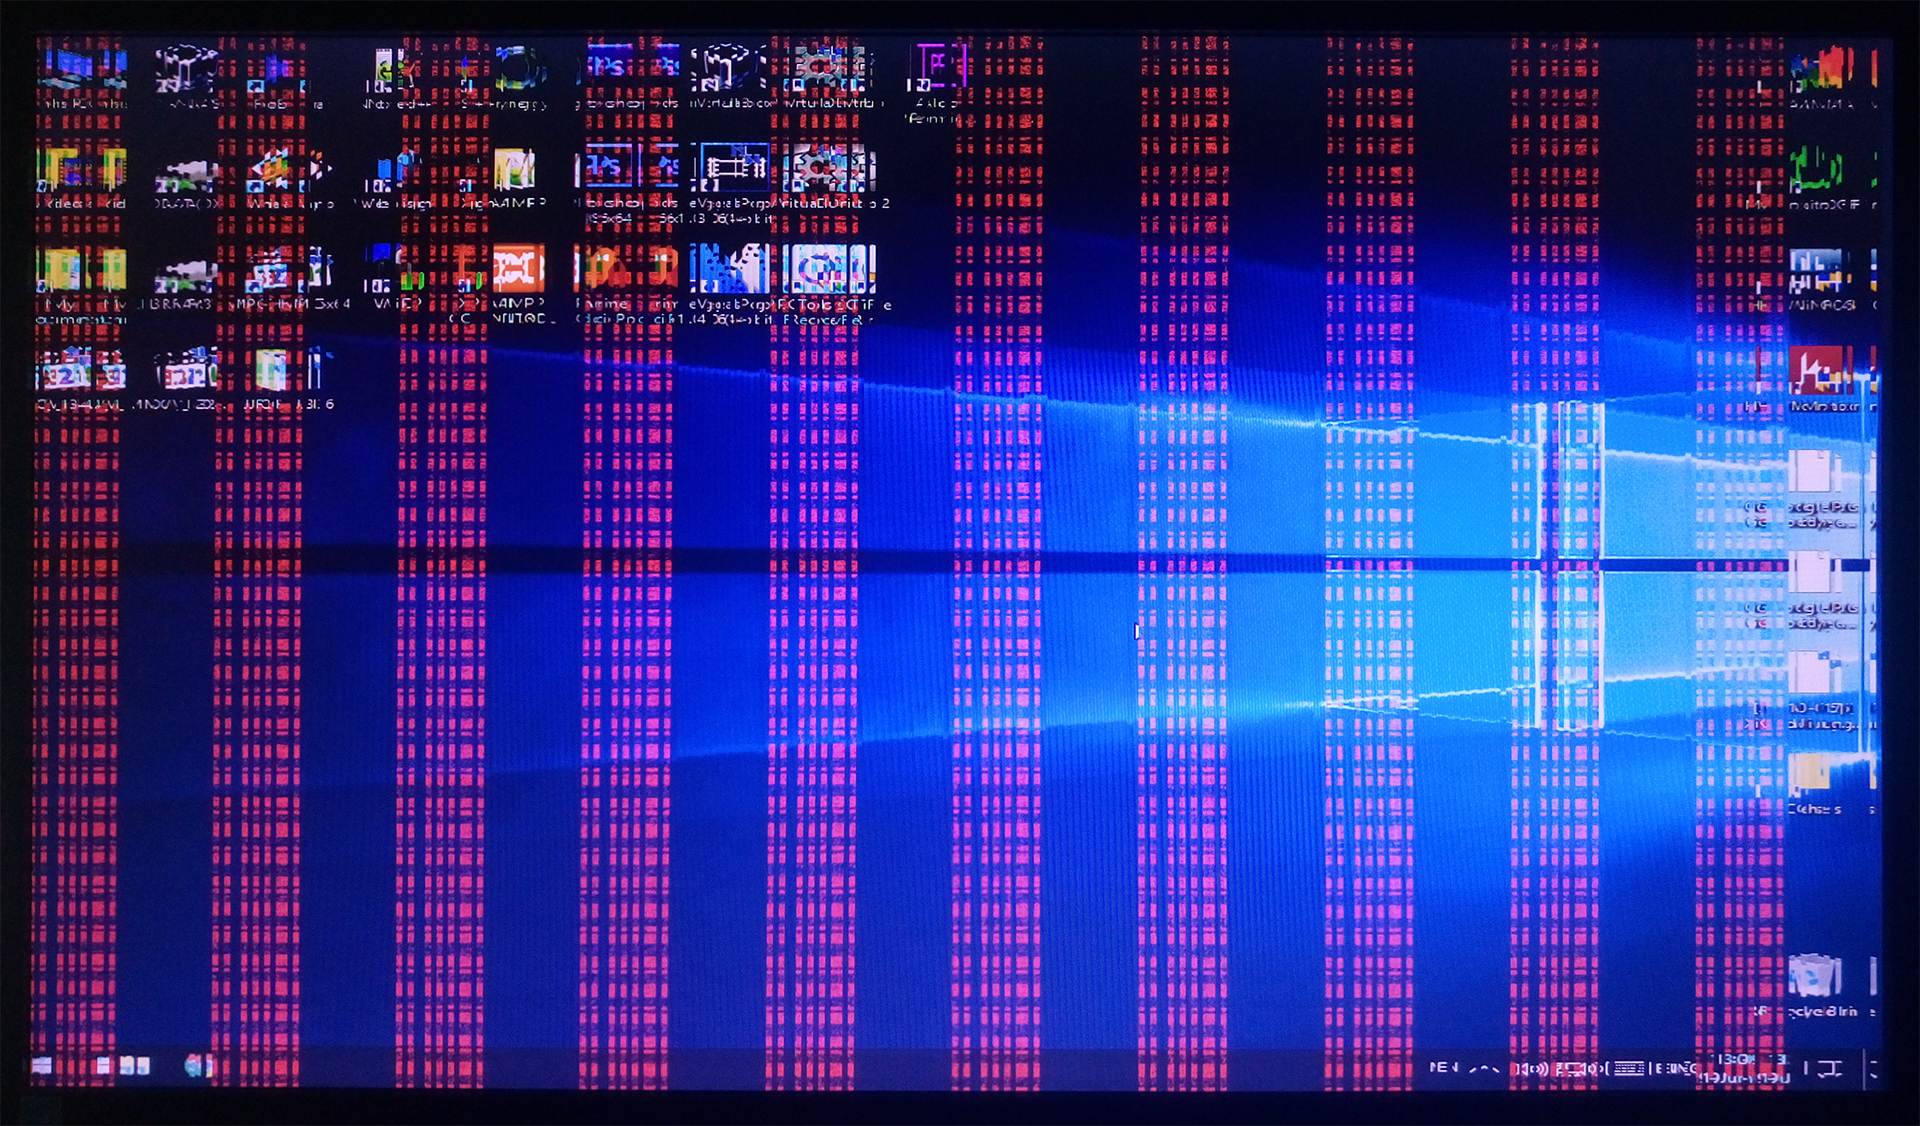
Malfunctioning Graphics Card with Vertical Stripe Lines and Image Artifacts – Windows OS
Problem started manifesting gradually. Initially, in the past year whenever I booted the machine from stand-by (sleep) mode, in 10% ~ 20% cases Windows BSOD occured with Video TDR Failure message and something about collecting and generating error report:
Video TDR Failure
blah blah blah + some error sequence code, which turned out completely unrelated/unhelpful in my case
I was frustrated, because solutions on the web and official Microsoft support forum suggested it was a driver/software issue. Problem is that this can also happen because of hardware related issues e.g. component failure, graphics card overheating (which can either cause problems itself during stressful operation and/or abnormal environment conditions or simply be a manifestation of other component malfunction) and so on.
Later, there were very brief glitches which lasted for a fraction of a second, almost unnoticeable. Cold boot was progressively getting worse every day. I started noticing weird pixelization distortion all over the place out of the blue, something I though was happening only on my old forgotten Commodore 64, when CPU and motherboard became very hot (because of poor thermal design and hours of gaming Manic Miner and Green Beret / Rush’n Attack). While booting through BIOS and various test screens everything was fine (at first), but as soon as it started booting Windows 10 with recognizable logo, things started getting weird. Sometimes, like completely random, Windows booting sequence was constantly freezing, Windows was trying to do some internal magic behind the scenes (judging from the SSD/HDD activity LED indicator), but eventually, Windows 10 always ended reporting BSOD screen with familiar message about Video TDR Failure, at which point either reset or power-off buttons were left as the only option.
Malfunctioning Graphics Card
Then, after constant agony of countless power-offs and reset/reboot cycles, all on its own, Windows 10 did another reboot until it eventually fully booted and succeeded! Huh, who would thought Windows 10 got so persistent and successful OS eventually!? Anyway, as I later discovered, this was more of a gambling luck, than anything, since the problem started happening more frequently, and became worse every day.
In one of many reboot-fail-reboot cycles, something suddenly changed and caught my attention. Windows 10 out-of-the-blue reported that NVIDIA 8600 GT Graphics Card hardware was disabled, because it reported a problem during boot sequence. I will spare you with all the details, since this event did not happen right away and all on its own (it would spare me a lot of trouble and unnecessary reboots and trials if it did), until Windows Repair Console was initiated (probably because of many reboots and unsuccessful startup sequences) and then I instructed Windows to try to detect and fix the problem by itself. It couldn’t fix the problem, naturally (because it was not software related, after all), however, it did detect that boot failures were related to the Graphics Card unit.
The biggest mystery that followed was the fact that (at least for next 2-3 days) computer started working “normally” with one (and only) GPU card disabled, and monitor (also one and only) still hooked up to it!? I thought if we disable one and only GPU card in the computer (like, in Windows Device Manager), that’s it – there won’t be any picture anymore.
Thing is, it was only disabled in Windows. Not BIOS, DOS, Linux or any other OS we might have. Graphics card was now using Microsoft Basic Display Adapter driver, with all advanced features (bells & whistles) disabled. Sleep function was also gone (only power-off/shut down and restart were available in Start menu).
So, image was still showing up properly during basic system boot and tests, and yes, even Windows 10. It just wasn’t using all hardware drivers and features, and that came with a reduced resolution of 1024×800 or so (I raised it up to max 1280×1024 later, but that was still far from the native 1920×1080 Full HD for my monitor). It sucked, though, as everything was distorted, icons and windows were stretched, movie playback of few clips required pixel AR correction option checked in the media player, and so on…
Well, at least, I had my PC back for a while.
I also installed a local VNC server, so even without any picture displayed, graphics card inserted or enabled, I could remotely connect to it via LAN and see that otherwise PC is working fine. HDDs, CPU temps and MEMORY benchmarks were all passing with no errors, Windows was now happy booting up, even with garbled image, which gave me confidence that the computer was otherwise working properly. It has to be related to Graphics Card, but how and why?
Searching various online sources for tips about troubleshooting and quick repair, I already:
- Uninstalled Graphics Card from PCI-E slot, cleaned the honeycomb pins and put it back.
- Windows Repair session did recognize the problem on few occasions, but without any improvements.
- Booting live Linux distro (e.g. Ubuntu) experienced exactly the same image artifacts at some point, clearly indicating this was a hardware related issue, and not an Operating System one. This test alone was a clear sign to me that this was not a software/driver issue, but rather a hardware problem.
- Checking memory DIMM slots, CPU, and other cables and components didn’t reveal anything problematic, either.
There were hardware repair related suggestions, as well:
- PCB Solder Reflow – GPU chip reballing or entire card overall
Reflow/Reballing can be used to “refresh” solder joints. My quick visual inspection of the card didn’t reveal any bad contact issues, but still, it could be a non-visible problem, particularly in the case of BGA surface mounted GPU. I have to admit that I have never done such a complicated procedure, and I probably wouldn’t bother for a cheap $10 used card (except for practice). You can either use a hot-air gun and gently hover over some areas, or put the card in the oven and “bake” it carefully. Both methods carry the risk of permanent damage and component overheating (but in general, hot air gun is better and more precise, since you do not heat entire board and all components at the same time, including non-electric contact bodies).
This PC was never used for gaming, in fact, GPU was never even benchmarked or stressed otherwise and even if I wanted to – it was only 8600 GT anyway, why would I want to do anything like that with 8600 GT? I mean, it wasn’t something like 8800 GTX, GTX 1080, GTX 2080 or similar. However, I recalled that at one point I disconnected GPU Cooler from graphics card’s PCB few years ago, as I was annoyed by the noise it was suddenly started making, and wasn’t too confident to repair it or replace it myself. It was fine, GPU was still below 70° C, and I didn’t actually care, because I never planned to stress it much with games or whatever.
Then came this gotcha.
Last and this year we had some heatwaves, and those heat waves stress not only us, fellow humans, but also our computers and their components. It is not the same when T ambient is 25° C or below, or 30° C and above! Remember that < 70° C from previous paragraph? Well, it was now close to 78-79° C! Poor thing simply couldn’t keep up!
Even without fan disabled, statistically, this ought to happen with non-solid low-quality electrolytic capacitors eventually. I actually have experience with motherboard repairs in this regard, replacing capacitors that were showing age and plaque.
I was suspecting that either GPU (Graphics Processing Unit) chip itself, or GDDR RAM memory was damaged somehow. I couldn’t verify GPU itself reliably, because as soon as I enabled Graphics Card under Device Manager, Windows 10 would freeze and enter endless rebooting sequence again and again – yeah, believe me I tried it, that’s how I know ;)
On the other hand, GPU is the most complex piece of technology on the graphics card itself, and it is usually very well protected (thermal shutdown and other safety mechanisms built-in). In another words, it should be rare occurrence that chip burns out, keeping all things checked (e.g. no overclocking, reasonable PC internal temperatures / cooling, no gaming or demanding GPU apps etc.).
There were some small utilities for testing and stressing Video RAM memory, and since at this point image was almost 100% of the time constantly distorted and useless, I connected through VNC LAN client and run it from remote desktop feature. To my shocking surprise, this tool run couple of cycles with 100% perfect health score! Hmm, so, it is not the GPU RAM on the card itself, at least according to this software. It must be the GPU or output image compositing stage somewhere, then. What else could it be that was manifesting like this!?
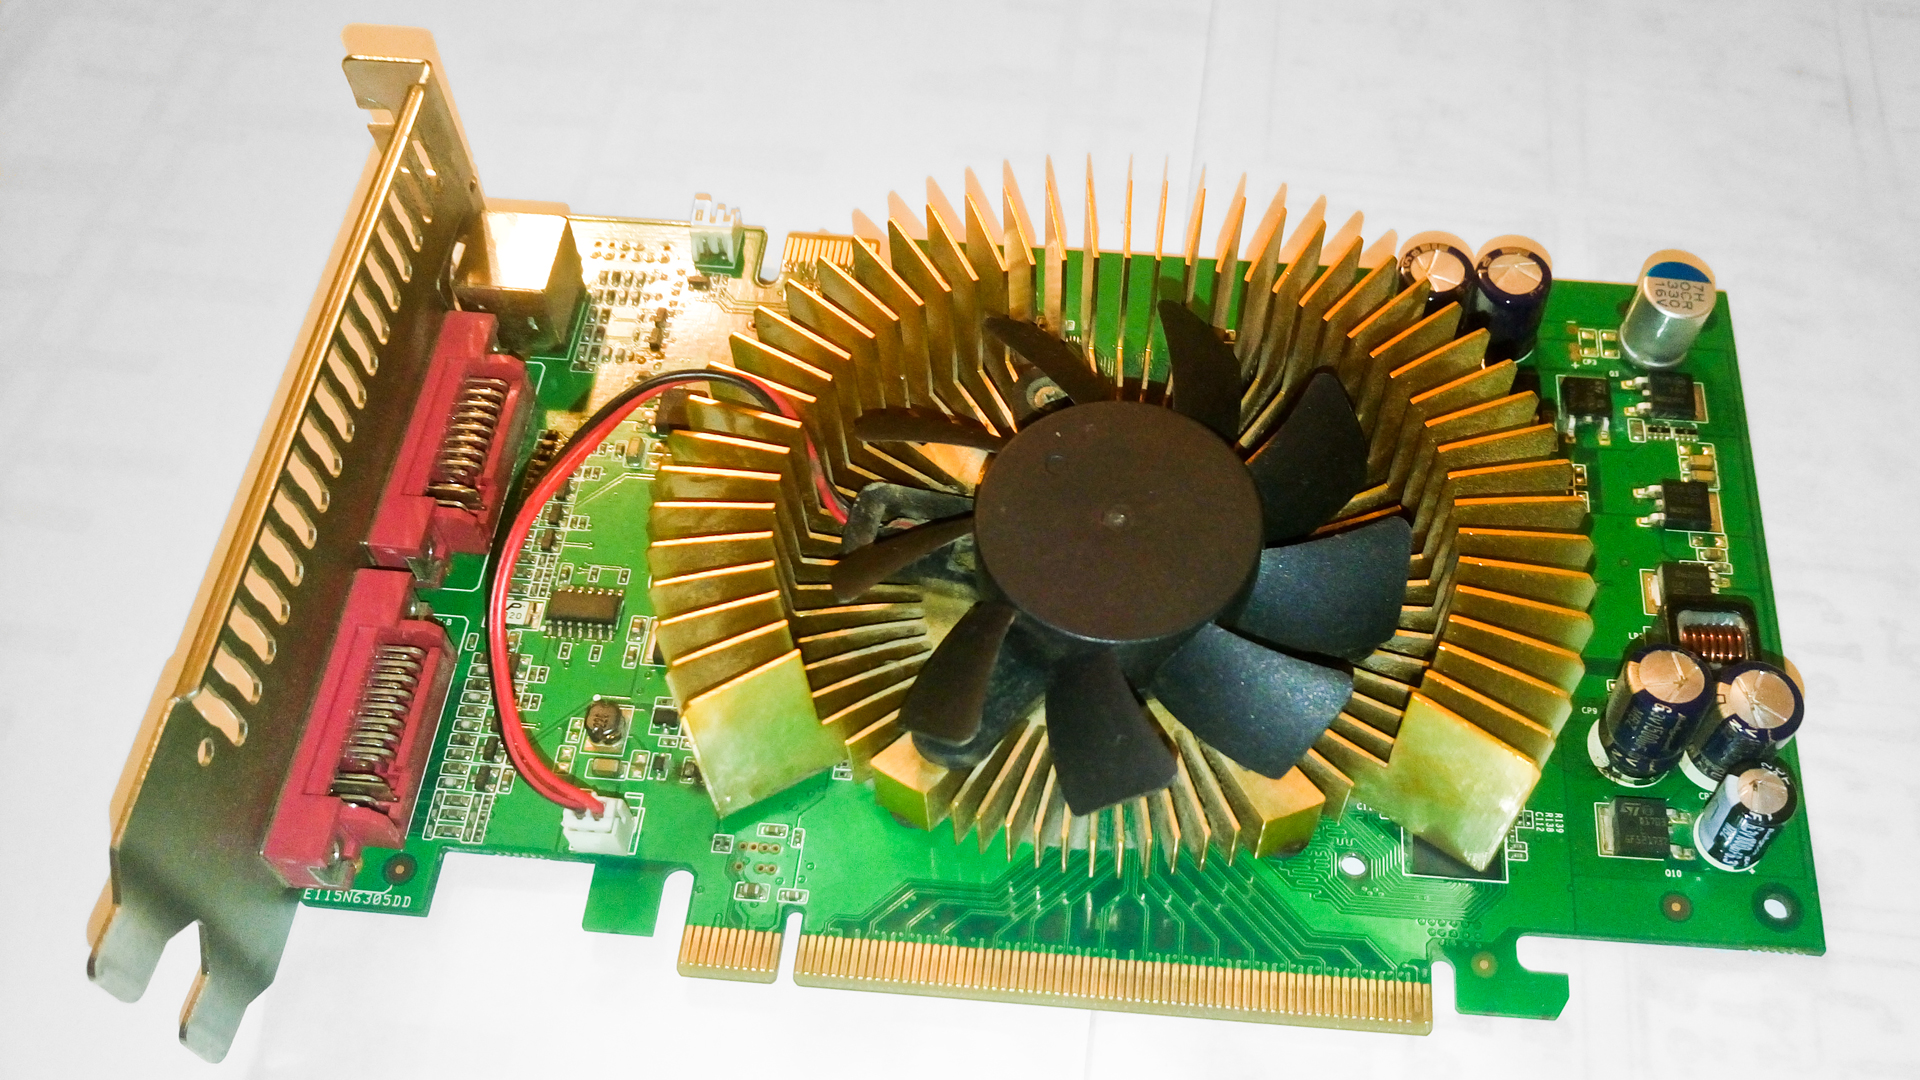
Malfunctioning Graphics Card – Swollen Electrolytic Capacitors
It never occurred to me that power supply and voltage filtering section could be the problem! Voltage instability can cause memory corruption, image artifacts, freezing / BSOD and other symptoms.
Given the fact that all electrolytic capacitors age (yes, even the solid type ones, albeit at a several times slower rate), they are the usual suspects in any malfunctioning graphics card that display above symptoms.
Since these cards came with multiple DVI-I output ports, I even got an idea to swap cable on both (plus mandatory reboot), but without any success. Both DVI outputs (digital DVI & analog VGA via adapter) were showing the same persistent problem.
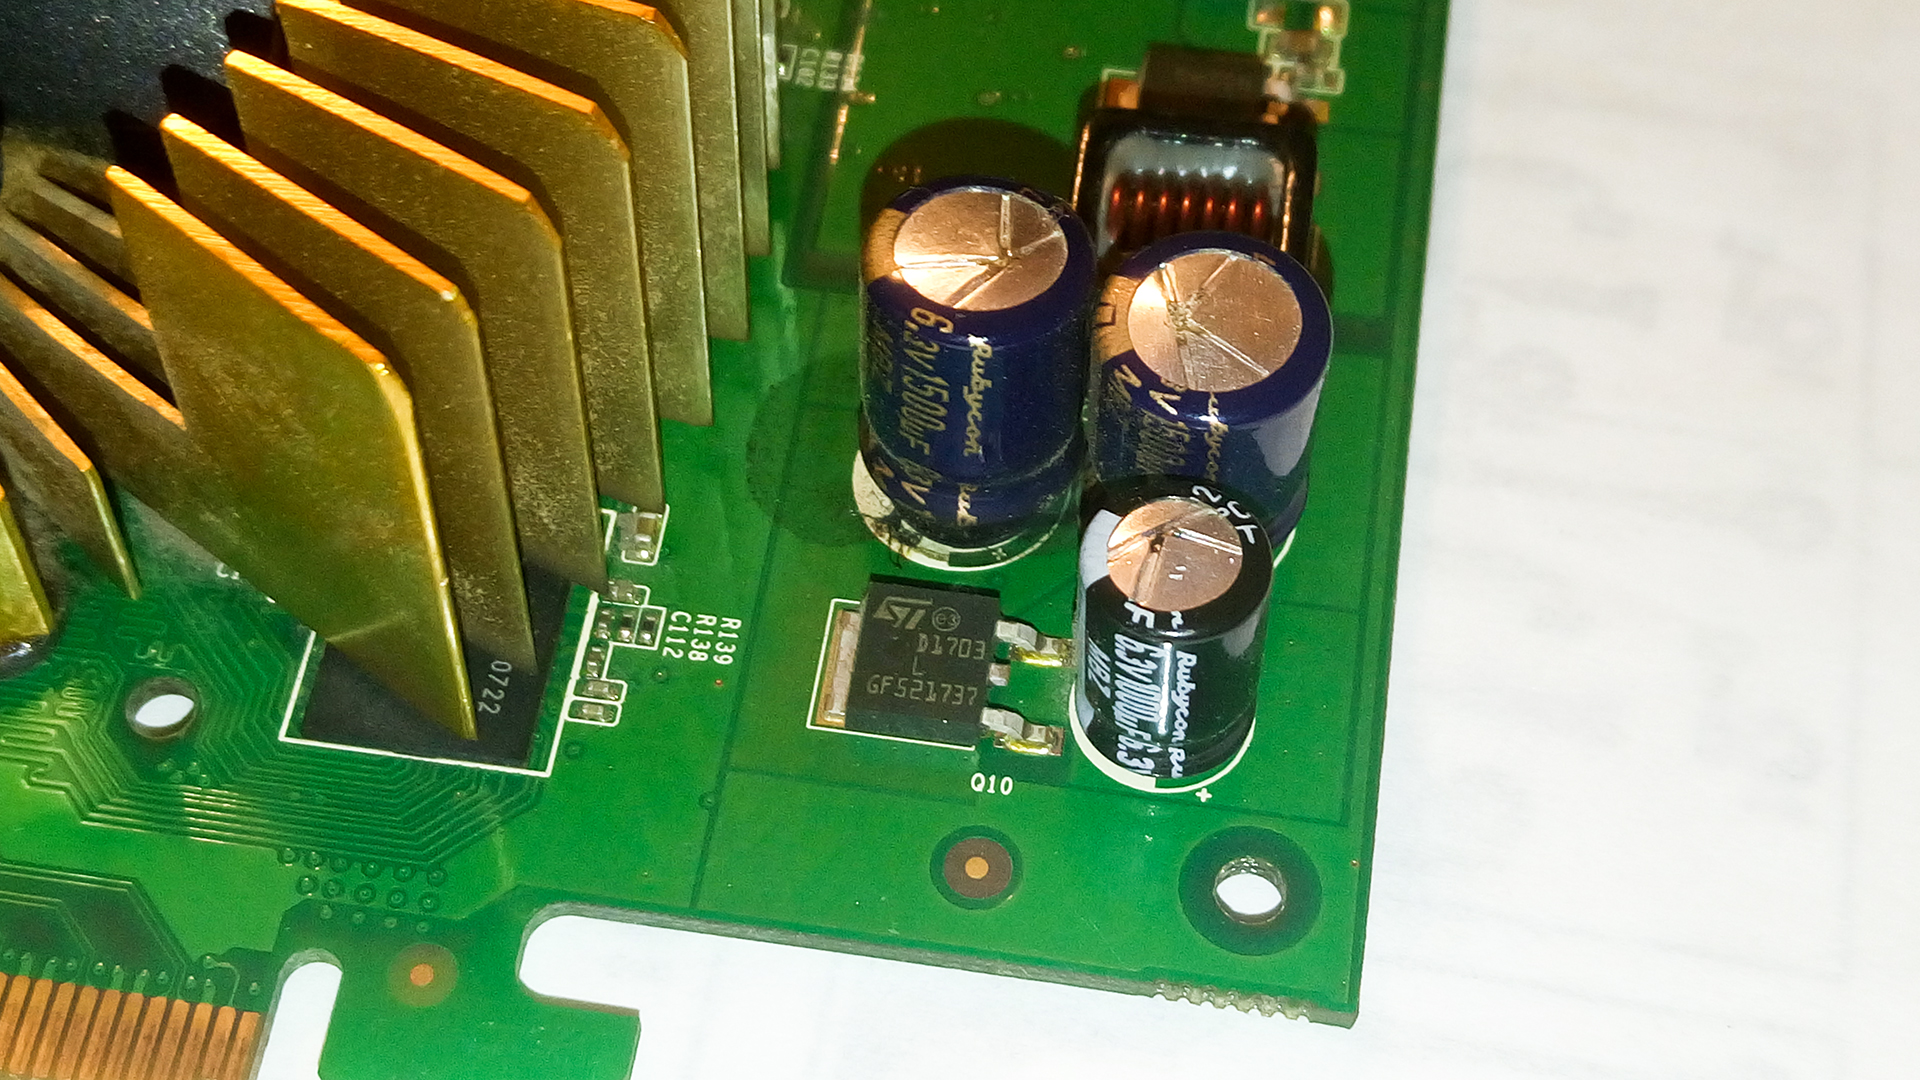
And, just when I was thinking to throw it out, and put a nice upgrade as a replacement, I looked at the board and noticed three swollen ELCOs (electrolytic capacitors) right next to the “passive” heatsink fins! A moment of epiphany. Everything got in place, I had a clear picture about what happened and smiled. Hydrogen gas build-up occurred, probbaly because of the surrounding excessive heat (despite the fact those capacitors were rated at 105° C, the electrolyte solution was old and probably dried over time). Also, the fact they were standing next to the inductor that heats pretty well, wasn’t helping either.
OK, it is time for repair! (video)
GPU or RAM memory overheating
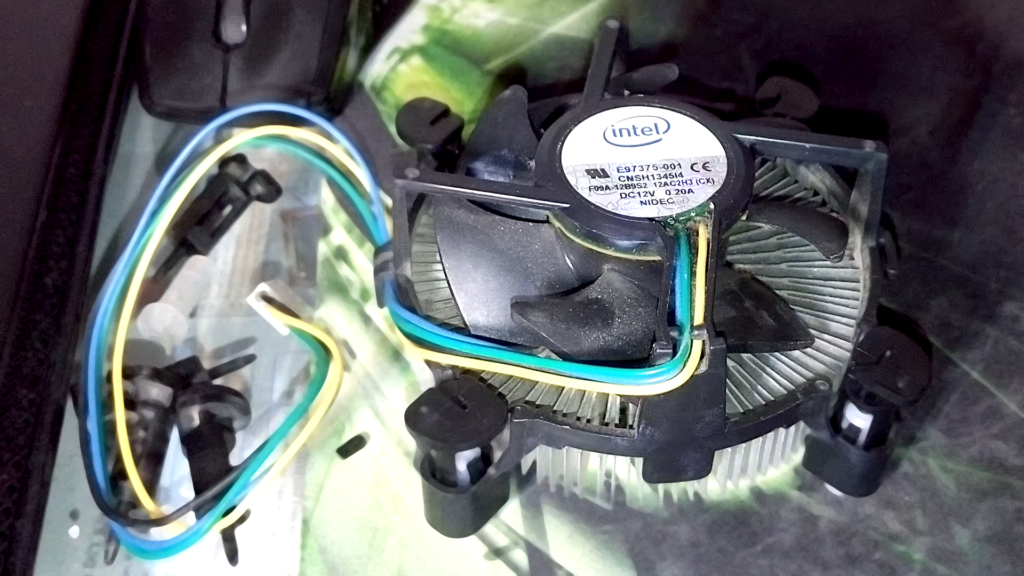
This issue was not something I originally had, but it was posted on YouTube comments by another user, who was trying to fix his second-hand graphics card he bought last month. His graphics card was working fine and then suddenly started showing black screen (of death). It turned out that the problem was 4 missing pads under the GPU heatsink (technically called distancers), which caused heatsink to touch memory chips with its tiny fins. This heat was affecting memory and activated overheating protection, causing black screen! He disassembled cooler assembly, replaced missing pads and — voila! Graphics card was brought back to life!
This is often the case with refurbished graphics cards you can purchase online for cheap (eBay, Amazon, AliExpress etc.), and it may happen to the best technicians in the world during GPU and memory thermal paste replacements.
So, there’s another thing you should try: inspect closely cooler / heatsink assembly and replace thermal paste on the GPU chip, it may help resolve the problem!
Recommended Reading
FINAL ADVICE / WORDS OF WISDOM
There’s a limited number of repairs you can perform at home with hobby tools. I was very lucky, and repair was straightforward and it worked! For complex repairs, professional equipment, spare parts and experience are a requirement, and repair is not always cheap.
You will need a decent soldering iron around, one that can probably go up to 300°~400° C. My 30 watts soldering tool barely managed to melt the PCB joints and it was excruciatingly painful thing to do it. Repair took couple of very long hours, instead of something like a 5 minute fix because of this.

Removed Faulty Electrolytic Capacitors Left Traces of Electrolyte Goo
I also recommend using Low ESR (low equivalent series resistance) versions with appropriate voltage specification and 105° C operating temperature (for longevity). It depends on the value of your graphics card, really. All modern cards with decent quality use solid capacitors nowadays. In my case, I used what I already had laying around: 3x 1000 uF / 105° C brand new capacitors, which were perfect for this aged low-end model. In case of some more expensive generations, I would even go with solid capacitors from established brands (Panasonic, Nichicon etc).
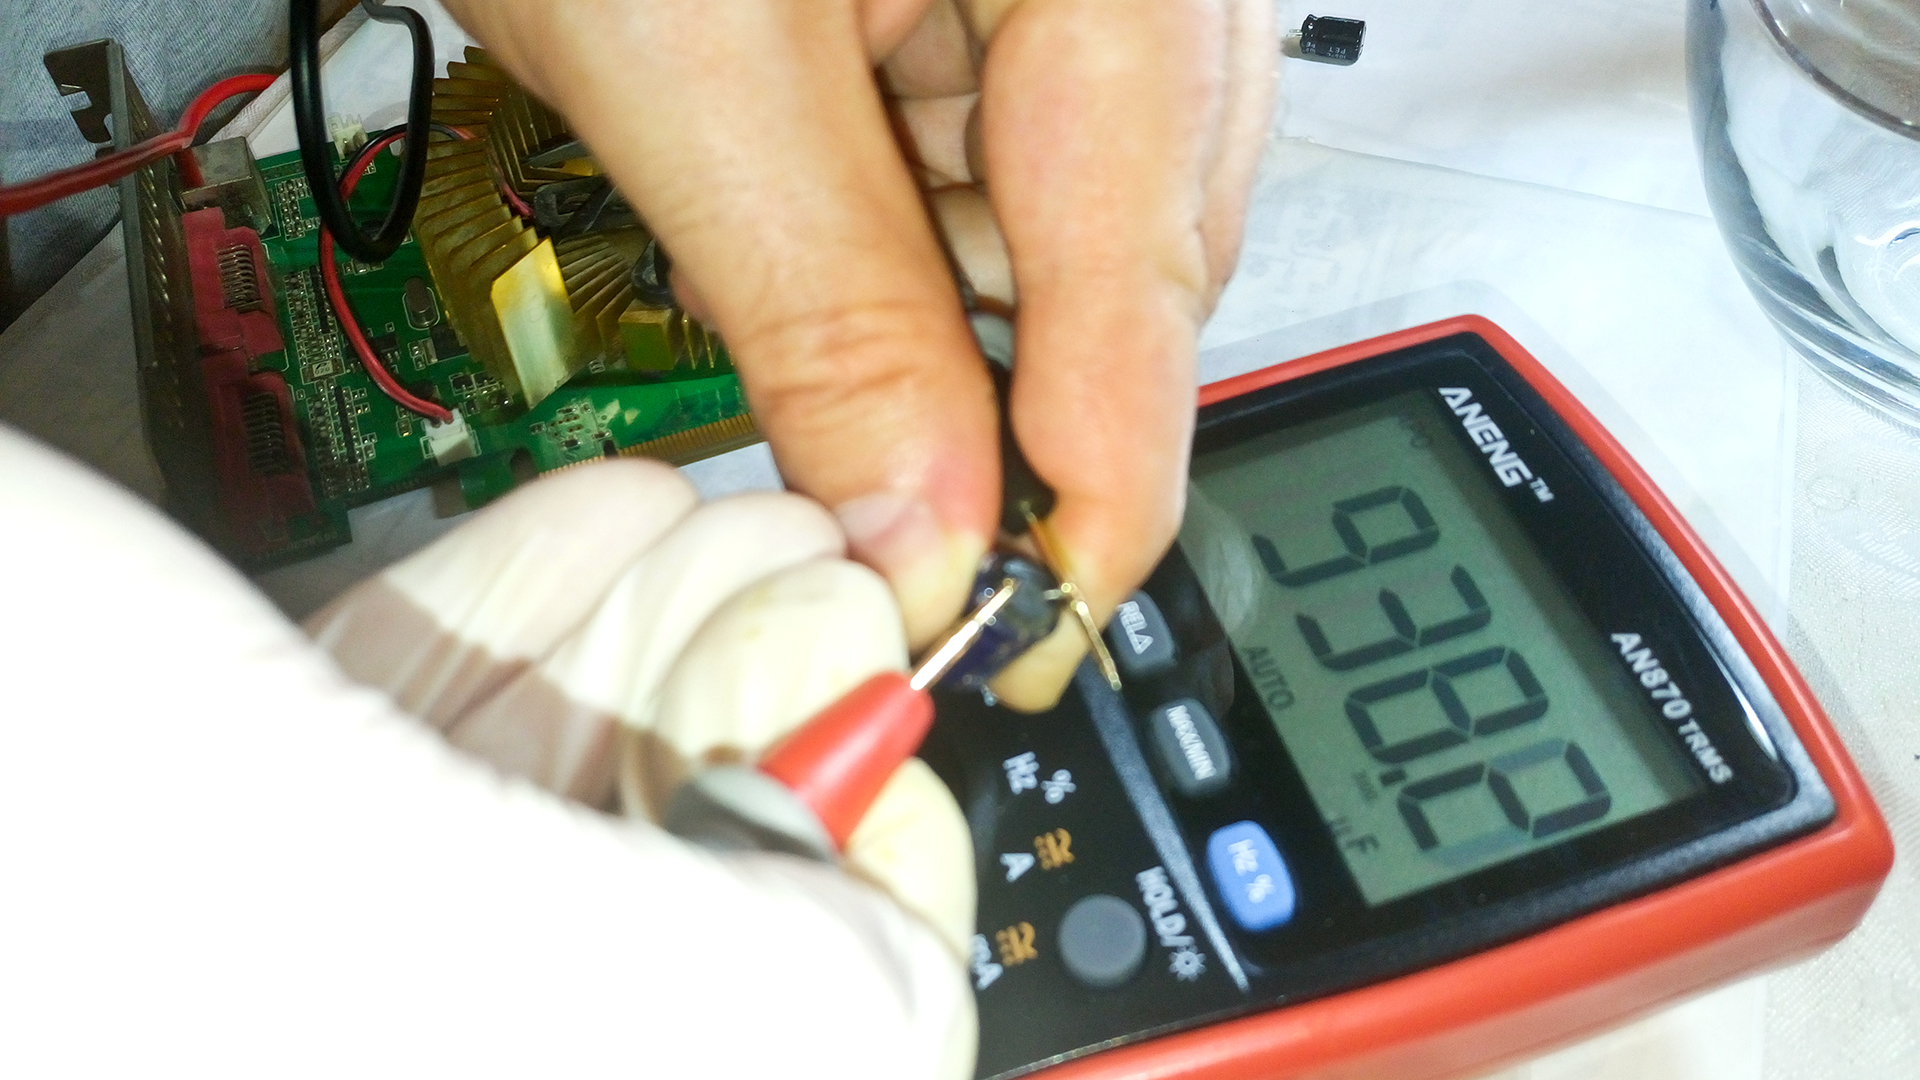
Faulty Electrolytic Capacitor Test – you can almost be fooled that this 1500 uF cap is fine!
Unfortunately, you cannot simply use ordinary Digital Multimeter (DMM) to test for faulty capacitors (well, not directly without some external helper circuit). They will show almost nominal or 30-50% reduced capacity value (ordinary ELCOs have usually -10% and up to +50% nominal capacity tolerance), however, you will not see other parameters like ESR (equivalent series resistance), which can indicate dry electrolyte, leakage or damage. Moreover, you cannot simply put test leads over ELCOs pins while they are mounted on the PCB board, because other circuits in parallel will affect your instruments and readings. There is another clever way to test them while mounted on PCB: by using oscilloscope and watching for any voltage instabilities and irregularities at their pins, which may indicate or reveal faulty caps during repair (assuming they belong to voltage section, ELCOs can also be used to block DC and separate AC signals in audio circuits).
CONCLUSION
After repair, machine never reported Video TDR Failure message ever again, neither when booting up from sleep/standby mode, nor when booting up Windows.
I was really lucky that this was a relatively simple hardware problem to notice and fix. Your mileage may/will greatly vary. Complex repairs require experience, serious testing, spare parts and repair equipment, not something you just happen to have laying around at your home. And, let’s be completely honest, sometimes it’s cheaper to buy another working card (new or used) and simply replace it!
Hopefully, this repair journey I took will help someone else in similar situation. Good luck!


![Xiaomi App - How To Re-Install Stock Factory Version - How To Fix Corrupted Gallery App [no root]](https://tehnoblog.org/wp-content/uploads/2025/09/Xiaomi-Gallery-App-Code-Bugs-Artwork-1024x576.png)


1 Comment
Add Your Commentthank youuuuuuuuuuuuu it worked
October 18th, 2021