

How to convert a sample rate of an audio track? What is the best way to do it? Is there a difference between software and hardware tools and the result quality? We present you with the method how to do a comparison for any digital audio resampling tool out there and make a best possible choice on your own.
DIGITAL AUDIO SAMPLE RATE CONVERSION QUALITY BENCHMARK
Hobby musicians & professional producers often may need to work on digital audio sample rate conversion of the source material. For e.g. from 192k or 96k to standard 44.1k (Audio CD) or 48k (DAT, DV) in both directions, and so on (k = means kilo or thousand, e.g. 44.1k is equal to 44100 [Hz] sampling rate).

Sample Rate Conversion
While conversion from 96k to 48k is simple (perform decimation by 2 = remove every other sample + slow down playback sample rate by half), it is very complex to do it with floating point ratios, such as from 96k to 44.1k (ratio ~ 2.177). Aliasing* distortion is inevitable, unless a high quality filtering and conversion algorithm is used.
The quality of sample rate conversion can be easily visualized via Spectrogram chart, which is just a fancy Spectrum Analyzer in time-domain. For example, conventional Spectrum Analyzer displays frequency on x-axis (linear or logarithmic scale), and amplitude on y-axis (linear, dB, relative, absolute…). On the other hand, Spectrogram x-axis represents time of the entire audio duration length (or some finite time frame if performed on real-time signal), y-axis represents frequency (again, linear or logarithmic scale), and the chart line itself is colorized to visualize frequency component’s amplitudes in audible range (usually 20 ~ 20000 Hz).
VIDEO TUTORIAL
In this video I have tested Audacity 2.1 and Sound Forge 8, just as an example apps I had on my laptop, but you can test any software or even hardware with this method, DAW (Digital Audio Workstation), NLE (Non-Linear Video Editing) suite and so on. Anything that can resample audio can be subjected to this kind of audio measurement.
In this tutorial you will learn:
- How to increase Spectrogram (Waterfall Spectrum) resolution in Audacity
- How to change (modify) resampling quality in Audacity
- How to view Spectrogram of currently open audio file in Audacity
- How to save (export) audio file in Audacity
- How to resample audio in Sound Forge
- How to save (export) audio file in Sound Forge
If you have ever wondered how the test results were done on src.infinitewave.ca website, and wish to verify them by yourself, here is how it is done. Of course, keep in mind that they used a customized charts with extended frequency range, but the principle is the same. I don’t care much about outside audible range (beyond 20000 Hz).
The goal here is to get as clean line as possible.
- if you generate the log sweep, the line will be curved just as in our tests below
- if you generate linear sweep, you will get a sloped (straight) line
Everything else outside main line should be a unified color, without noise and especially without any ghost lines. If you see faint ghost lines, the distortion (spectral aliasing) is probably going to be inaudible, but that really depends on the source material complexity itself.
If you see strong spectral copies all over the place, forget about that app and it’s algorithm, and use one that produces cleanest charts.
BENCHMARK RESULTS
Here are some of the test results obtained with above testing method. With presented method you can easily test any application or hardware device that you desire.
NOTES: In above video MONO signal was used for testing, and below is the same signal in STEREO (two channels), which explains the dual curves per chart. Click on images to load full-size versions.
16 bit / 96k Original Reference Test Signal generated with Audacity
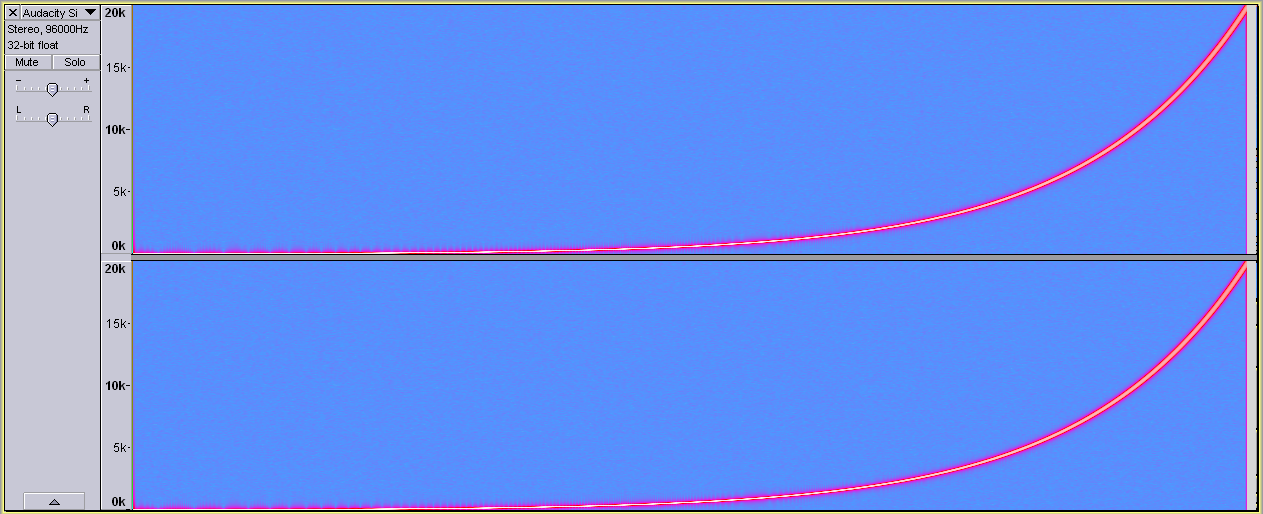
Sine_Sweep_16bit-96k_20-20kHz_[Audacity-Original-MONO].wav
Sine_Sweep_16bit-96k_20-20kHz_[Audacity-Original-STEREO].wav
Audacity
96k to 44.1kHz Sample Rate Conversion – Best Quality + No Noise Shaping

Editor’s Note: Extremely Fast & Accurate | Editor’s Choice Award
FL STUDIO 10
96k to 44.1kHz Sample Rate Conversion with 6-point Hermite Interpolation + No Dither
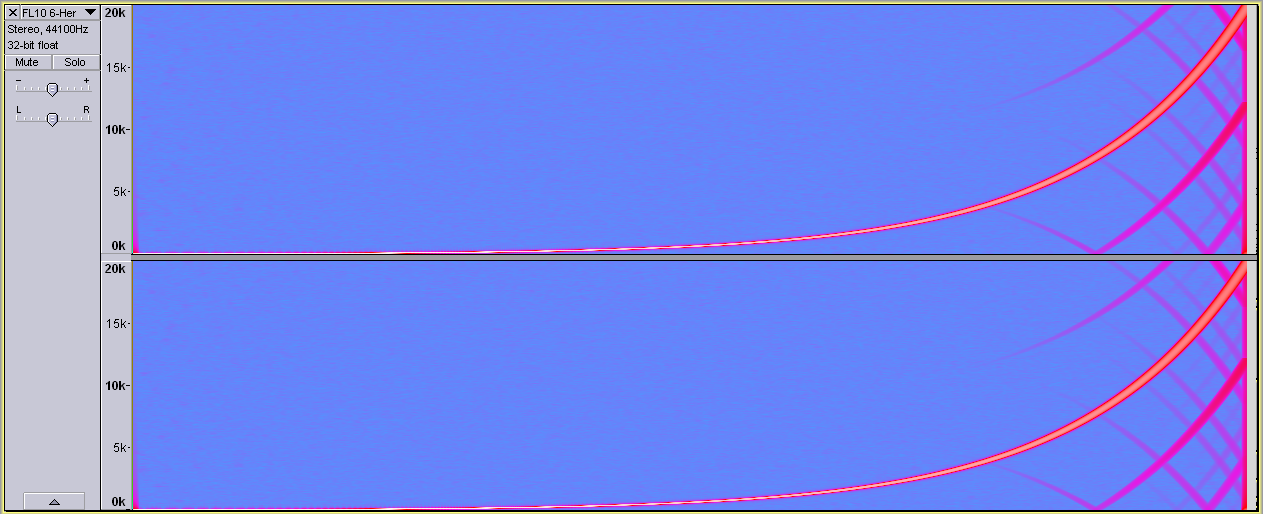
Editor’s Note: Avoid for important material
FL STUDIO 10
96k to 44.1kHz Sample Rate Conversion – 64-point Sync Interpolation + No Dither

Editor’s Note: Excellent Quality & Very Slow
FL STUDIO 10
96k to 44.1kHz Sample Rate Conversion – 512-point Sync Interpolation + No Dither

Editor’s Note: Excellent Quality & Extremely Slow
SoundForge 8
96k to 44.1kHz Sample Rate Conversion – Quality 4 + Anti-Aliasing Filter

Editor’s Note: Avoid for important material
SoundForge 10
96k to 44.1kHz Sample Rate Conversion – Quality 4 + Anti-Aliasing Filter
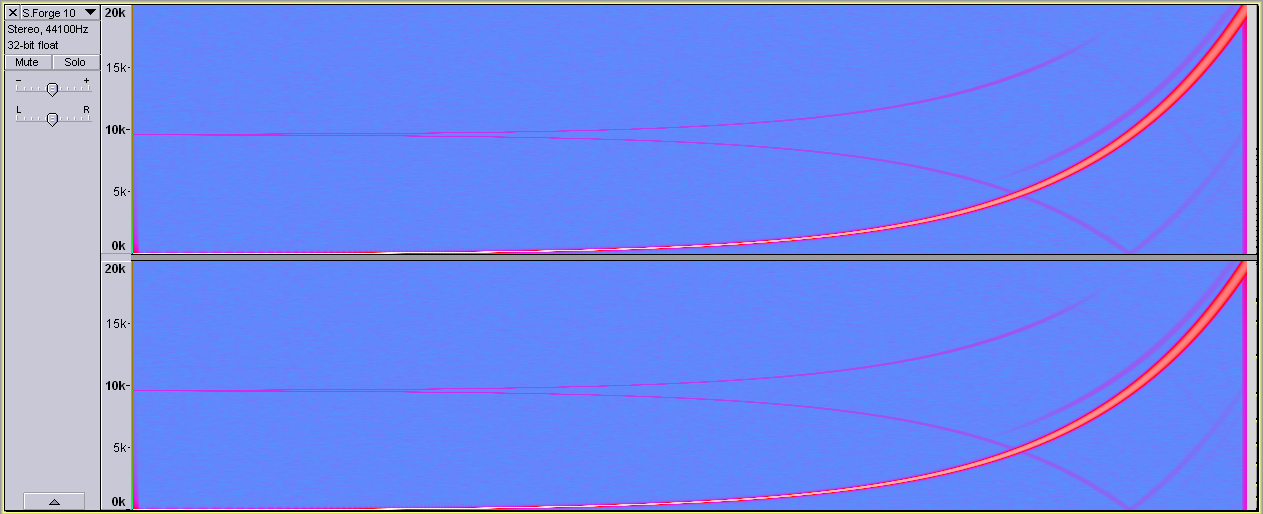
Editor’s Note: Good | Noticeable improvement from Sound Forge 8
iZotope 64-bit SRC
96k to 44.1kHz Sample Rate Conversion – Max Quality
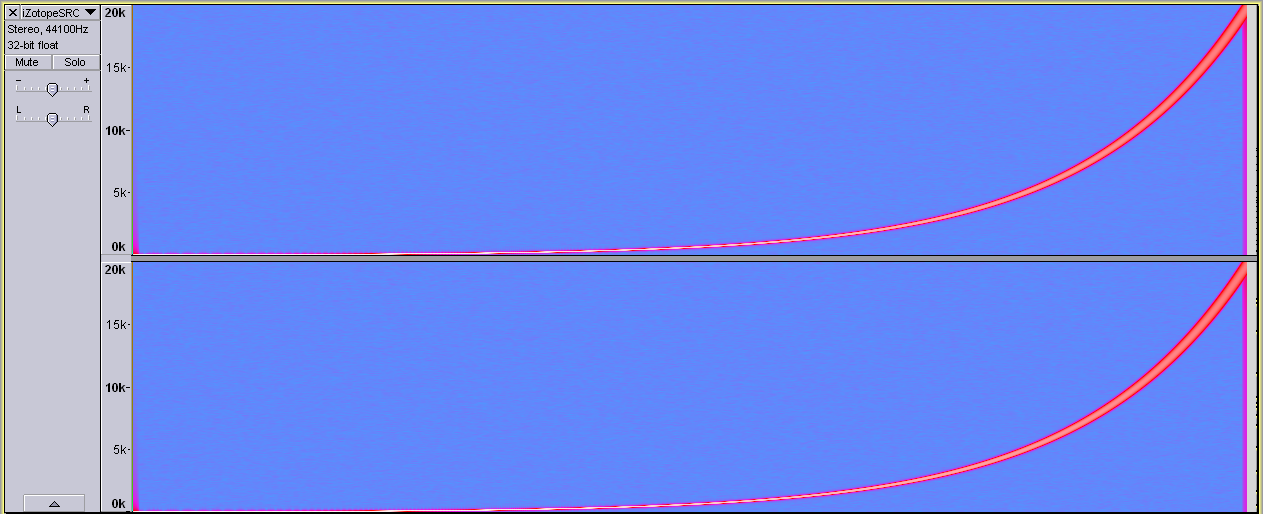
Editor’s Note: Extreme Quality & Very Slow
VirtualDub 1.10.4
96k to 44.1kHz Sample Rate Conversion – 64-Taps Filter Bank + 64-Taps Lowpass Filter
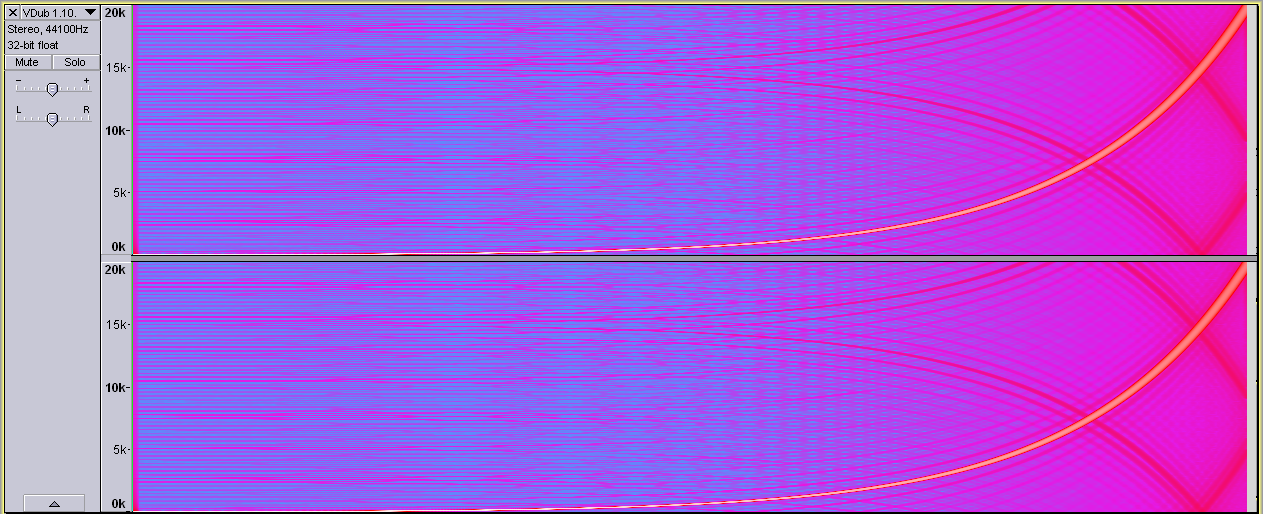
Editor’s Note: Avoid for important material
VirtualDub 1.10.4
96k to 44.1kHz Sample Rate Conversion – 64-Taps Filter Bank
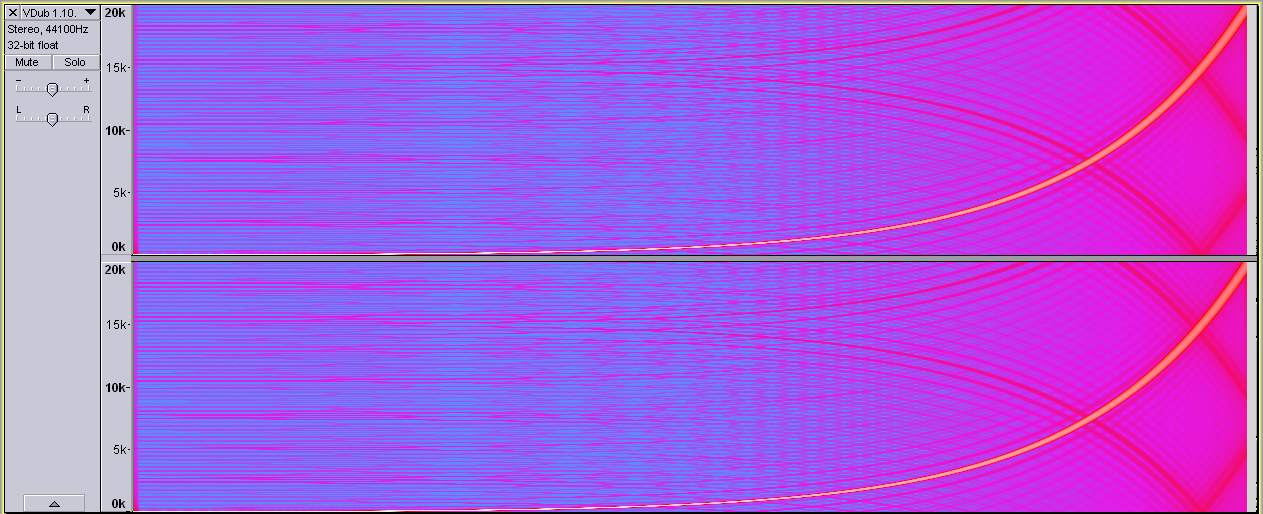
Editor’s Note: Avoid for important material
VirtualDub 1.10.4
96k to 44.1kHz Sample Rate Conversion – Built-In High-Quality Conversion

Editor’s Note: Avoid for important material
CONCLUSION
Audacity’s Sample Rate Conversion algorithm is astonishingly fast and accurate. FL Studio 6-point Hermite produces some unwanted aliasing in the higher frequency range (most probably inaudible for the majority of grown-ups), but more costly and slower Sync algorithms should be fine. However, you may save on time if you export your audio in native SR and later down/up-sample it in Audacity or similar tool, because it will be much faster and equally accurate, if not better.
Sound Forge built-in resampling algorithms are a bit of a disappointment, really, thought there is a significant improvement in Sound Forge version 10, keep in mind that latest version Sound Forge 11 was not tested.
iZotope SRC is excellent tool with many advanced resampling options (tested as Sound Forge 10 plugin, with simplified quality mode slider set to max). And quality comes with a price, it is very slow. However, you will notice that we did not take conversion time measurements in our benchmarks, simply because this is usually a one-time task where real-time processing is not critical, and the ultimate desire is quality over quantity.
VirtualDub is a popular video editing tool, even today, when everything is dominated by 1-click video converters and such, but it still offers unique features on it’s own. However, when it comes to audio resampling, you should absolutely avoid it! We tested advanced filters with 64…1024-taps filter bank, and results were pure crap. You will be much better with specialized audio tools, like Audacity (open source, free!).


![Xiaomi App - How To Re-Install Stock Factory Version - How To Fix Corrupted Gallery App [no root]](https://tehnoblog.org/wp-content/uploads/2025/09/Xiaomi-Gallery-App-Code-Bugs-Artwork-1024x576.png)


Comments
Post A Comment