

Ubuntu LTS Server is widely used in many VPS and Dedicated hosting environments. However, it comes with now obsolete PHP 7.0.x branch version, and many web applications software, including WordPress, cannot properly run on it because of security and performance issues. In fact, WordPress already gives you a warning that PHP Requires Update in Admin Dashboard home page.
How To Manually Upgrade PHP version – Ubuntu Server LTS Tutorial

In this brief article we will show you how to manually install and update PHP version to the latest 7.x or 8.x version on Ubuntu LTS VPS server using apt package manager. If you are reluctant to perform this relatively easy procedure on a live server you can install Ubuntu Server LTS in a virtual machine environment and run a simulation or exercise in a sandbox first. Once everything goes well you can perform it again in a production environment, entire procedure shouldn’t take more than 10-15 minutes to setup (assuming you regularly maintained your server software up to date).
STEP 1: Perform Initial Packages Update / Upgrade
Login via SSH to your server (e.g. using PuTTY) and run following commands:
sudo apt update
sudo apt upgrade
STEP 2: Install 3rd Party Repository Support
In order to be able to use add-apt-repository command install required 3rd party repository support:
sudo apt install software-properties-common
STEP 3: Add Ondřej Surý’s PPA repo
NOTE: confirm with ENTER after each command
sudo add-apt-repository ppa:ondrej/php
[*] if you use PHP as Apache module:
sudo add-apt-repository ppa:ondrej/apache2
[*] if you use PHP with Nginx:
sudo add-apt-repository ppa:ondrej/nginx
STEP 4: Perform Packages Update / Upgrade
NOTE: please ignore “The following packages have been kept back” message regarding old PHP 7.0.x components for the moment
sudo apt update
sudo apt upgrade
STEP 5: Install PHP 7.x or 8.x
Technically, PHP 7.3 is EOL / no longer in active support, so you should consider installing 7.4 or 8.0 version. Of course, you will still receive security updates until the end of 2021 if you decide to install 7.3 branch.
NOTE: When prompted select option to KEEP local version of config file(s)!
install PHP 7.3 with common components:
sudo apt install php7.3 php7.3-cli php7.3-fpm php7.3-apcu php7.3-opcache php7.3-common php7.3-pear php7.3-curl php7.3-zip php7.3-mcrypt php7.3-mysql php7.3-mbstring php7.3-xml php7.3-gd php7.3-gmagick php7.3-imagick php7.3-xmlrpc php7.3-geoip
install PHP 7.4 with common components:
sudo apt install php7.4 php7.4-cli php7.4-fpm php7.4-apcu php7.4-opcache php7.4-common php7.4-pear php7.4-curl php7.4-zip php7.4-mcrypt php7.4-mysql php7.4-mbstring php7.4-xml php7.4-gd php7.4-gmagick php7.4-imagick php7.4-xmlrpc php7.4-geoip
install PHP 8.0 with common components:
sudo apt install php8.0 php8.0-cli php8.0-fpm php8.0-apcu php8.0-opcache php8.0-common php8.0-pear php8.0-curl php8.0-zip php8.0-mcrypt php8.0-mysql php8.0-mbstring php8.0-xml php8.0-gd php8.0-gmagick php8.0-imagick php8.0-xmlrpc php7.3-maxminddb
If you wish to manually install additional or specific PHP modules depending on your application’s requirements, use following command in order to see all available modules for particular PHP version:
apt-cache search --names-only ^php
STEP 6: Configure PHP .ini file
NOTE: Use terminal via SSH or FTP/SFTP client and text editor (e.g. Notepad++) for this purpose.
Depending on your server setup (e.g. Apache or Nginx or some other server and PHP interface) you will have to configure appropriate PHP configuration .ini file and PHP handler manually.
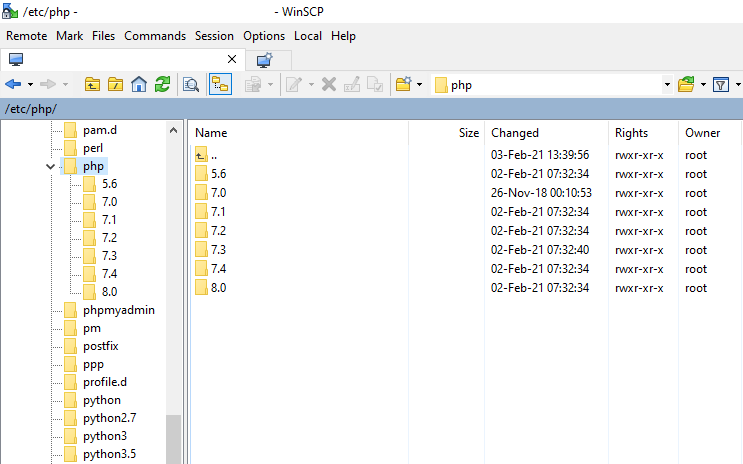
PHP Config Files – etc Folder – Ubuntu 16.04 LTS Server via WinSCP SFTP Client
If you run PHP as apache2 module visit /etc/php/php7.3/apache2/php.ini or /etc/php/php7.4/apache2/php.ini or /etc/php/php8.0/apache2/php.ini and configure PHP variables (e.g. MEMORY SIZE, APPEND FILE, EXEC TIME LIMIT, FORBIDDEN COMMANDS etc.).
If you run PHP through FastCGI Process Manager (FPM) interface, corresponding PHP .ini file is located in /etc/php/7.x/fpm/php.ini or /etc/php/8.x/fpm/php.ini and server configuration procedure is different. You have to update server configuration file to use new PHP-FPM as you did before when configuring original php-7.0 FastCGI version.
STEP 7: Set PHP 7.x or PHP 8.x as default PHP version
Default Ubuntu PHP 7.0.x binary is still handling all PHP requests, we need to change it:
for PHP 7.3
sudo update-alternatives --set php /usr/bin/php7.3
for PHP 7.4
sudo update-alternatives --set php /usr/bin/php7.4
for PHP 8.0
sudo update-alternatives --set php /usr/bin/php8.0
NOTE: following commands are only in case you run PHP as apache2 module!
Disable old PHP apache2 module version:
sudo a2dismod php7.0
Enable new PHP apache2 module version:
for PHP 7.3
sudo a2enmod php7.3
for PHP 7.4
sudo a2enmod php7.4
for PHP 8.0
sudo a2enmod php8.0
STEP 8: Restart Server
restart Apache server service:
sudo service apache2 restart
or
sudo systemctl restart apache2
restart Nginx server service:
sudo service nginx restart
or
sudo systemctl restart nginx
DONE!
STEP 9: Installation Verification
You can check inside your application, for example:
WordPress Admin > Tools > Site Health > Info tab > Server > PHP version row
Or you can create a simple check.php file with following command:
<?php phpinfo(); ?>
Save it and upload it to your site’s root folder and access it via https://yoursite.com/check.php with your browser. If everything went right, you should get a PHP information page containing version number and other configuration details.
Remember to at least once a week (or two) perform regular server software update and upgrade tasks in order to keep up with relevant bug fixes, security patches and new features!
Also, don’t forget to check plugins and themes compatibility with particular PHP version and resolve any issues before or immediately after you perform PHP upgrade, although you should generally be fine as no drastic changes were made between 7.0.x and later 7.x.0 branches that should normally cause any serious issues (well, except maybe this one, but it’s definitely not critical).
STEP 10: Clean-up (Remove) Old Packages
After several weeks or months, when you make sure everything works, you can optionally remove unused and old packages with following command:
sudo apt autoremove
This step is optional, but keep in mind that some old PHP version packages will be kept back, check your server response message after running apt update/upgrade commands periodically.


![Xiaomi App - How To Re-Install Stock Factory Version - How To Fix Corrupted Gallery App [no root]](https://tehnoblog.org/wp-content/uploads/2025/09/Xiaomi-Gallery-App-Code-Bugs-Artwork-1024x576.png)


4 Comments
Add Your Commentif you don’t install libapache2-mod-php7.X you won’t have /etc/php/php7.X/apache2 folders…
March 30th, 2021Due to Ubuntu 16.04 (Xenial) has reached End of Standard Support, the php packages have also been removed from Ondrej repository. This installation method does not work anymore on Xenial.
Any alternative?
July 21st, 2021Yeah, that’s a real shame. Answer and alternative (paid) can be found here: https://github.com/oerdnj/deb.sury.org/issues/1567
Seriously, though, moving to a new server (or upgrading existing one if possible) should be considered at this moment, anyway.
July 21st, 2021This got me for a few days until I seen this comment, made sense as had beem getting a lot of errors on sudo apt update
January 14th, 2022