

GIT FOR WINDOWS TUTORIAL
In this article we will focus on one area of Git version control software that is usually overlooked and not covered in most basic tutorials out there – how to use it for your own private and local files version tracking.
Git Logo
WHAT IS GIT ?
Git is a revision control software — an essential tool that can help you track all the changes in your projects and your source code management. In the old days before version control software was widespread and easily available, programmers used to create and keep zipped/archived file versions of their projects: project_version_1.0.zip, project_version_1.1.zip, project_version_2.0.zip and so on.
While this practice is still around and actually not part of the history as some may believe, VCS/SCM/RCS (all synonyms!) can help you focus more on your work, instead on keeping the track with all the versions and changes.
What’s more, revision control software has many “smart” features such as automatic detection of renamed files/directories, calculating similarity between old and new created ones, automatic synchronization of changes between different users (users A and B can work on the same project at the same time), easy comparison between different files and entire project versions, and so on.
Git is the most popular one today, but you should know that there are many others, with different architectures and features, and their own set of advantages and disadvantages. For a list of available VCS tools take a look at this list here.
WHAT IS GIT FOR WINDOWS ?
First of all, there are many GUI (graphical user interface) so-called Git clients for Windows — take a look at this list here. However, in this tutorial we will focus on the simplest, free and very easy to use Git for Windows found here:
updated url: https://gitforwindows.org/
(old url: http://msysgit.github.io)
Naturally, this entire project is hosted on GitHub, a “cloud” version of the Git itself here: https://github.com/msysgit
And finally, in case you wish to read about differences between msysGit and Git For Windows naming conventions and all the confusion that arises between them – go here
In a nutshell, using layman’s terms, Git for Windows is a version control built in executable form (.exe) which you can download and install on your Windows OS machine (XP, Vista, 7, 8, 10…). It comes with 2 versions:
- Git Bash (this is a terminal or command line version of Git for Windows)
- Git GUI (this is what we are talking about and will use today in this tutorial — this is a zero CLI — no command lines Git tutorial for newbies!
HOW TO DOWNLOAD GIT FOR WINDOWS ?
At msysgit.github.io gitforwindows.org there is a pretty straight forward download page, however, you may get confused about the msysGit part, so to make sure you have the right file, it must have the similar name like this one:
Git-1.9.5-preview20150319.exe
Filename begins with “Git–” and that is the most important part. Next is the version number, then comes the confusing word “preview” (do not worry, technically all Git for Windows releases are still considered as preview versions – not final, but that does not mean they are unstable or anything), and lastly comes a release date with .exe extension. Now, by the time you will be reading this there could be a newer versions like 2.0, and the word “preview” might be removed from the filename, but it will be similar to the above pattern anyway.
Once you download it, install it like any other Windows Application (just use default options) and you should initially see Git Bash icon on your Desktop. However, in Start menu you will also find Git GUI shortcut, so you can copy it onto Desktop, since in this tutorial we are only going to use GUI version of Git:
Git for Windows Git Bash/Git GUI
Since 2.x rhombus background of the icons is replaced with a 4-color Microsoft Windows styled version instead of single-colored classic red kind.
IMPORTANT NOTE: We will skip the part where you need to generate SSH key (.ssh file) in your C:\Users\User\… or C:\Documents and Settings\… folder) with credentials such as your device/computer label and your passphrase, since this tutorial is focused on local/private projects which will not be synced with public repositories hosted on GitHub, GitLab, BitBucket and so on in case you wish to use SSH for access. In case you wish to use HTTPS, no SSH keys are actually required!
GIT FOR WINDOWS – 10 MINUTES TUTORIAL
HOW TO BECOME A GIT MASTER WITH ZERO COMMAND LINES
STEP 1: We will create an empty directory* (folder) that will hold our project. It will be called git-basics and we will place our project under XAMPP server htdocs directory. You can place your project wherever you want: on C:\ drive, Z:\drive, under My Documents, and you can have as many projects as you like — across all places around. However, if you like to be organized, better stick with one universal location that you will dedicate to Git projects.

Git Basics 01 Create Empty Project Folder
* There is one important difference regarding this step when working with local (private) and publicly available repositories.
Remember:
- When you work with local repositories (as in this tutorial) you must create an empty directory/folder that will keep your local project.
- However, if you wish to clone/sync existing public repository (e.g. from GitHub), you MUST NOT create the directory in advance (only specify the proper path to the directory you would like that project to be copied into)! Git client will refuse to proceed otherwise, during the setup/cloning stage.
STEP 2: Run Git GUI and select Create New Repository option:

Git Basics 02 Create New Repository
STEP 3: Set Directory for New Repository Path to Created Empty Folder in previous step:
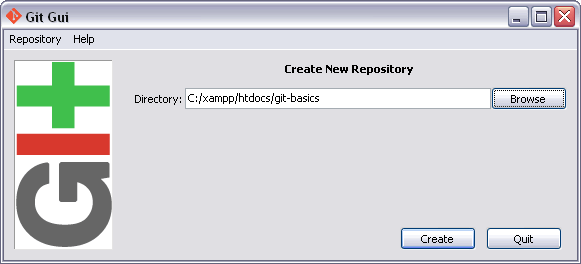
Git Basics 03 Set New Repository Path To Created Empty Folder
STEP 4-1: Git New Project Window will look like this:
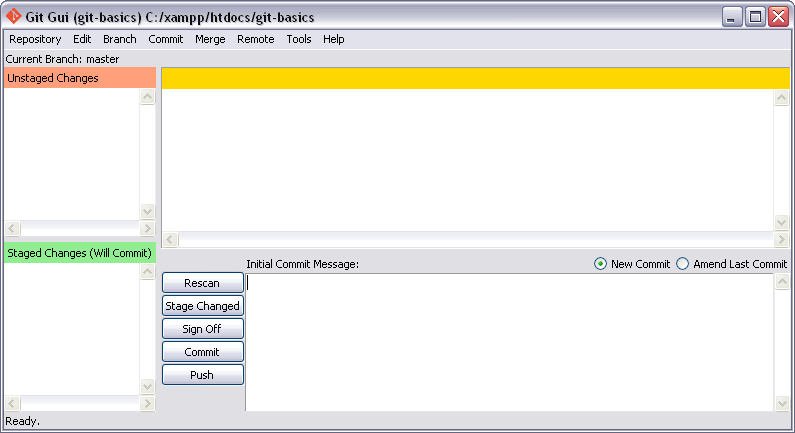
Git Basics 04 New Project Window (Part 1)
STEP 4-2: You will frequently access Visualize master’s History option from the Repository menu, and since we have a blank new project — let’s see what will happen when we try it:
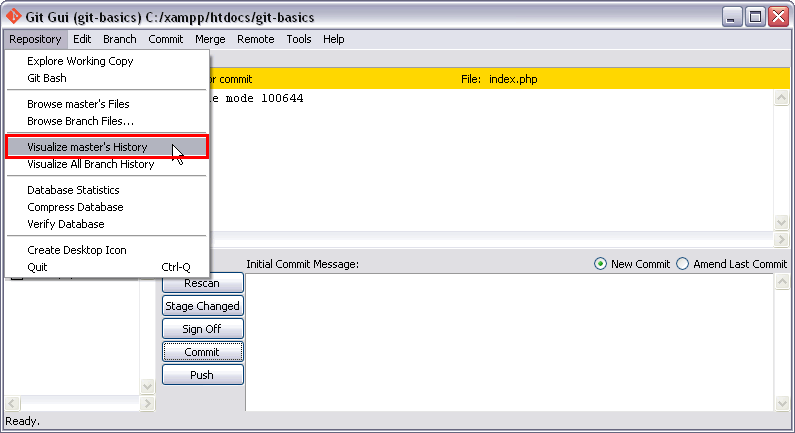
Git Basics 04 New Project Window (Part 2) – Visualize Master’s History
STEP 4-3: … and here comes our first error:
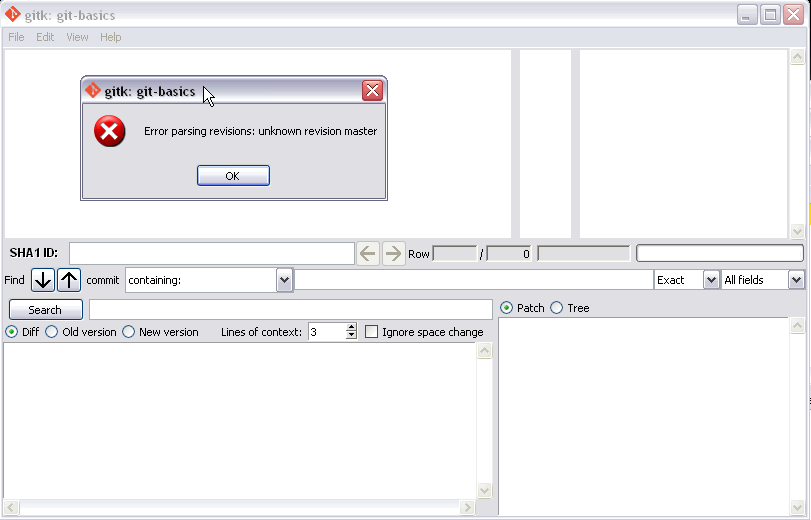
Git Basics 04 New Project Window (Part 3) – Visualize Master’s History Error
Thing is our project has no commits yet (commit is simply a “change” or series of changes to our files/project) and this function does not work yet.
STEP 5: Let’s go back to our project’s directory and see what happen there in the meantime:

Git Basics 05 Project Hidden .git Folder Created
We can see that Git created a special hidden .git folder that contains some system files. This is the actual structure that contains all the tracking info of our changes, git project database and stuff. If you delete this directory — your Git project will be dead. So, don’t unless you really want it to.
STEP 6: Let’s create our first empty file in our project — we code in PHP, so the first file will be called index.php
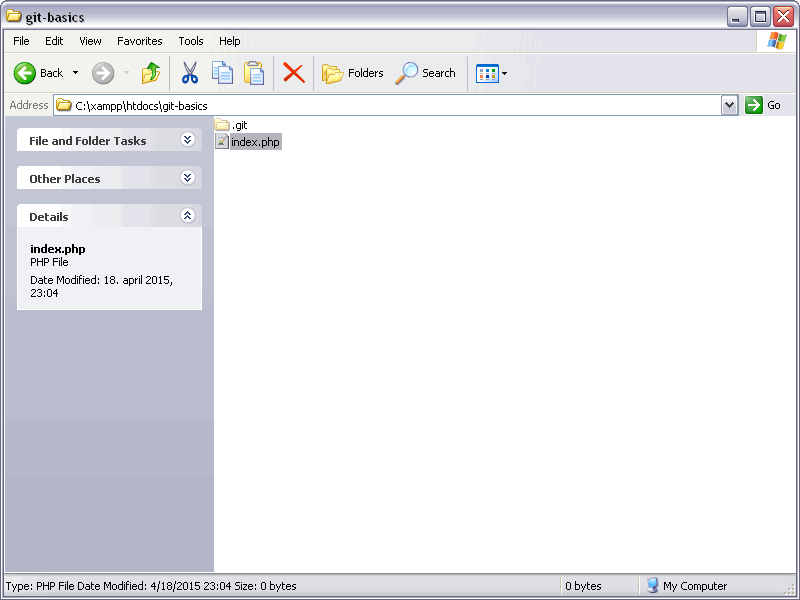
Git Basics 06 Create Empty PHP File
STEP 7: Now, go back to Git GUI window and press Rescan button to scan project’s folder for any changes:

Git Basics 07 Rescan Project Folder For Changes
This step is necessary each time you make a change to your files/project.
STEP 8: Once the Rescan task is completed (usually lasts couple of nanoseconds), you will see a message window like this:
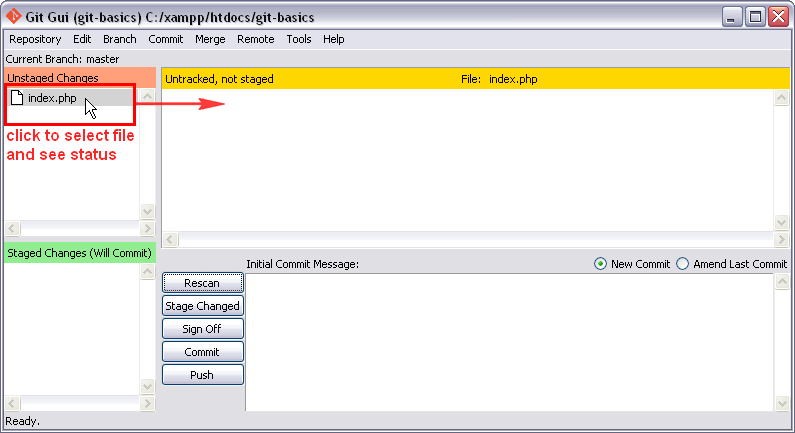
Git Basics 08 Rescan Completed – Check Changed File Status
On the upper left side is the small window that contains a list of changed files — you may click on each to see the status of the tracking. For our index.php file the status is:
Untracked, not staged
What does this mean?
Untracked means that Git is not aware of this file and any change you made before and you may make in the future will NOT be recorded in Git’s project database. Remember, all the fuss about SVN/RCS/VCS is to record/track any file changes that we create during development phase (and then some more).
Not staged means that Git is not prepared this file for commit yet (that is, it will not be added to the project’s database at all — it is not even “elected” for commit yet, let alone be actually merged into project’s tracking history). Every change you make needs 2 steps-process to be added/tracked/recorded into Git:
(1) stage/staging phase and (2) commit phase
Stage is just a yellow traffic light here saying: “This file will be added once the Commit button is pressed, but not before that. You are now just in a ready & wait state.”
For all practical purposes, think about “STAGE” command as a safe-guard and protection for yourself, if you accidentally add something into commit pipeline that it should not be there in the first place.
STEP 9-1: OK, lets perform those staging and commits, then: Stage New Changes (Part 1)
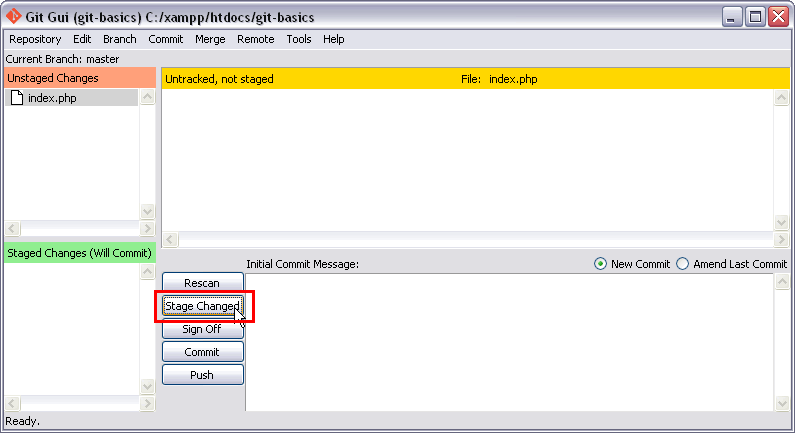
Git Basics 09 Stage New Changes (Part 1)
STEP 9-2: Stage New Changes (Part 2)

Git Basics 09 Stage New Changes (Part 2)
As we can see above, Git has detected a new file that we created (upper right window field) and in the lower left smaller window Staged Changes (Will Commit) title is enlisted our index.php file. So far – so good!
NOTE:
At this point you will probably (maybe – maybe not) trigger a warning message like this:
Updating the Git index failed. A rescan will be automatically started to resynchronize git-gui.
warning: LF will be replaced by CRLF in /path/to/file.
The file will have its original line endings in your working directory.
My thought is that this is happening because of Windows/Unix differences between line ends styles, Notepad++ Editor and the default installation setup you picked when you installed Git for Windows. In any case, select “Unlock Index” and it should replace them, or “Continue” to avoid EOL conversion process. Read here for more details.
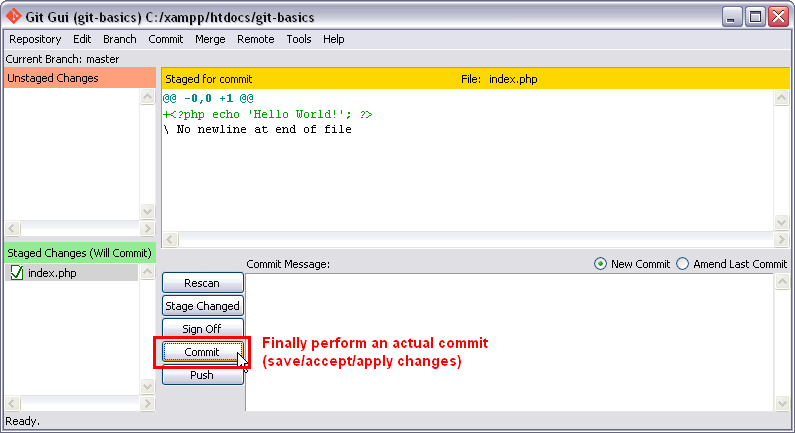
STEP 10: Now we finally need to apply our changes and record them – via Commit command:
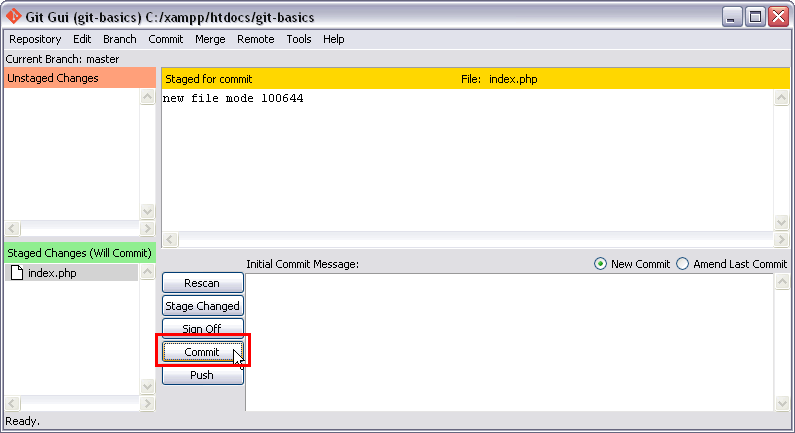
Git Basics 10 Commit New Changes To Project (1)
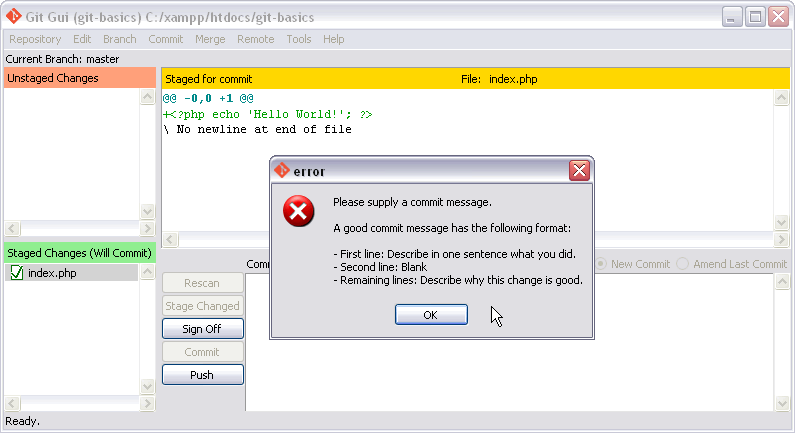
Once you press on Commit button, we will receive an error stating: “Please supply a commit message.” This is actually a good thing, it forces us to input at least some short description about what we are doing and the changes we have made:
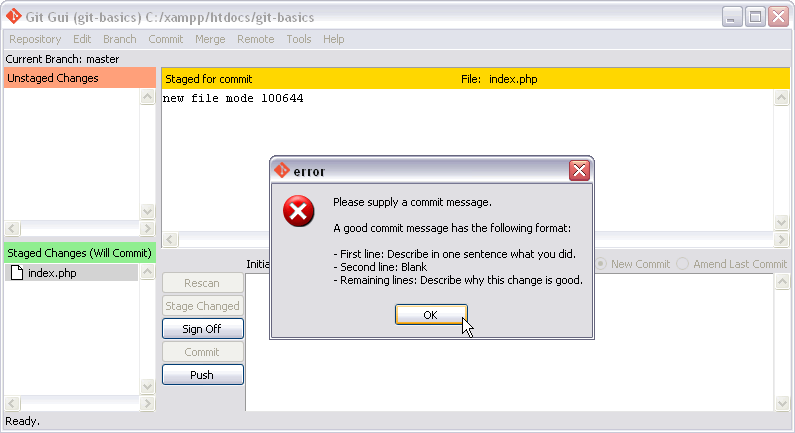
Git Basics 10 Commit New Changes To Project (2)
Try to be concise and creative here:
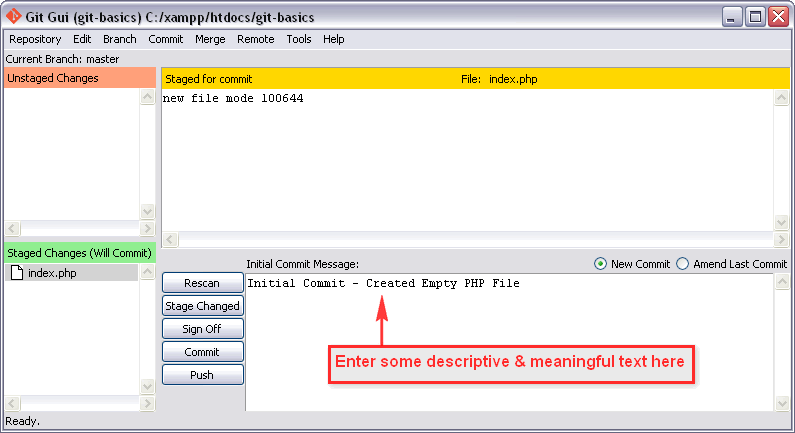
Git Basics 10 Commit New Changes To Project (3)
After a successful commit you will see a small notification about it in the lower status bar — and that’s it. As if nothing big just happened!
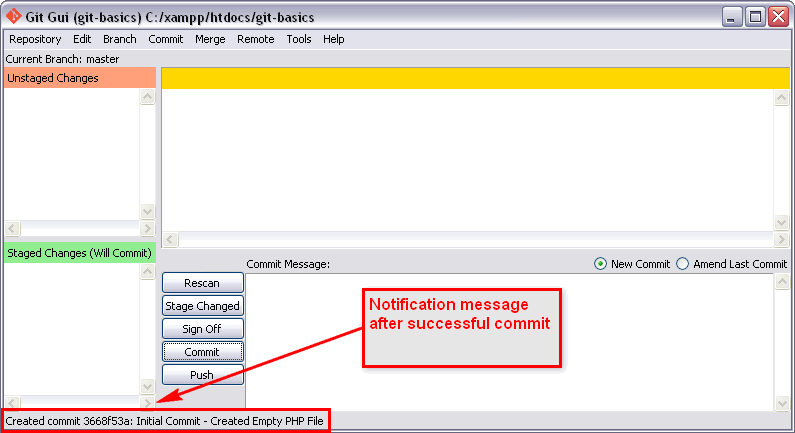
Git Basics 10 Commit New Changes To Project (4)
STEP 11: Time for some fancy stuff. Let’s go back to our Visualize master’s History command that did not work before and check if it will be the same this time:
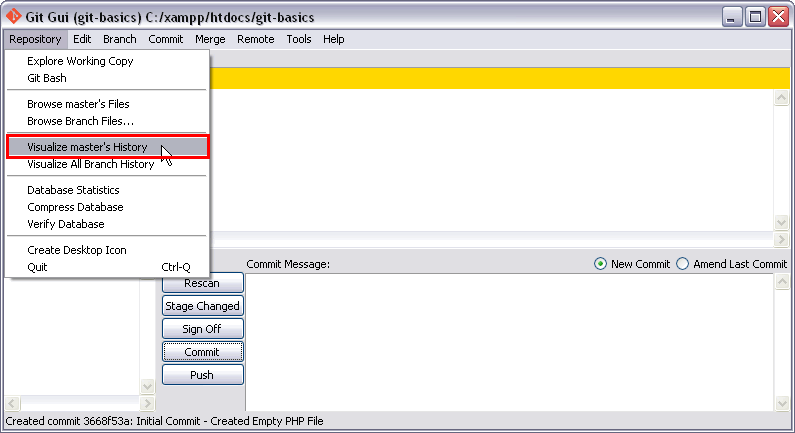
Git Basics 11 Project Visualize Master’s History (1)
It works! Now, we have officially made our first commit in our private, super-cool, top-secret project :)
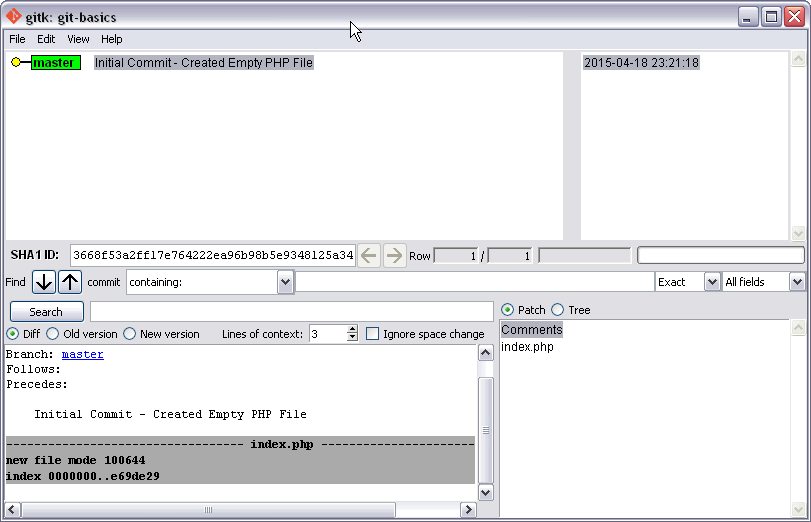
Git Basics 11 Project Visualize Master’s History (2)
And not just it looks great, but we can easily scroll to all our changes that we’ve made with recorded date and time, our contact information and so on (obviously, we’ve removed our email address from above screenshot for privacy reasons).
STEP 12: We will return to our index.php file once again and make some changes inside it. We will use Notepad++ text/code editor for this task (free/open-source/portable/great). Essentially, we will summarize steps 6-10 once again.
Git Basics 12 Edit Existing PHP File (Part 1) Modify Your Files
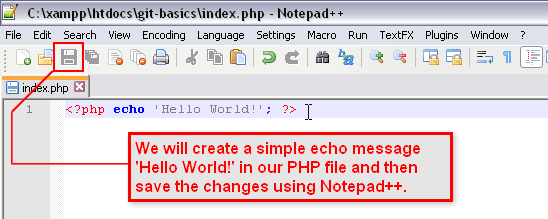
Git Basics 12 Edit Existing PHP File (Part 1) Modify Your Files
Git Basics 12 Edit Existing PHP File (Part 2) Rescan New Changes
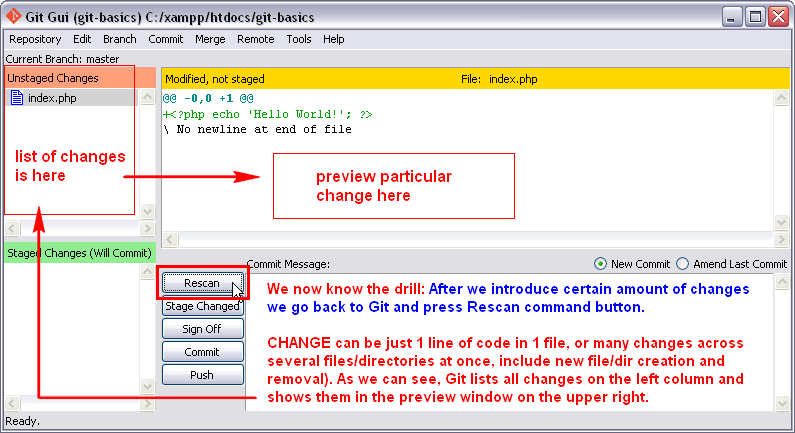
Git Basics 12 Edit Existing PHP File (Part 2) Rescan New Changes
Git Basics 12 Edit Existing PHP File (Part 3) Stage New Changes
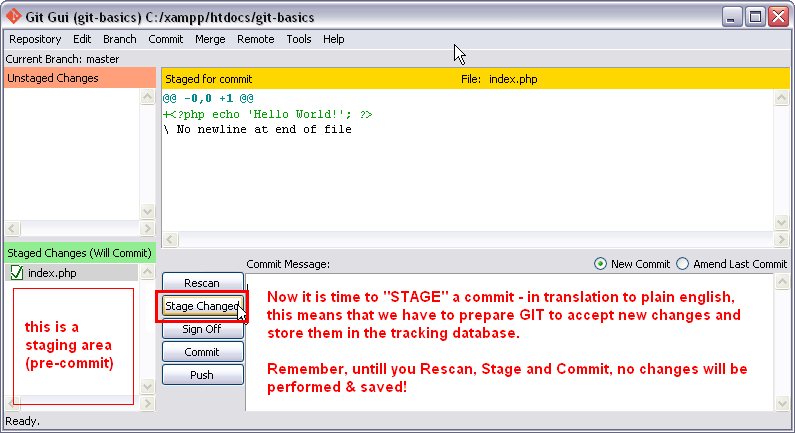
Git Basics 12 Edit Existing PHP File (Part 3) Stage New Changes
Git Basics 12 Edit Existing PHP File (Part 4) Commit New Changes
Git Basics 12 Edit Existing PHP File (Part 4) Commit New Changes
Git Basics 12 Edit Existing PHP File (Part 5) Do Not Forget Commit Description Message
Git Basics 12 Edit Existing PHP File (Part 5) Do Not Forget Commit Description Message
Git Basics 12 Edit Existing PHP File (Part 6) Do Not Forget Commit Description Message (cont.)

Git Basics 12 Edit Existing PHP File (Part 6) Do Not Forget Commit Description Message
Git Basics 12 Edit Existing PHP File (Part 7) Visualize Master Branch History

Git Basics 12 Edit Existing PHP File (Part 7) Visualize Master Branch History
Notice that changes are nicely colored: plus (+) sign at the beginning of the line means that the code was added (it is new) and it is in green, and the deleted or removed code starts with minus (-) sign at the beginning of each line and it is in red. Simple and effective! Blue lines represents internal Git’s comments with no changes.
ADVANCED TIPS: GIT SUBPROJECT MODULE
Of course, this is just the beginning and a tip of the iceberg. There are few more tricks inside Git for Windows GUI that you will master over time, but this is a good start. For example, say, in our project we wish to add another subproject (a 3rd party plugin, library, extension, module or whatever code not created by ourselves). IF that author also uses Git for tracking (and probability for that is extremely high nowadays), you may find a hidden .git file once you unpack that code you’d like to embed:
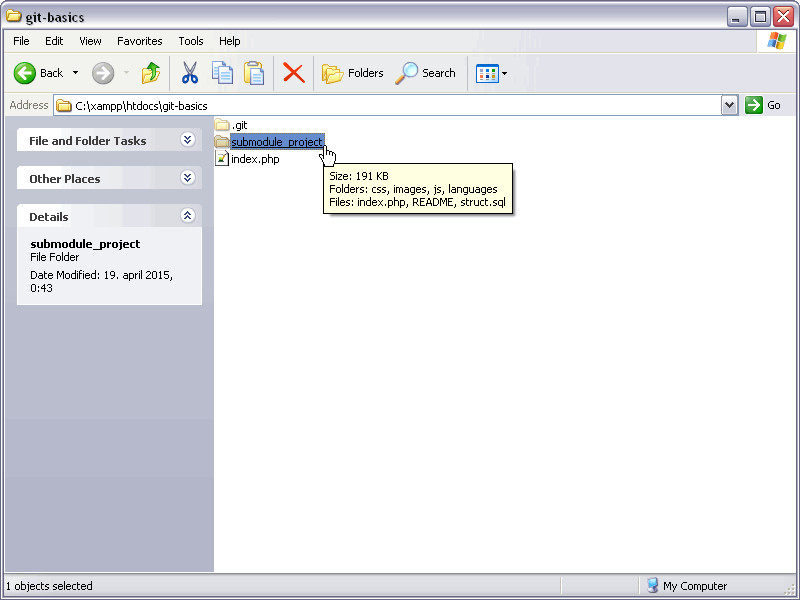
Git Basics 13 Advanced Tips (Part 1) Adding SubProject Module To Existing Project
The “subproject_module” directory name is just for educational purposes only, it may be a wordpress site, a plugin or whatever you need. And inside it we also discover a .git file that was NOT created by our Git app.
Git Basics 13 Advanced Tips (Part 2) Adding SubProject Module To Existing Project
As we can see in our next screenshot, staging and committing a subdirectory that also contains a “3rd party” .git subfolder will be treated as a “subproject” in this case (another Git technical term that you need to learn) and you may Rescan, Stage and Commit as much as you want, but it will always return Modified, not staged message with subproject module list:
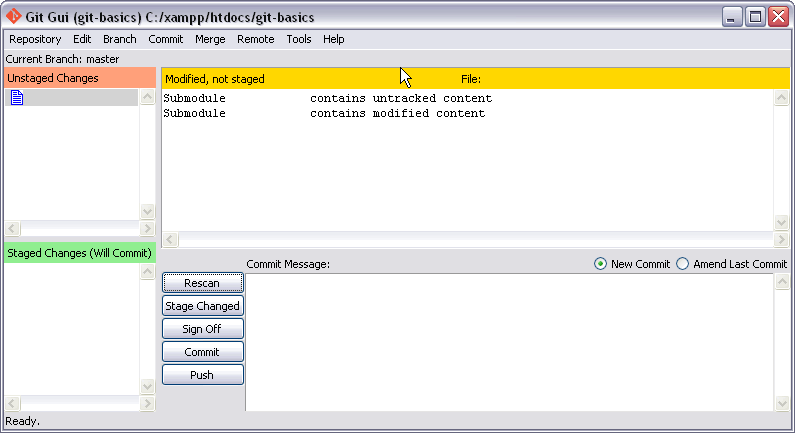
Git Basics 13 Advanced Tips (Part 3) Submodule Project Contains Untracked Content Issue
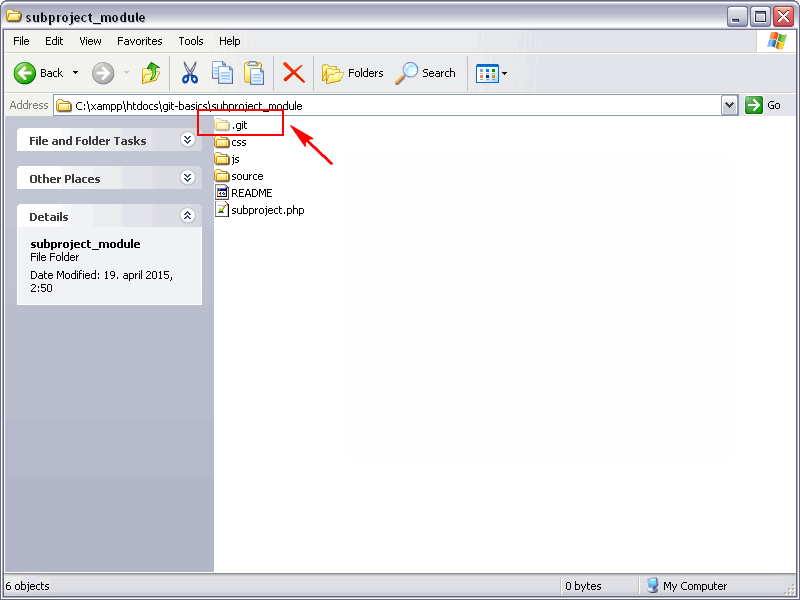
The solution for this issue is to simply remove / delete .gitignore file and/or entire .git folder from your subdirectory (sometimes it may be hidden in sub-sub-subdirectory that you should be aware of, so pay attention what you are adding!):
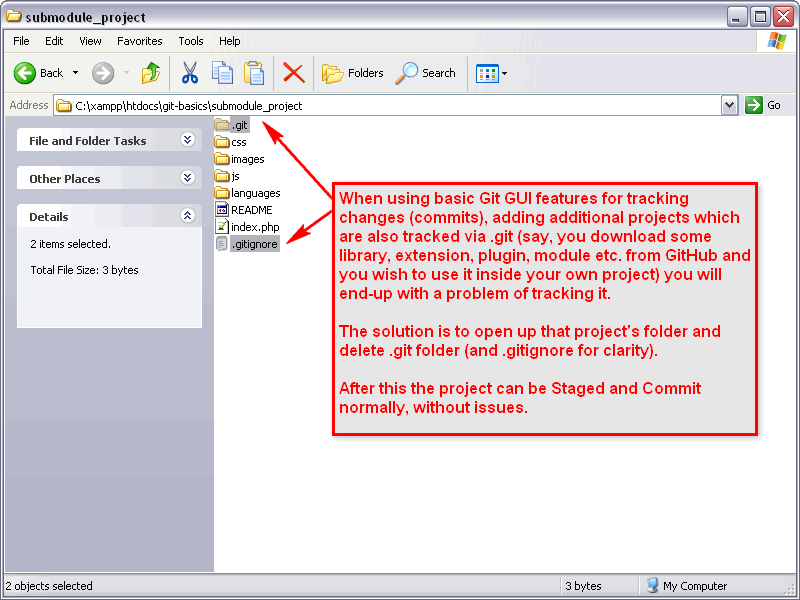
Git Basics 13 Advanced Tips (Part 4) Delete .git Folder From Submodule Project
CONCLUSION
This is the end of our basic Git for Windows Tutorial. Hope you learned something about Git, but keep in mind this is just a beginning. There are other topics you should learn about: how to create a remote repository (for example, hosted on GitHub, GitLab, BitBucket etc.) and sync with your local files. Learn about branches and merge between them, FETCH and PUSH commands and so on.
Git for Windows is one of the simplest GUI tools that are built around Git version control protocol, but it covers all the basics and then some more. Git BASH is a command line terminal that can do so much more than the GUI version, but that’s left for some other tutorial.


![Xiaomi App - How To Re-Install Stock Factory Version - How To Fix Corrupted Gallery App [no root]](https://tehnoblog.org/wp-content/uploads/2025/09/Xiaomi-Gallery-App-Code-Bugs-Artwork-1024x576.png)


7 Comments
Add Your CommentGreat ! tutorial, i started learning Git. i found many tutorials but,i ended my search with your blog.
December 30th, 2017Thanks for this tutorial.
Very good – clear and straight forward and reduced to the max ;-)
March 8th, 2018Thank you! :)
March 8th, 2018Thanks. Very good.
May 25th, 2018thanks for sharing very useful information
July 29th, 2018Nice Tutorial
January 25th, 2019Necessary information For GIT.
June 5th, 2019Thanks