

Article Last Updated: 05 Aug 2021
Viber is a very popular app these days, now even more than ever, because of a global pandemic with Corona virus (COVID-19) going on. In any case, there are few ways to make a simple backup of your chats before you permanently delete them.
Viber App Logo
Now, why would you want to delete them in the first place? Well, I for one, like to keep things clean on my screen, and occasionally remove staled and old chats. That makes my Viber app and phone overall performance much more stable and faster.
On another hand, I have friends and relatives which NEVER, like NEVER, delete anything from their chats, even when they move on to their new phones and do upgrades. Can you imagine how much stuff you can find in there? Practically, entire person’s history :)
Anyway, enough of the chitchat and let’s get onto work!
HOW TO MAKE VIBER APP MESSAGES & CHATS BACKUPS
METHOD #1: Use Viber Desktop PC or MAC version
Note: Only textual messages can be exported this way – images and videos cannot! You have to manually backup Viber media files using separate procedure (e.g. copy/paste Viber images and videos files and folders to SD card or external USB flash memory stick).
This method is excellent for manual individual chat backups (e.g. chats with specific person or group).
This method – watch video tutorial here – is a variation of the screenshot method, but instead on your phone, you can install Viber for Desktop on your PC and once you connect it with your phone’s Viber account (just follow instructions on PC, it is very easy to do it), all your chats will be there as long as you have it on your phone. You can then use screen capture or screen recorder app on your computer to make “analog” backup just as described in Method #2 above. But, that’s not the main trick this time.
However, on computers we can export specific chat messages into text document of choice (e.g. TextEdit, Notepad, WordPad, Word etc.) as explained in the video.
Still, nice thing is that messages will have date/time timestamps and participant’s names in chronological order, along with the textual content next to every line.
METHOD #2: Use Screenshot / Screen Capture feature
This method is kind of analog and slow, and it comes in two different flavors (so to speak) but you can take screenshots of your phone’s screen of your particular chat simply by scrolling one step at a time and taking screenshots or screen capture.
Yeah, I know. It can be a tedious or impossible job if the chat is endlessly long. But, still, this is great to take at least partial backups of important conversations and – on a plus side – you will, at least, have an exact chronological order of messages with image thumbnails and video clip previews.
To make a screenshot on most modern phones just click Power/Screen Lock button shortly at the same time with Volume Down button.
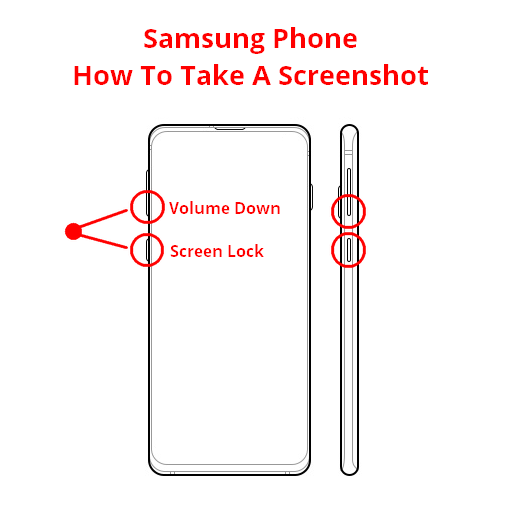
Samsung Android Phone – How To Take A Screenshot
On other phones like Sony Xperia you have to long-press Power/Screen Lock button and simply select Take Screenshot from the menu. Your screenshots are stored on your phone’s internal memory under Pictures > Screenshots folder or similar (use Gallery app > open a screenshot > then hit info/properties to find exact path). You can then use other ways to backup them to your computer, cloud storage etc.
To make a screen capture / video recording, you either have to download a dedicated app, or use a built-in one if it comes with such feature. For example, most Sony phones have an excellent built-in screen recorder feature, Samsung phones require special app to be downloaded and enabled from app store, and for other phones just google the best solution.
METHOD #3: Cloud Backup: Use Google Drive & Viber built-in backup function
Note (2020):
Only textual messages can be backed up and restored this way – images and videos cannot! You have to manually backup and/or restore Viber media files and folders (e.g. using copy/paste to/from SD card or external USB flash memory stick).Update (2021): Viber developers finally added a long requested option to include photos and videos in automatic backups!
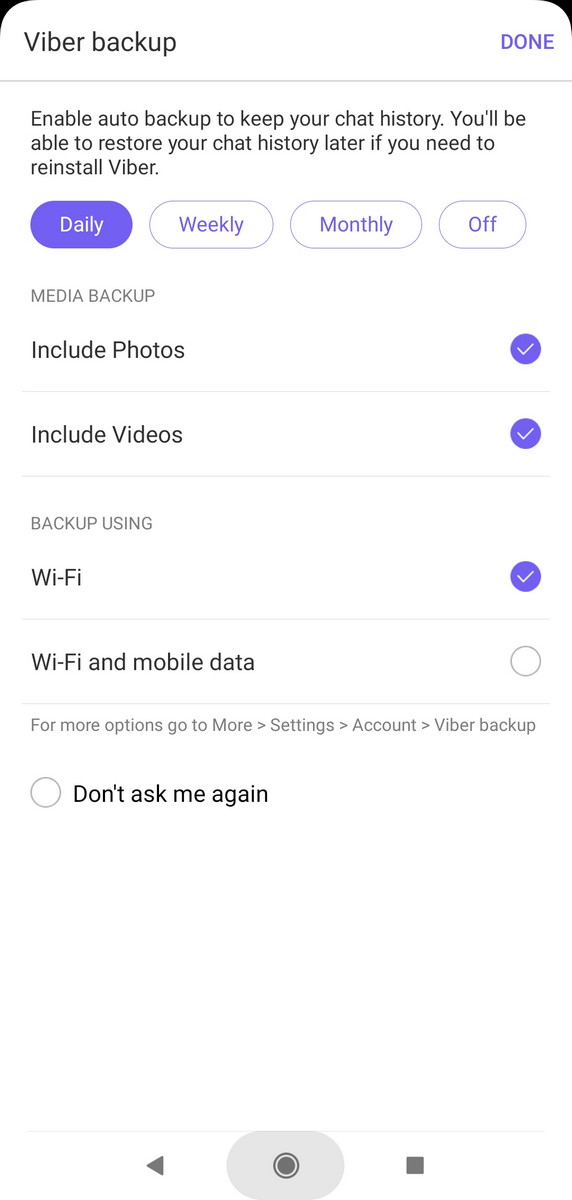
Viber App Google Drive Cloud Backup Feature 2021 Update – Includes Photos and Videos
- Go to Viber’s ≡ More button (look at the bottom right corner) > Settings > Account > Viber backup
- Connect Viber to Google Drive account (your regular Google Play Store account or a new one if you use Apple iPhone)
- Now you will have the option to export ALL your current chats as TEXT MESSAGES only (not pictures and videos!)
Where are Viber cloud backups stored?
Once a Viber cloud backup is created, you’ll be able to find it on Google drive tied with your selected Google account (Gmail address and password), but the files themselves may be encrypted (test it first before you permanently delete your original chats!).
Backup is hidden / not visible in your G drive like other files, it is stored under HIDDEN APPS menu. You can access backup like this: open G Drive Settings (top left gear circle/wheel icon) > Settings > click on Manage Apps on the left pane of the new popup window, there should be Viber App listed
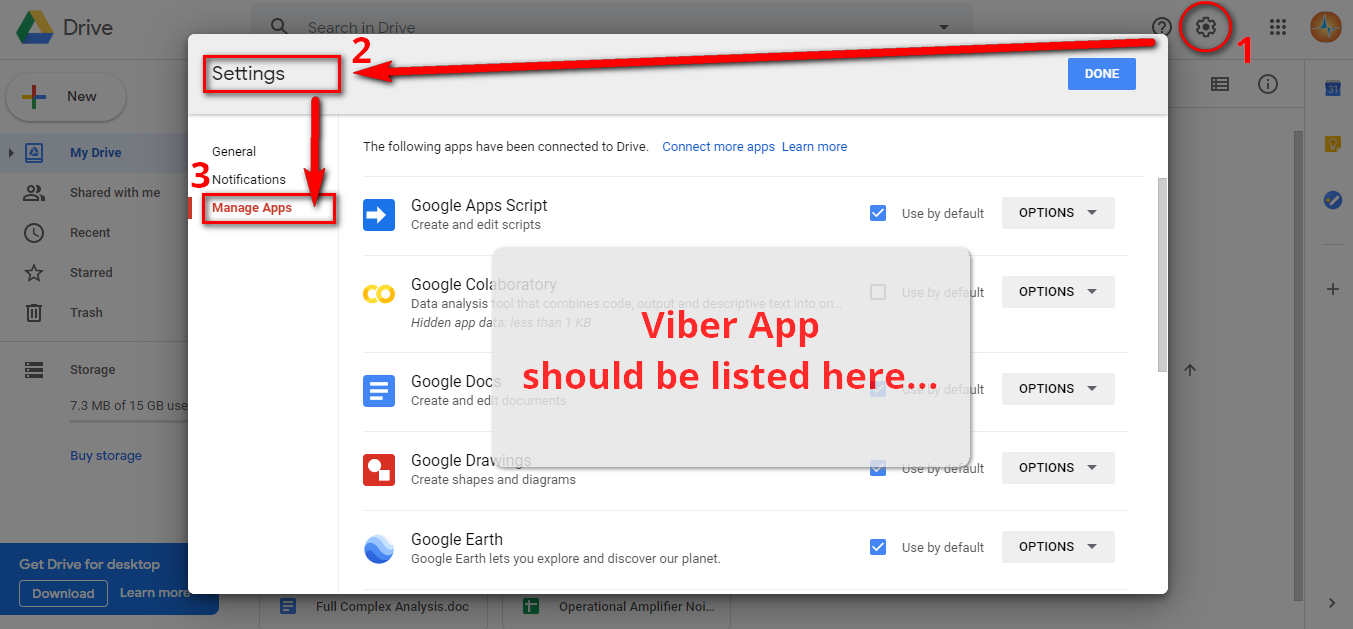
Google Drive – Where Are Viber Backups Located
CONCLUSION
Hopefully, these ideas above will help you choose the best backup strategy.


![Xiaomi App - How To Re-Install Stock Factory Version - How To Fix Corrupted Gallery App [no root]](https://tehnoblog.org/wp-content/uploads/2025/09/Xiaomi-Gallery-App-Code-Bugs-Artwork-1024x576.png)


Comments
Post A Comment