

How to uninstall & reinstall Intel CPU Stock cooler? How to replace old thermal paste with new one?
Recently, I decided to revamp my old, almost forgotten, Core2Duo powered desktop PC, which, amazingly, still works perfectly fine as a media/internet PC, and has enough power to run Full HD videos, even at 60 FPS. As part of the upgrade process, I had to replace thermal grease on an aged processor. Core temperature was fine during winter, but at peak summer hot waves it was getting dangerously high — above 80 degrees Celsius!
Recommended Reading
Thermal compound layer (thermal paste) should be replaced at least every couple of years or so, depending on your usage pattern. If the PC is running 24/7, paste will not thicken that easily over time, and should last longer theoretically. At another corner, when you turn off your PC, the TIM layer will naturally become stiffer and dry (cake-like), turn into small particles or dust, sort of crumble away from the surface and over time effectively lose it’s properties.
Also, you might have discovered that not every thermal compound (paste) is made equal, some are extremely cheap (likely the one you already have in your system), and others are quite expensive. So, you wish to buy a new paste and replace the cheap one you already have on your Intel CPU? This guide may help you in that case!
Video Tutorials
INTEL CPU Stock Cooler Thermal Paste Replacement Step-By-Step Guide
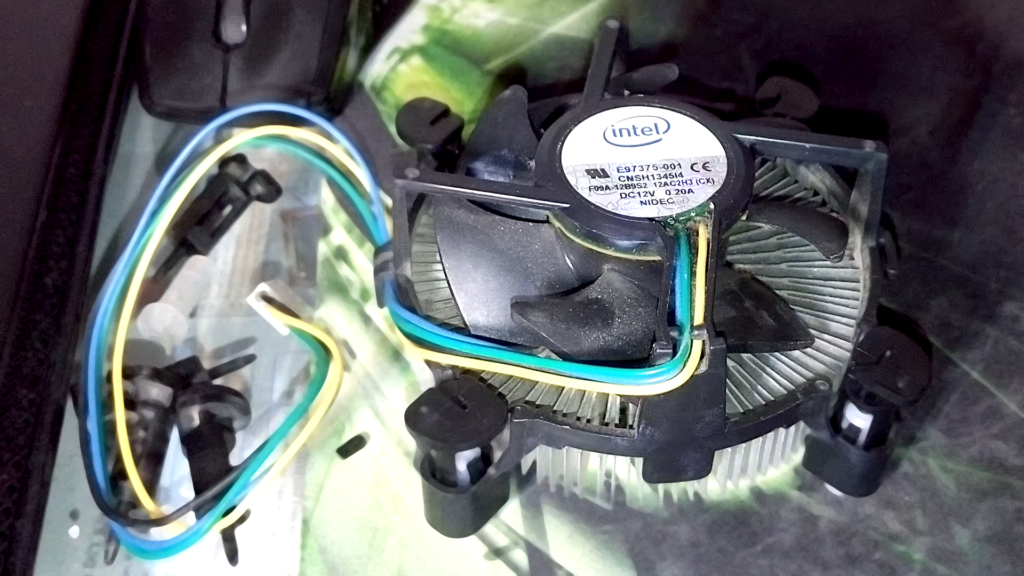
INTEL boxed (as opposed to tray) versions of desktop computer (PC) processors (CPU) usually come with stock coolers (except models intended for over-clocking purposes, for example), which are composed of a relatively small sized heat sink and a fan that works in the range of 1000-2000 RPM (rotations-per-minute).

INTEL CPU
I am mostly satisfied with stock coolers when it comes to normal computer usage (e.g. multimedia/internet PC and occasional serious work like gaming), but most power users will see them as inferior (e.g. too loud, not providing enough adequate cooling etc.). Still, they are cheap, and the price is included when you purchase your brand new Intel processor.
As mentioned, INTEL Core2Duo E8400 processor has enough power to run Full HD videos on its own, even at 60 FPS. It does struggle with 4K videos without dedicated GPU help, but 2.5K works fine at 30 FPS. It was part of a legendary C2D series, back in time when Intel seriously ‘trashed’ AMD’s grounds. Bottom line, in my opinion, it is still usable and respectable hardware!
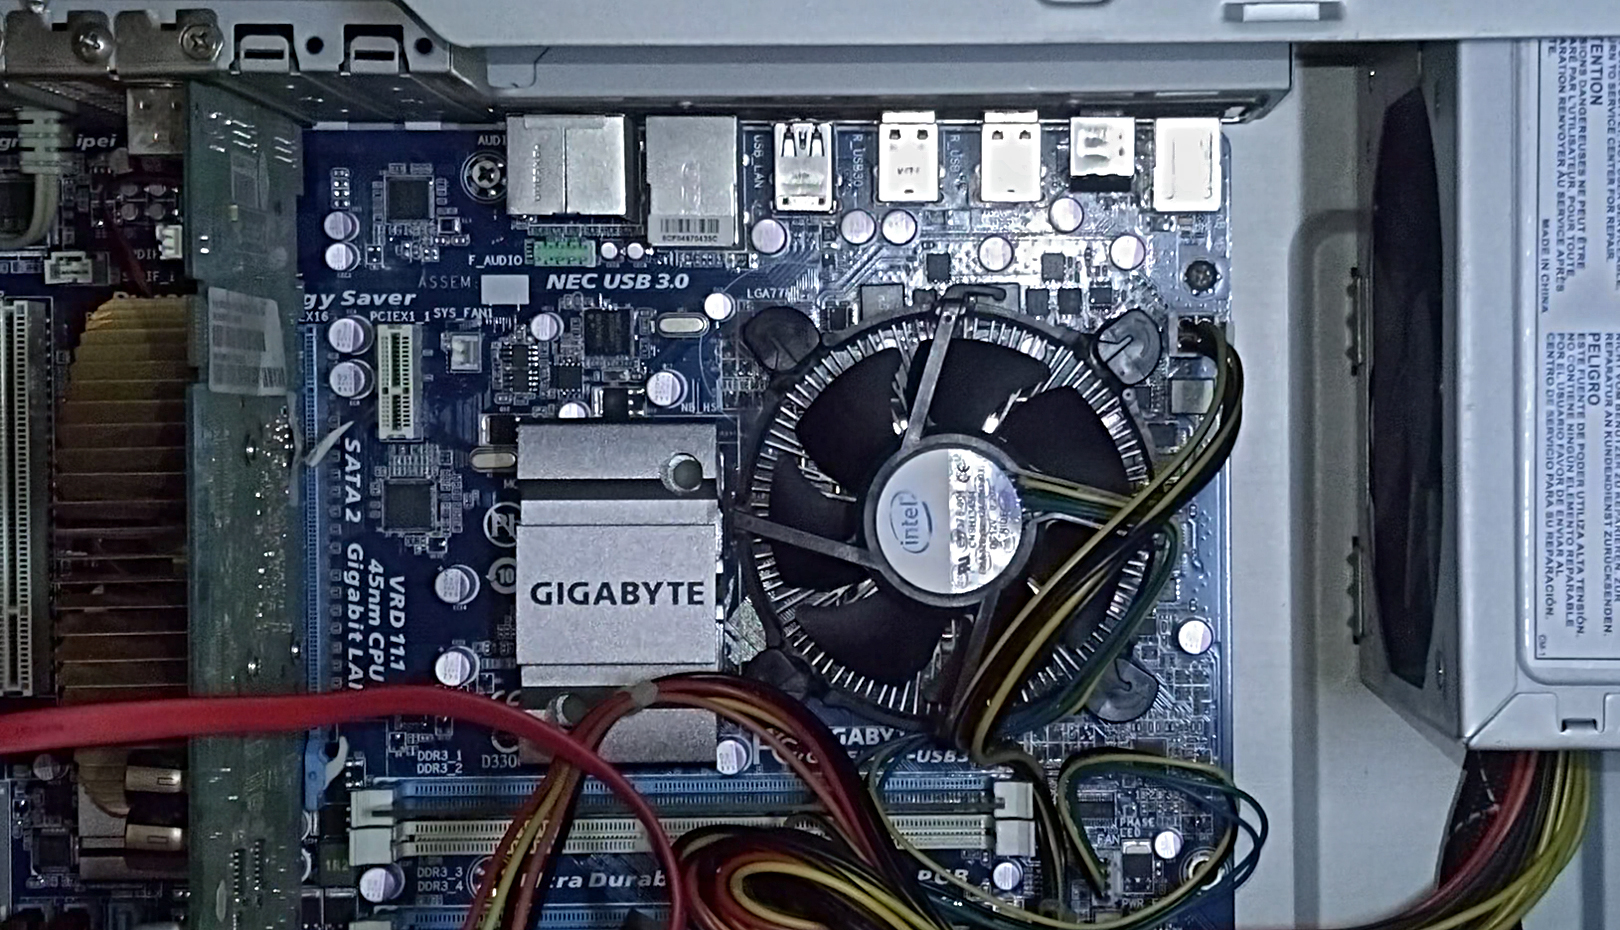
INTEL CPU with Installed Stock Cooler
Additionally, along Windows 10, I also run Lubuntu-based virtual machine in parallel that runs NAS server, coupled with my external hard-drive library that serves as a local network storage (a.k.a. local home version of a cloud storage).
All that gave me more than enough reasons to upgrade it a little: install SSD on system partition, add more RAM and couple of extra hard-drives for extended storage. But one thing that recently started to annoy me is the increased CPU fan RPM value, which was probably a result of more hard-drives inside the case.
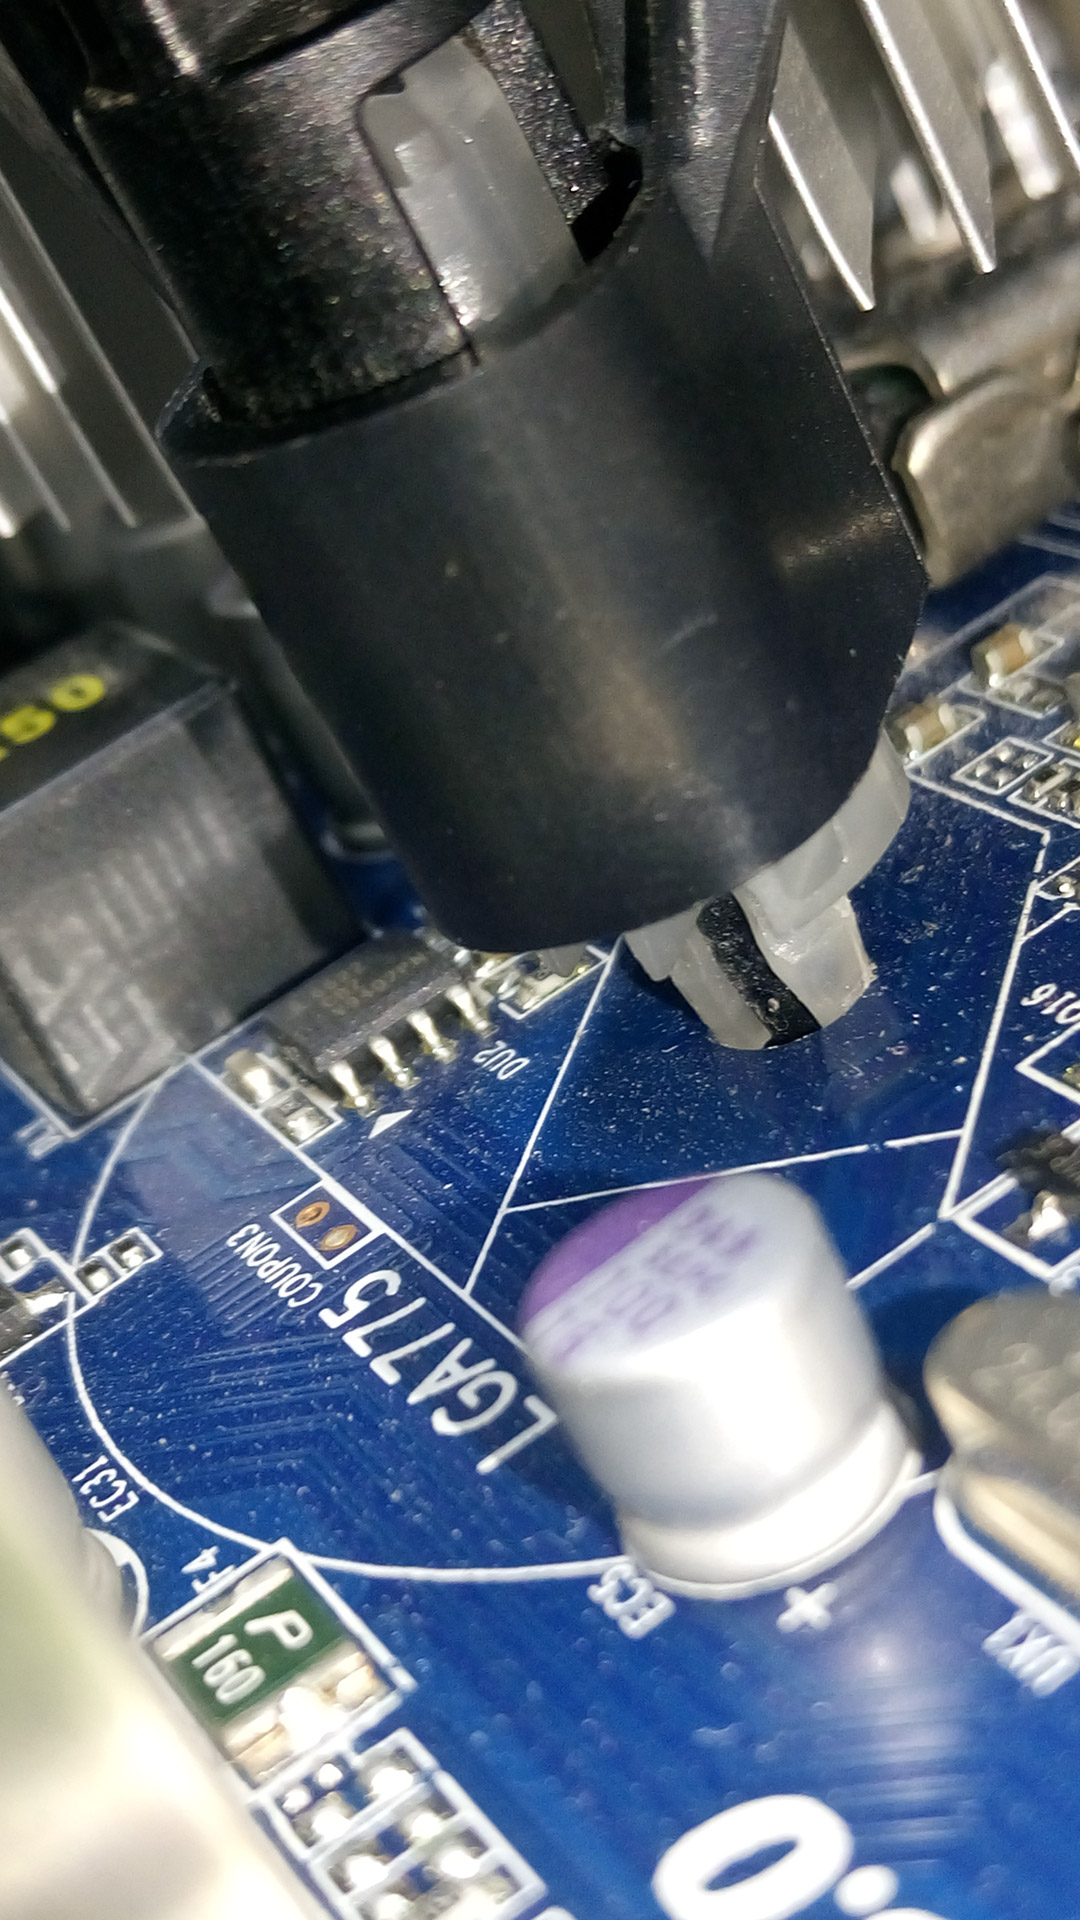
INTEL CPU Stock Cooler – Push Pin Close-Up
Anyway, I decided to check the situation with the thermal layer between heat sink and CPU’s IHS (integrated heat sink) surface, and to my surprise, it was not good! Thermal paste layer looked like half of it “evaporated” over the years, and CPU temperature was around 45 degrees at no load.
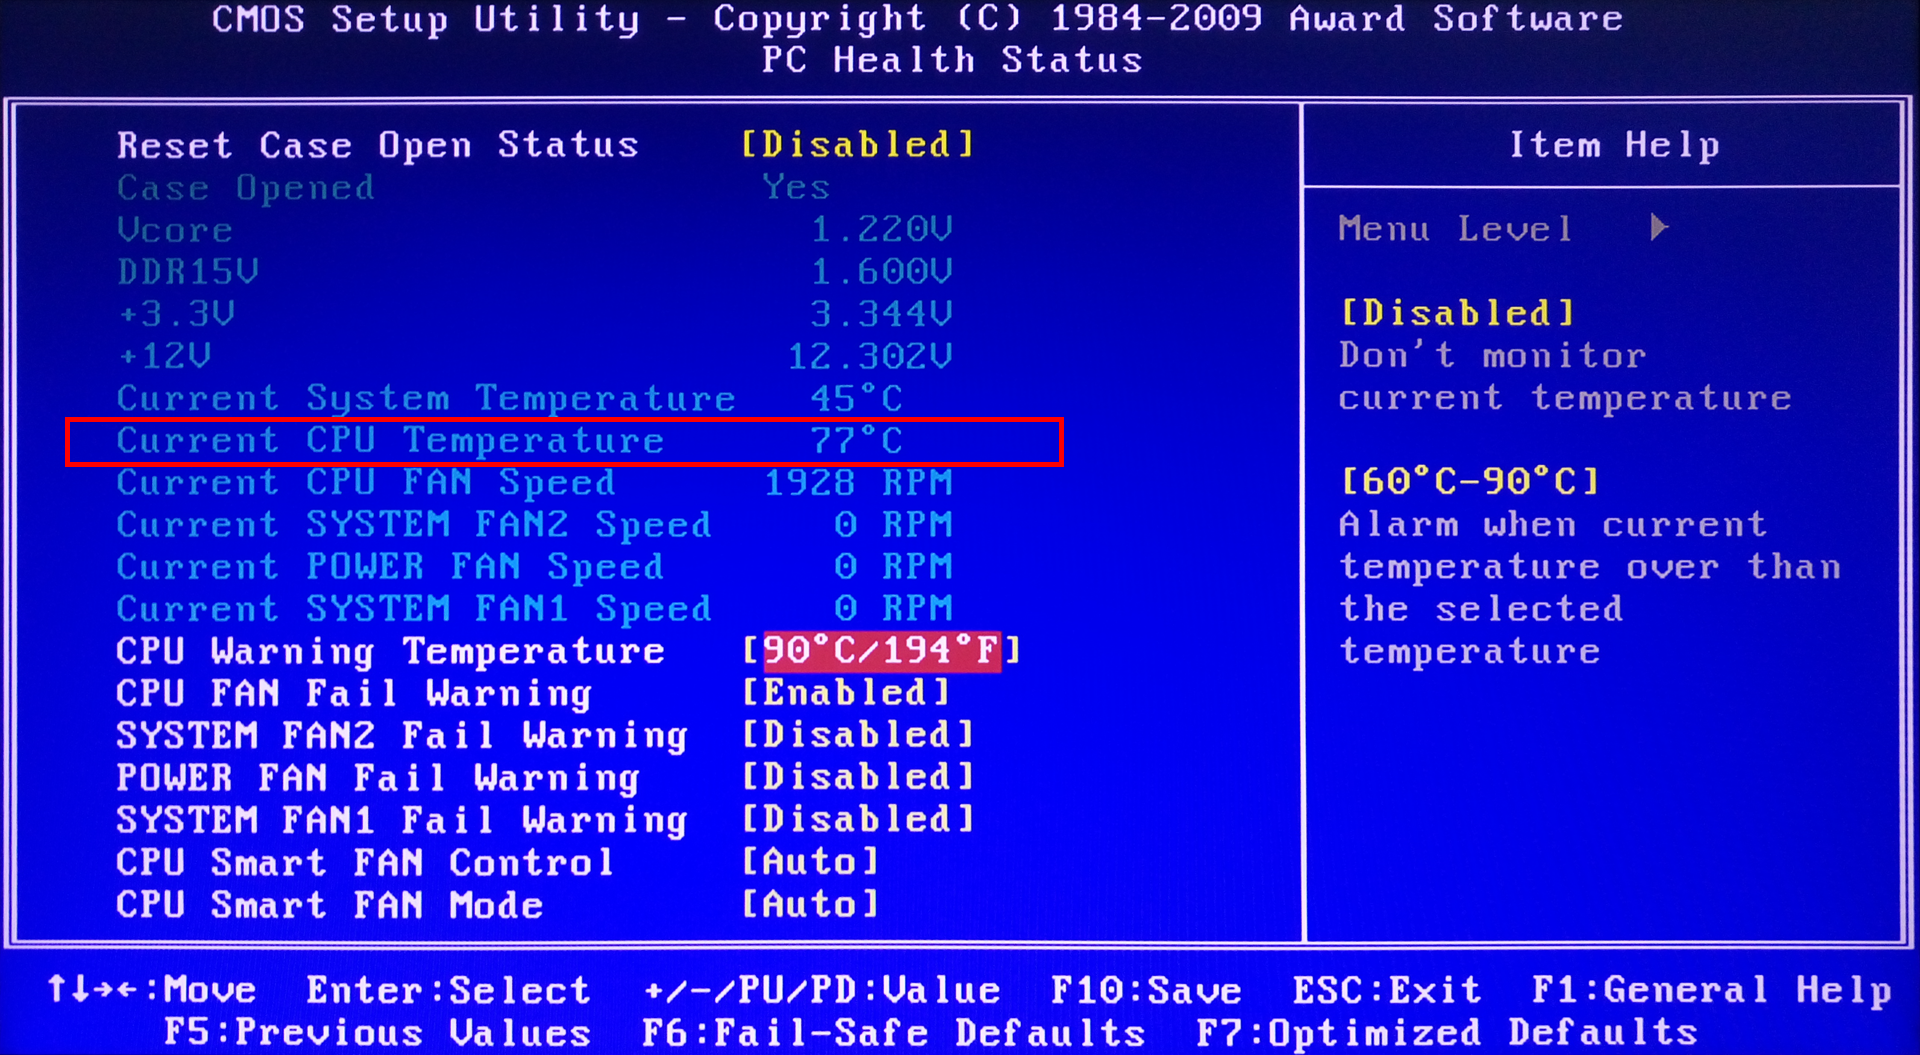
After disassembling and replacing thermal paste layer with fresh one, CPU temperature went down to 39-40 degrees at no load (which is great for this CPU generation and stock cooler), and CPU fan’s RPM went down to 1200 in idle state. Great and definitely worth the trouble!
STEP-BY-STEP TUTORIAL
STEP 1 Safety First!
- Turn-Off your PC and disconnect the power cord.
- Remove case screws and access CPU area.
STEP 2 Remove Stock Cooler
- Disconnect CPU Fan connector from the motherboard
- Uninstall heat sink + fan assembly as instructed in the video
STEP 3 Housekeeping Time!
- Clean CPU surface to remove residue of old thermal paste
- Clean Heat Sink surface to remove residue of old thermal paste

Static Electricity
For this task I used ordinary kitchen towel and literally few drops of tap water. Not ideal, but that was all I had laying around at the time of doing this. Ideally, you should use specialized anti-static poly-shield wipers and isopropyl alcohol. Oh, well…
STEP 4 Apply Thermal Paste Compound
There is a huge debate about right amount of grease and method of application:
- BIG vs SMALL blob at center
- THIN vs THICK spread
- Dots / Tapping method (used in this video)
- …
I don’t plan to succumb to pointless discussions and “thermal paste wars” in here, as that is absolutely pointless. First of all, point of adding thermal paste layer in the first place is to fill-in the microscopic gaps or air pockets that have very bad thermal conductivity property. Those gaps are miniature in nature, and so is the requirement of grease layer – don’t overuse it! First, it will cost you more, and second: thermal paste does not dissipate heat that well as your heat-sink + fan does. It is not a replacement for your cooler assembly!
In most cases, method of application and amount of thermal compound does not matter much on desktop CPUs because of a (relatively) large heat-sink and fan cooler, that will compensate for all variations. Assuming proper contact between heat-sink and CPU surface, you can expect couple of degrees variance at best. If the contact is bad (e.g. because of improper cooler installation), there’s not enough thermal paste in this world that will save you from high CPU temperatures, premature / unexpected thermal shutdowns, and even burning and permanently damaging your processor!
Bottom line: Just use common sense and be reasonable :)
STEP 5 Re-Install Cooler
- Re-connect CPU Fan connector with the motherboard
- Install heat sink + fan assembly as instructed in the video
Finally, access BIOS or use desktop CPU Temperature monitoring apps (e.g. HW iNFO, HWMonitor, CoreTemp) to verify that the temperature is within normal range with (1) no load and (2) under stress / full load. For Intel CPU stress test you can use IntelBurnTest.
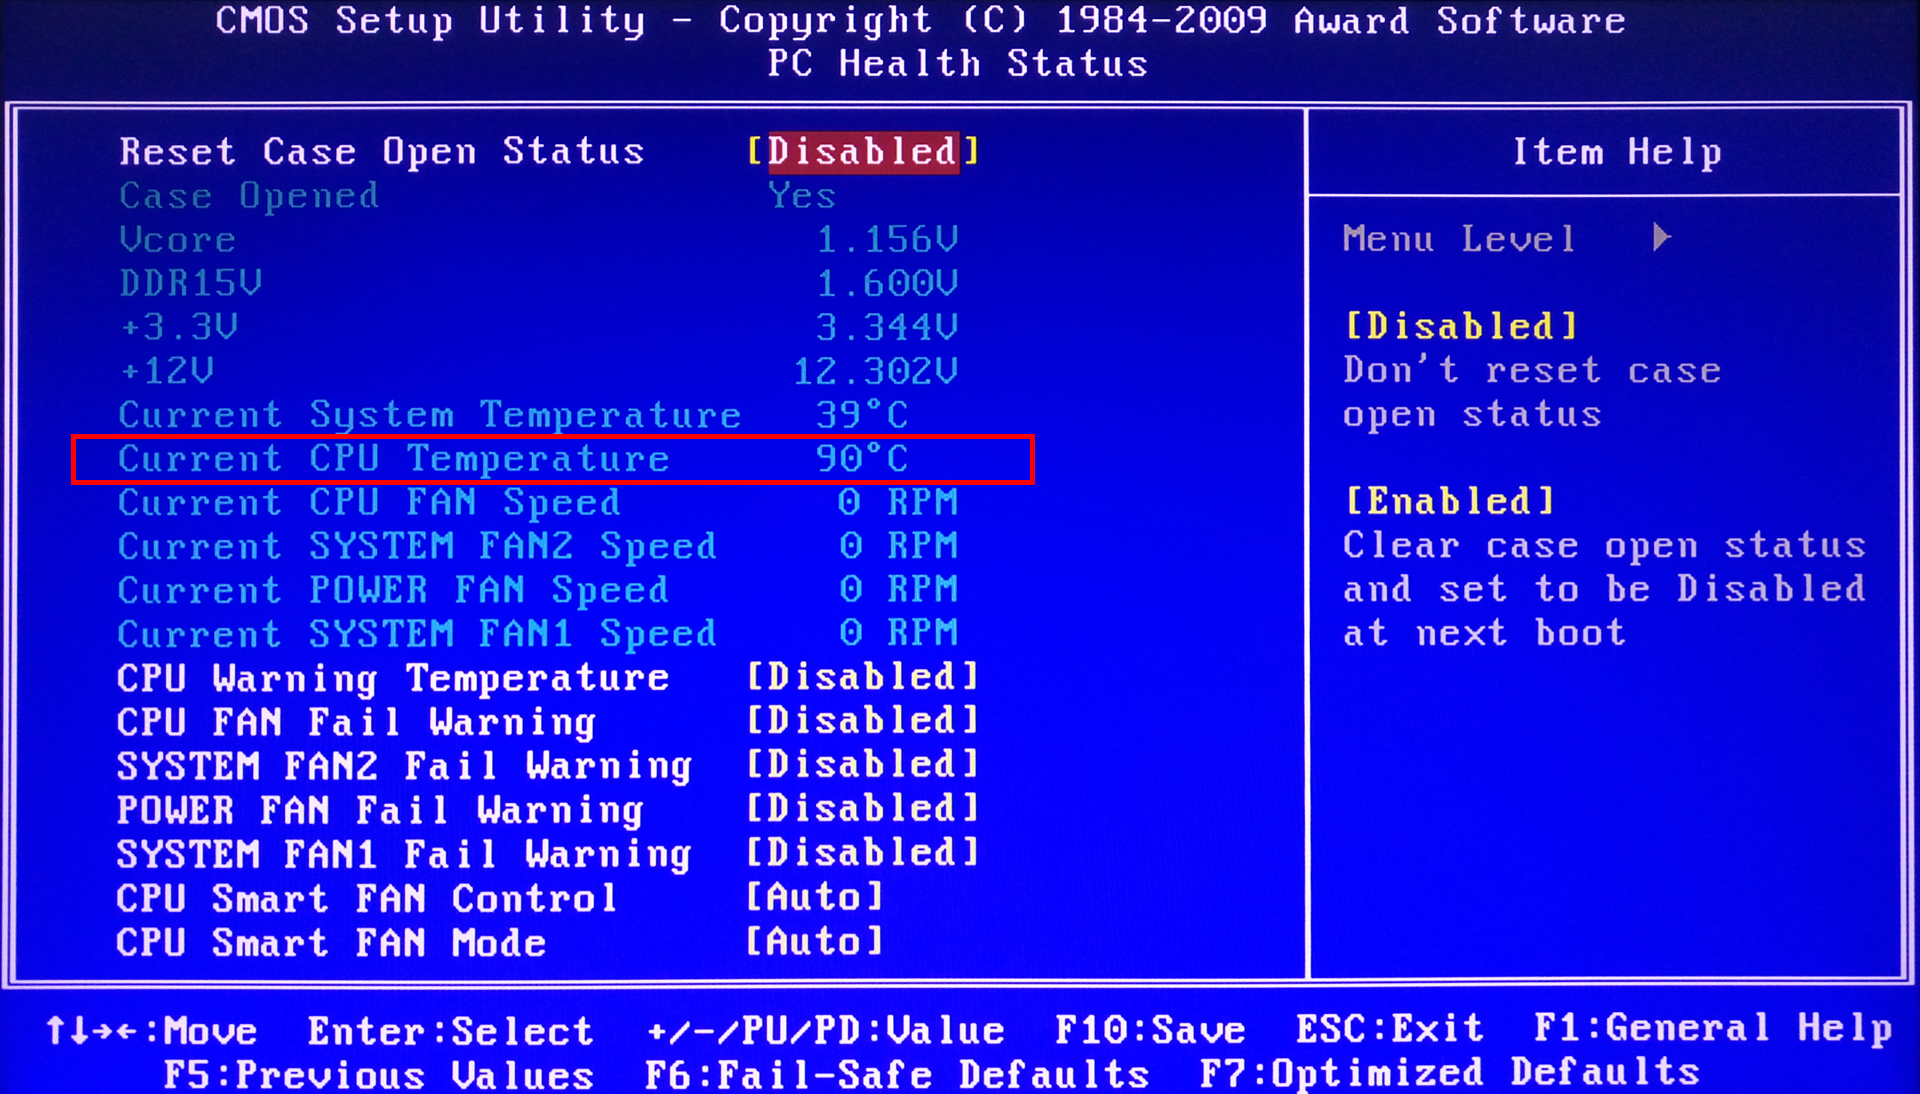
INTEL CPU Temperatures – Stock Cooler Inappropriate Installation + Fan OFF
INTEL CPU Temperatures – Stock Cooler Inappropriate Installation + Fan ON

INTEL CPU Temperatures – Stock Cooler Proper Installation + Fan ON
After you make 100% sure that everything is all right, close the computer case and re-connect peripheral devices (mouse, keyboard, monitor…).


![Xiaomi App - How To Re-Install Stock Factory Version - How To Fix Corrupted Gallery App [no root]](https://tehnoblog.org/wp-content/uploads/2025/09/Xiaomi-Gallery-App-Code-Bugs-Artwork-1024x576.png)


1 Comment
Add Your CommentVery helpful. Was able to perform my first CPU repasting when poking around in an old machine. Watching someone show that working with their hands and that having a bit of trouble with these things was normal gave me more confidence to complete the task without thinking that I’d break it.
January 3rd, 2020