

FreeFileSync is an awesome freeware tool for files and folders synchronization and backup. It has a lot of premium-like features (but for free!) that no other freeware tool on the market can match today, and it even outmatches many premium backup & sync tools out there.
However, one of the most overlooked (or least understood) feature of this absolute must have for sys admins and advanced home users is — real-time synchronization. How does it work? How do you setup real-time folders sync with FreeFileSync?
Files & Folder Synchronization
In this tutorial we’ll show you how to utilize real time sync / backup on Windows 10 operating system in just a few relatively simple steps. It will look extremely complicated and convoluted, but once you go through, it’ll become a routine task to set up later.
FreeFileSync – File Types (Extensions) Explained
FreeFileSync has a little bit convoluted procedure for creating real-time synchronization between folders,
but first let’s learn one important thing which will help us better understand and go throughout the tutorial later.
FreeFileSync can generate 3 different kind of files (extensions):
- *.ffs_gui
- *.ffs_batch
- *.ffs_real
All 3 extensions have different use cases.
Of course, *.ffs_gui is straightforward to explain: it is simply a settings file of all the options you set in the main program (app) windows with graphical user interface (hence, _gui part), containing folder pairs, sync modes, exclusion list etc. In another words, this is simply a backup file of main program configuration.
All 3 above files are actually XML file types, so if you understand basic XML or HTML structure, you can open them with Notepad++ or similar code editor and examine their “secret” content!
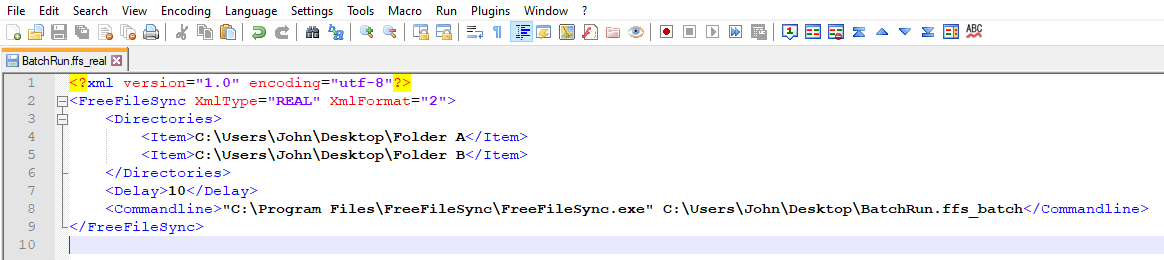
FreeFileSync ffs_real XML File Code Example
FreeFileSync – How To Setup Real-Time Folder Sync In Background
PART 1
- Install FreeFileSync
You will have 2 shortcuts on your desktop: FreeFileSync (green arrows icon) and RealTimeSync (red arrows icon).
Do not run RealTimeSync.exe yet, especially if you are a beginner, there’s a much easier workaround to configure it!
PART 2
Run FreeFileSync.exe first. This is required in order to generate batch template file (*.ffs_batch) which we’ll need later:
- Create Folder A (source) and Folder B (backup) pairs ( or alternatively you can set drive roots e.g. D:\ and E:\ ), set synchronization mode, and things you usually do with FreeFileSync.
- Save this newly created job as a BatchRun.ffs_batch file (IMPORTANT: DO NOT SAVE IT as *.ffs_gui — we don’t need that one now!!!)
Look for the last diskette icon with dark square and CMD (command line) cursor and green arrow symbol overlay in the upper left corner for Save as a batch file command:
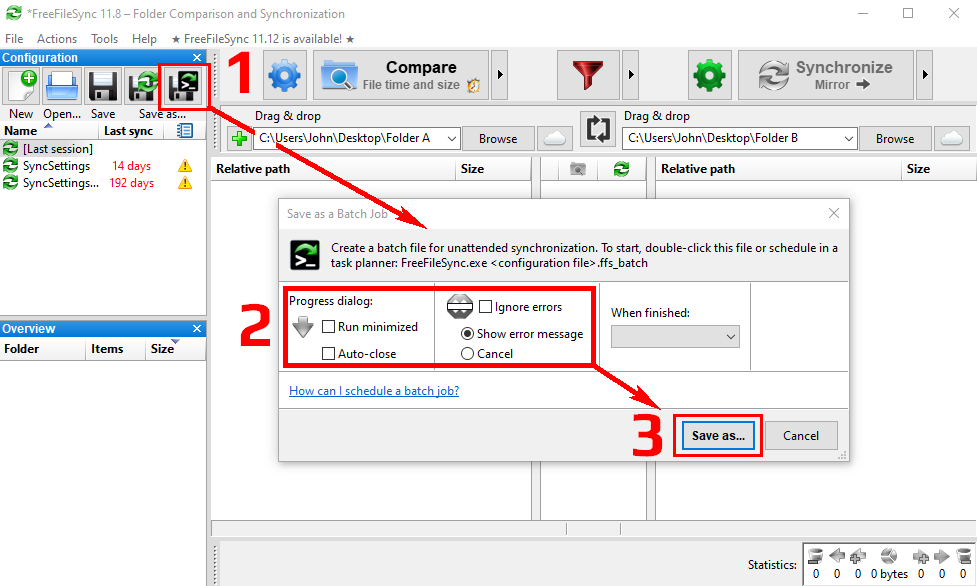
FreeFileSync – Save Sync Job As A Batch File
You can select optional checkboxes to run batch job minimized (recommended), ignore errors (nope!) and shut down or put computer into sleep when done (we don’t want this either).
PART 3
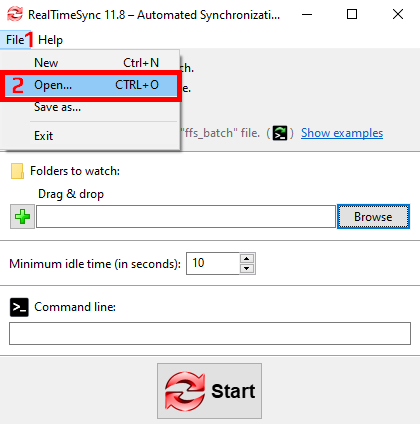
Run RealTimeSync.exe now
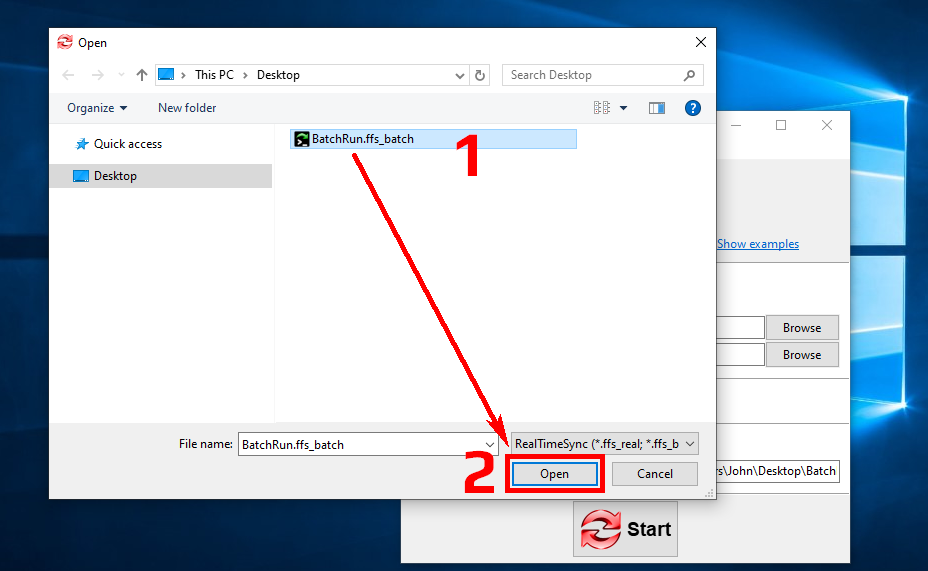
- In RealTimeSync app click on File > Open… to load above created BatchRun.ffs_batch file into RealTimeSync — or use drag & drop into app’s window in newer versions.
- New settings will be automatically filled-in into all relevant fields. Optionally, you can change minimum idle time delay between actual folder change and sync trigger.
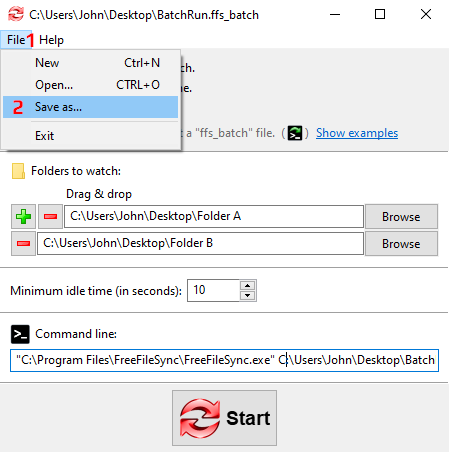
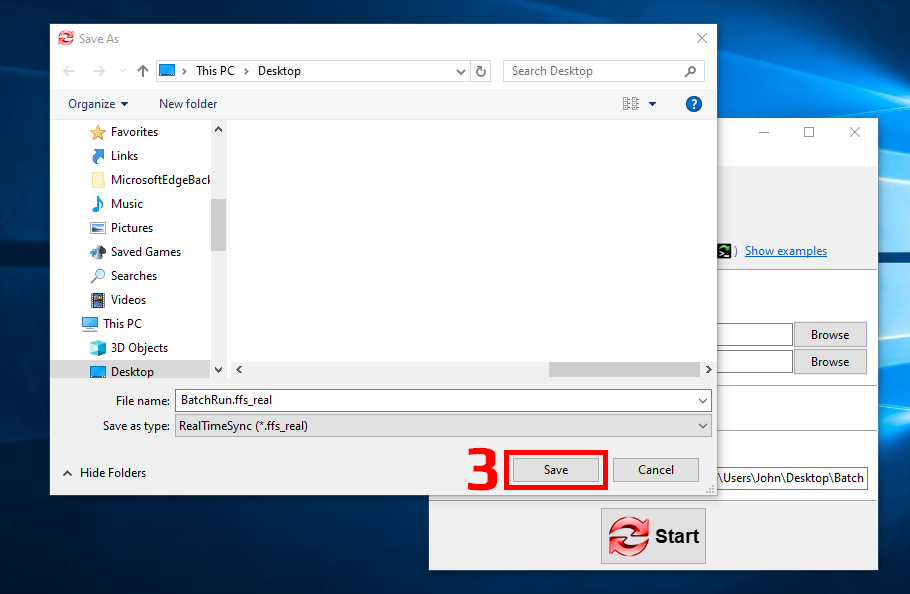
- File > Save As… this new real-time sync configuration as BatchRun.ffs_real file.
NOTE: save/keep it in a safe location because we’ll use it regularly each time our PC starts / boots!
RealTimeSync – Load Batch File 1
RealTimeSync – Load Batch File 2
RealTimeSync – Save Real File 1
RealTimeSync – Save Real File 2
PART 4
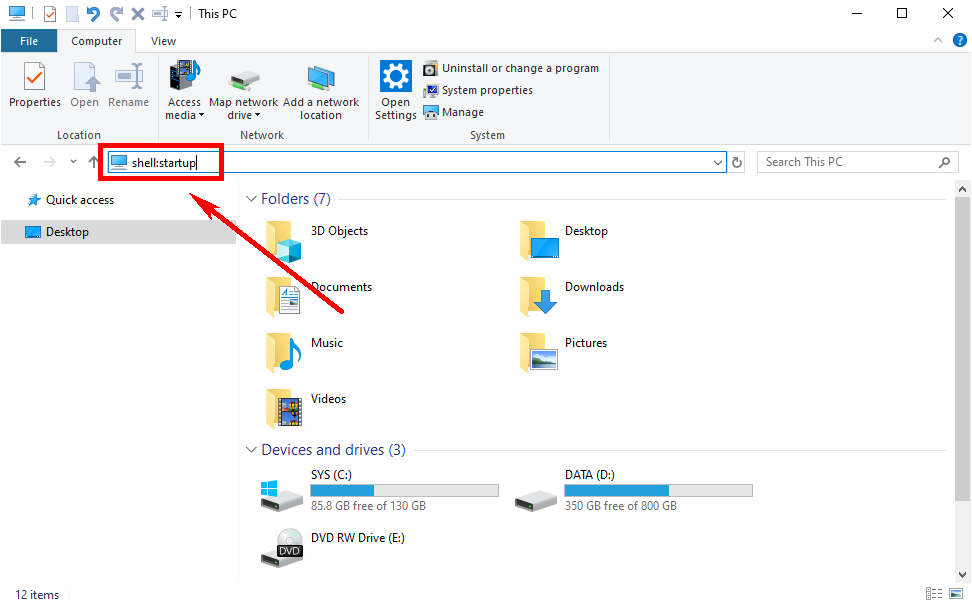
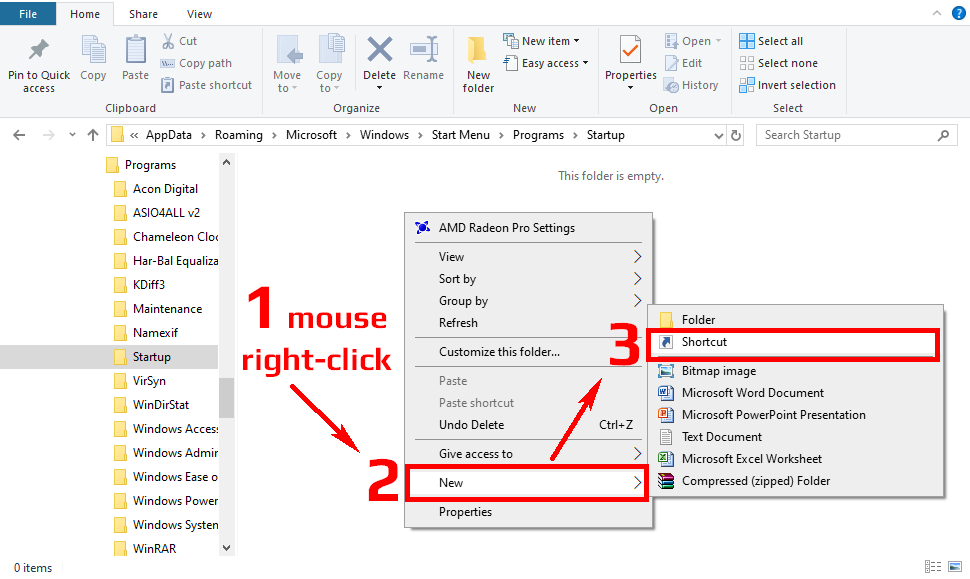
- Open Windows Explorer and type shell:startup in the address/location bar field + hit ENTER key — it will open traditional startup location for Windows apps/programs.
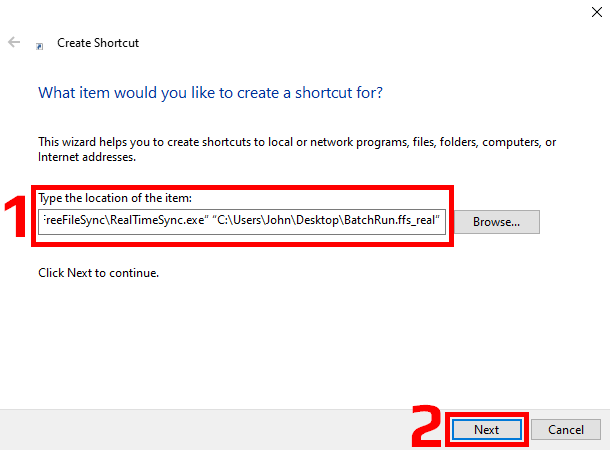
- Right-click with your mouse > new shortcut in here and paste a line similar to this:
"C:\Program Files\FreeFileSync\RealTimeSync.exe" "C:\Users\John\Desktop\BatchRun.ffs_real"NOTE: This is just an example for Windows 10 default installation and if your PC’s username is “John” and you saved *.ffs_real file on Desktop. You must replace “John” with your username and actual location of RealTimeSync.exe and *.ffs_real files on your PC!
💡 EXTRA TIPIf we simply copy BatchRun.ffs_batch file into Windows’s startup directory from step #3 above, that alone wouldn’t do us much good because it will only start RealTimeSync app when Windows boots, but we would still have to hit Start button manually to run the background sync service! For this reason procedure is actually a bit more complicated / different.
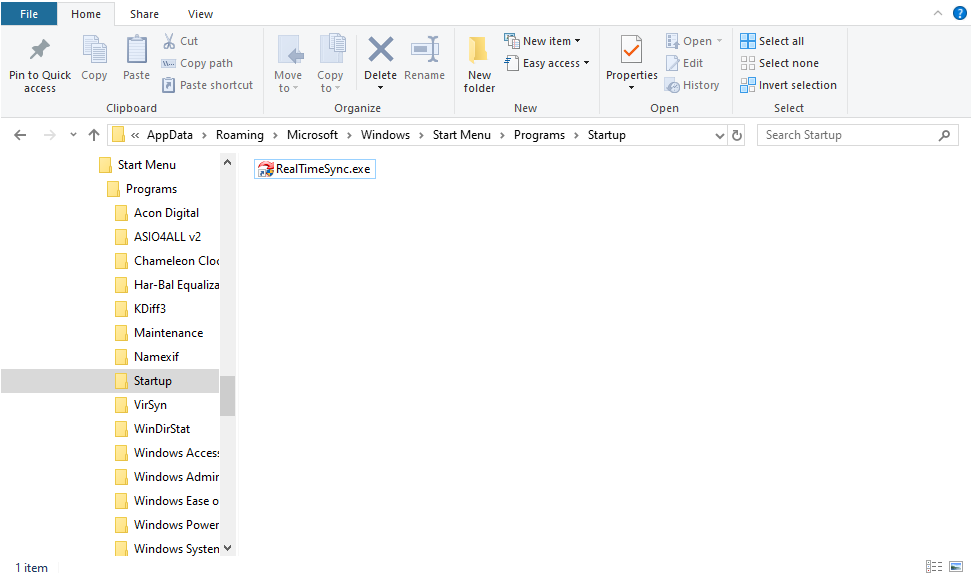
- Save new shortcut under whatever name (Windows 10 should automatically suggest “RealTimeSync.exe”) and you’re DONE!
DONE!
Now, every time your PC starts / boots it will automatically register a real-time syncing service.
Windows 10 Explorer – shell startup command
Windows 10 Startup Folder
Windows 10 Startup Folder New Shortcut
Windows 10 Startup Folder RealTimeSync Shortcut


![Xiaomi App - How To Re-Install Stock Factory Version - How To Fix Corrupted Gallery App [no root]](https://tehnoblog.org/wp-content/uploads/2025/09/Xiaomi-Gallery-App-Code-Bugs-Artwork-1024x576.png)


4 Comments
Add Your CommentRegarding the delay time set in RealTimeSync, with an example of 10 seconds, does it sync whenever there’s an idle time of 10 seconds, meaning another sync will auto run after an elapse of 20 seconds and another sync will auto run again after an elapse of 30 seconds (and this keeps on going)? Or does the sync only happens once after a PC startup and will not happen again until the next PC startup?
February 6th, 2022Hi, good question, this is how we understand this feature:
RealTimeSync process continuously runs in the background, yes it starts automatically when PC starts, and it also continues to run afterwards independently.
Sync delay only defines actual synchronization frequency to spare your CPU/HDD/SSD/Network resources and avoid doing double work e.g. while you work on heavy files on the main drive/partition/folder.
Process monitors changes, and when the timer reaches predefined delay without any further changes activities, it runs the sync procedure automatically in the background. Then the new cycle runs, but if there are no changes made, there will be nothing to sync.
In simple terms, let us consider an example: you work on a file, then you save it. Delay timer starts, and starts counting to 10: 1, 2, 3, 4… But, 5 seconds later you do another change and save the file again. Delay timer resets, and starts counting again to 10. If you do not make any further changes this time in that predefined delay interval, sync process will run in the background and synchronize the file with remote drive/partition/folder.
This is an excerpt from the FreeFileSync manual, hope it further clarifies this matter:
February 6th, 2022Hi,
June 14th, 2022How can I turn off getting a notification after every successful sync (about every minute)?
Thanks ahead for your answer.
Hi, what kind of notification?
June 14th, 2022